Get started with Azure Bot Service
 September 25, 2020
If you want to create an interactive bot that responds to human language, you are in the right place. Here you will find how to get started creating a basic bot.
Azure Bot Service provides you with a hosting environmend for your bot and allows you to develop intelligent, enterprise-grade bots using the help of Microsoft Bot Framework.
Microsoft Bot Framework is a comprehensive framework for building enterprise-grade conversational AI experiences, supporting a multitude of channels while being able to interact with human language and fetching data from knowledge bases. The SDK is open-source if you would like to take a look.
Create
Let’s start!
Head over to the Microsoft Azure Portal at https://portal.azure.com and log in, or sign up if you do not have an account yet.
You will then be greeted by the Azure portal. At the top of the page search for Web App Bot, like in the picture below.

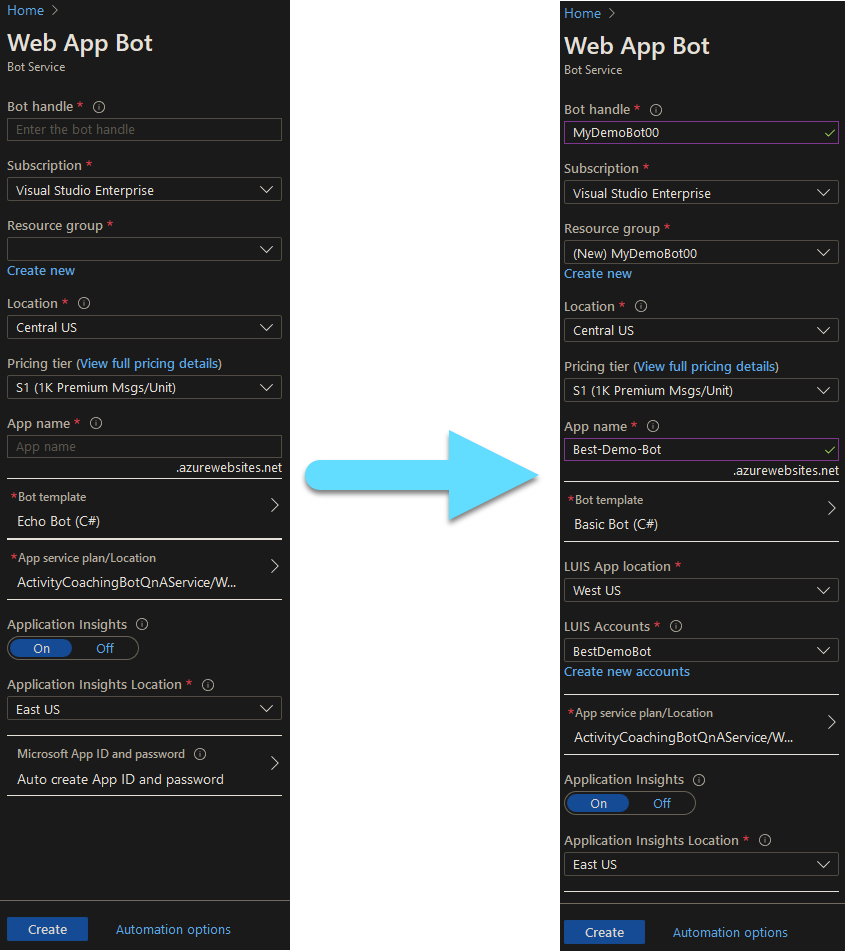
Only the fields with the ‘*’ are mandatory.
- The Bot Handle is a unique identifier to your bot. However it does not have to be the same as the display name of your bot.
- The Subscription field is populated by default with your default azure subscription.
- Resource Group is the group that will contain the resources you are creating now. You can either create a new one, ore use an existing one.
- Location is also populated by default, but you are free to change it. It indicates where the server that contains your bot is physically located.
- Choose the Pricing Tier that suits the needs of your bot. It is automatically payed using your Azure credits.
- The App name forms your bot’s endpoint URL on azure. You can have the same name as your Bot handle.
- For the Bot template you have the options of Echo Bot and Basic Bot as well as the choice between C# and Node.js. The Echo Bot, echoes back the user messages, and the Basic Bot is a template containing Language Understunding (LUIS) intergration as well as Bot Analytics and some code on top of that to get you started. In this tutorial we will choose Basic Bot using the C# SDK.
- LUIS App location is the location of the Luis service that is going to be created along with your bot.
- Luis Account is the authoring resource that will cointain your bot’s connected LUIS app. You can name it something similar with your bot to better recognize it, as it will come usefull when you need to teach your bot how to understand human language. You can find your LUIS app, after the bot is deployed, at luis.ai.
- For the App service plan/Location you might need to create an new service plan. Just fill in the name and choose the desired location for your service plan. If you already have one, you can use that.
- Application Insights enables your bot’s Analytics on Azure. It is on by default, but you can turn it off if you do not require access to Analytics.
- Application Insight Location is the location for your Analytics and it is populated by default.
- Lastly on Microsoft App ID and password you can choose your own App ID and password for your bot, or you can leave it as is, to automatically create one for you.
After you completed everithing your page should look like the picture below.
Click the Create button to start the deployment process. You might need to wait a few minutes. Once the deployment is complete, you will be greeted with a new notification prompting you to go to your new resource, just like the picture below.
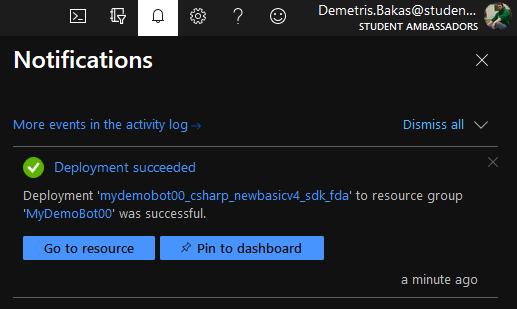
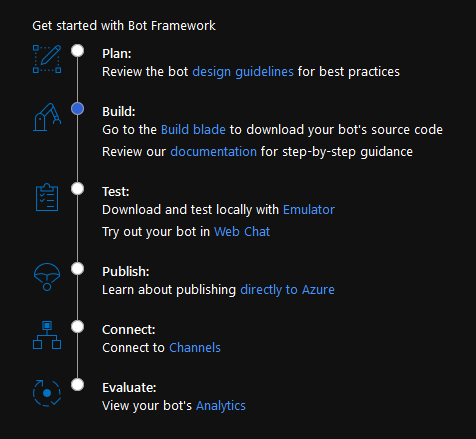
Click Go to resource to visit your newly created bot resource. Once you get into your bot’s overview page, you will see a chart on how to get started. Right now you just completed the build step. If you so desire, you can go ahead and test it.
Click the Web Chat link in the Test category. You can now communicate with your bot. It has some basic book a flight dialogue build in to get you going. Try to talk to it, to observe how it responds.
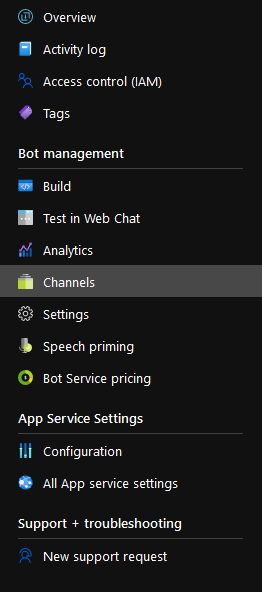
Then you can proceed at configuring the channels you wish to publish your bot in. Click the Channels tab from the menu on the left.
As you can see, your bot is already connected to Web Chat.
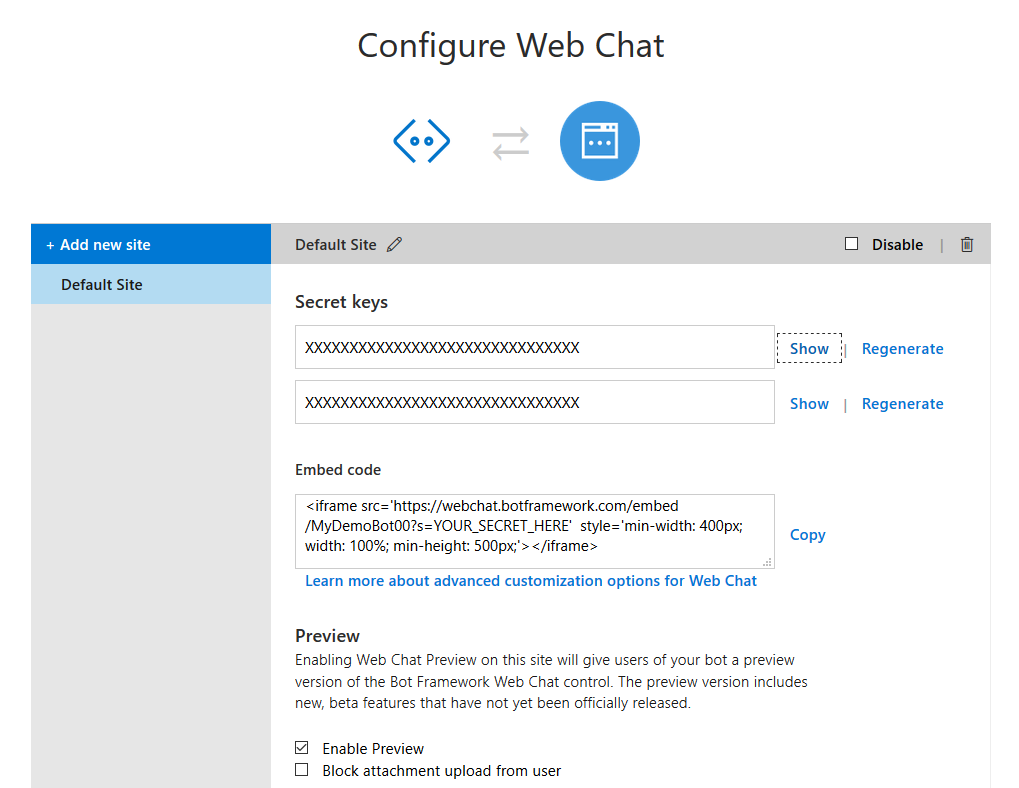
In the Embed code field you can find an iframe to publish your bot on a website. Just replace the YOUR_SECRET_HERE text with one of your Secret keys. Alternatively you can open the src link in a new tab and interact with your published bot there.
Build
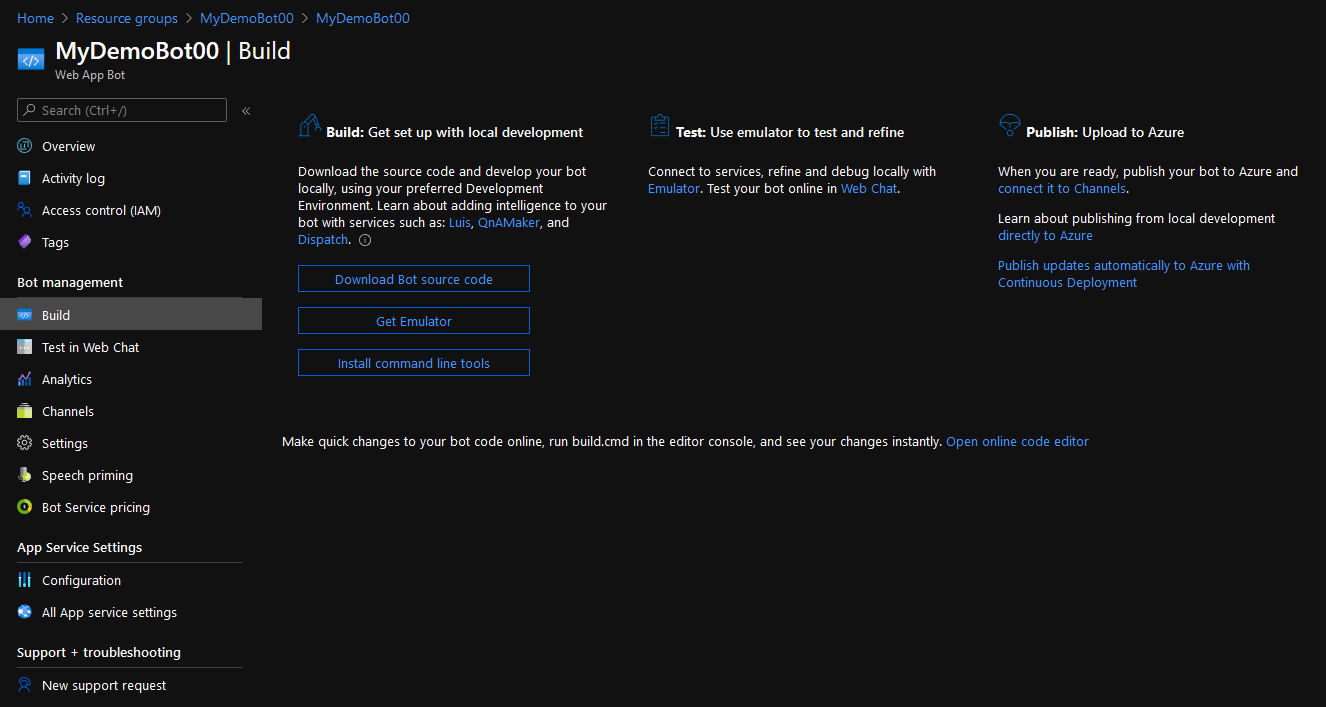
Head over to the Build tab on your left and you can find this window. Here you can find the source code of your bot.
If you would like to make some fast changes to the bot you can click the Open online code editor link. However this is not an optimal way of modifying the code of your bot. If you need to actively write code for the bot on a regular basis, you should download an editor. For our needs, Visual Studio works best, you can download it here (the Community edition is free). After installing Visual Studio, you will need Bot Builder V4 SDK Templates. You can download it inside Visual Studio from Extensions, or you can get it from this link.
Back to Azure, you can get an emulator to run your bot by clicking the Get Emulator button. This will bring you to a GitHub repository, with the latest releases of the emulator. Download and install the latest one.
Now you have all the tools you need to start developping your bot. Click the Download Bot source code button to downlad a .zip with all the prewritten code. You will be asked if you would like to Include app settings in the downloaded zip file, click Yes and then Download Bot source code. Extract the .zip file in the directory you want your bot to be. Open the CoreBot.sln file using Visual Studio to load up your project. You can run the solution by pressing F5. A window in your browser should open, using port 3978. This is just to show you, that the bot is running. To interact with it you will need the emulator. Launch the emulator you installed before and press the Open Bot button. Put in the Bot URL field this URL http://localhost:3978/api/messages, like in the picture below. If your port is different than 3978, then replace it with the port you have. Leave the rest of the fields empty.

As you can see the bot does not run correctly. Stop the bot from running by pressing Shift + F5. Open the appsettings.json file from the Solution Explorer. This file contains the various keys your project has. Comment out the MicrosoftAppId and MicrosoftAppPassword lines, like the code below.
{
  "LuisAPIHostName": "westus.api.cognitive.microsoft.com",
  "LuisAPIKey": "3f64LuisKey3f8aa5abf",
  "LuisAppId": "d8fb2a71-LuisIda1924f851",
  //"MicrosoftAppId": "93427421-AppId52a6382",
  //"MicrosoftAppPassword": "A%PPasswordH&g)(&",
  "ScmType": "None"
}
Run the solution again and press Restart Conversation on the emulator. Now everithing should work correctly. At this point you can tinker with your bot as much as you like. You can also use this repo full of working samples for reference.
Publish
Now let’s take a look on how to publish a new version of our bot. There are many ways to publish a bot, you can do it straight form Visual Studio if you so desire. However, we are going to do it using git, to achieve a more consistent workflow going forword.
Firstly, get over to GitHub and create a new repository for your project (if you do not have a GitHub account, now is the time to create one). It is suggested to add a .gitignore file with the VisualStudio template, but you can always create that later on your own time. Avoid pushing passwords and keys in a public repository, add the appsettings.json in the .gitignore file. After that, create your first commit and push it to GitHub. You can upload the files directly to the GitHub website, but the use of a client program, or even terminal, will be almost mandatory in the future, and will greatly enchance your workflow. Now every time you make changes to your bot, you should commit them and then push them to GitHub.
Going back to Azure, open the Resource group that you created earlier. From the shown resources, click the one with the App Service Type.

Navigate to the Deployment Center on the left and you will see all the deployment options.

Since we uploaded the project to GitHub, we will choose the GitHub option. During the process you might be asked to log in with your GitHub account.
Next you should pick a Build Provider.
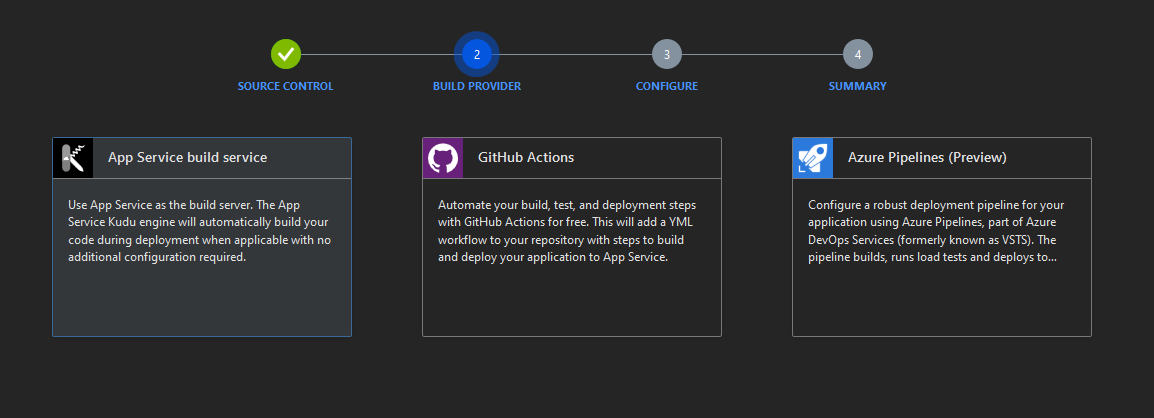
Choose App Service build service from the options and click Continue.
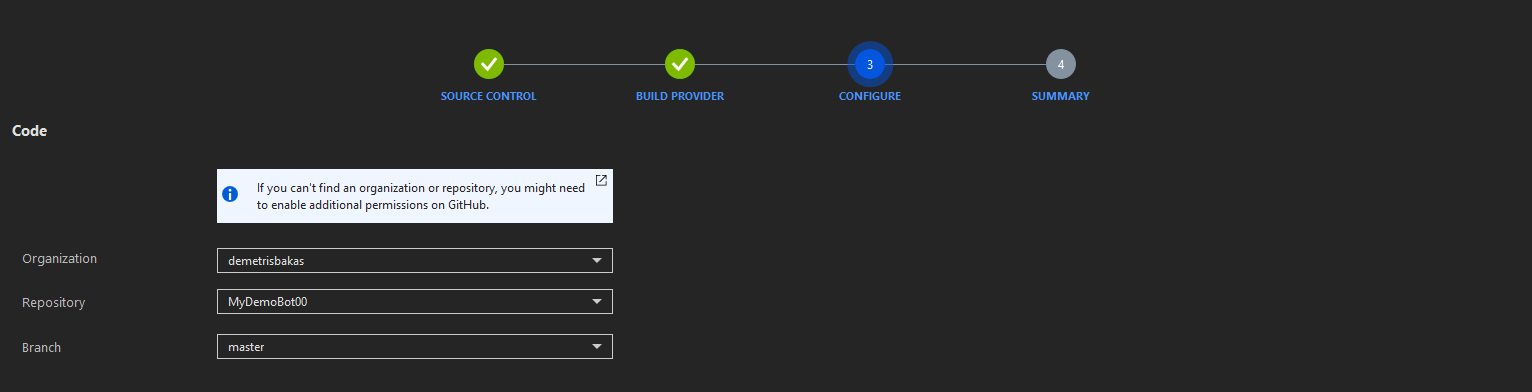
In the Configure step, put your GitHub username as Organization, the project’s repository name as Repository and the master branch, as Branch (Unless you have created a release branch).
Ensure that everything is correct in the Summary step and click Finish. Deployment might take a while.
After deployment is complete, you can check out your published bot int he Web Chat, or any other channel you have active. From now on, all you have to do to publish a new version of your bot, is to push a new commit to the master branch of your projects repo.
If buggy code is accidentally uploaded to master branch, it will automatically get deployed and introduce those bugs to your published bot. For this reason it is highly recommended to create another branch for the development of your bot. When you achieve a stable version, you can merge that branch with master to publish the new features.
Everithing is now ready to start the development of your own bot!