Create new dialogs with Bot Framework Composer
 July 22, 2021
Here you can find how to create your own custom dialogs using Bot Framework Composer.
Dialogs provide a way to manage a long-running conversation with the user. A dialog performs a task that can represent part of or a complete conversational thread. It can span just one turn or many, and can span a short or long period of time.
Create
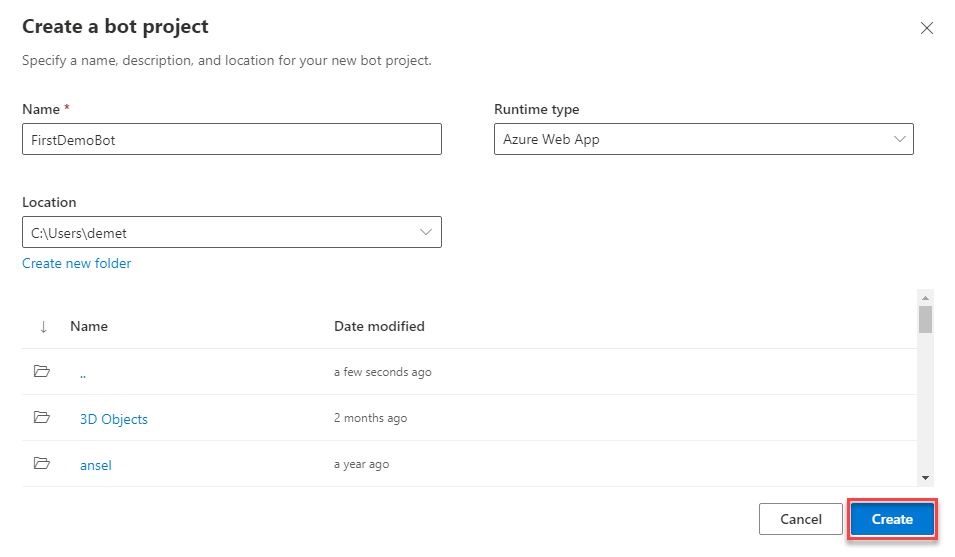
Open up Bot Framework Composer and create an Empty Bot.
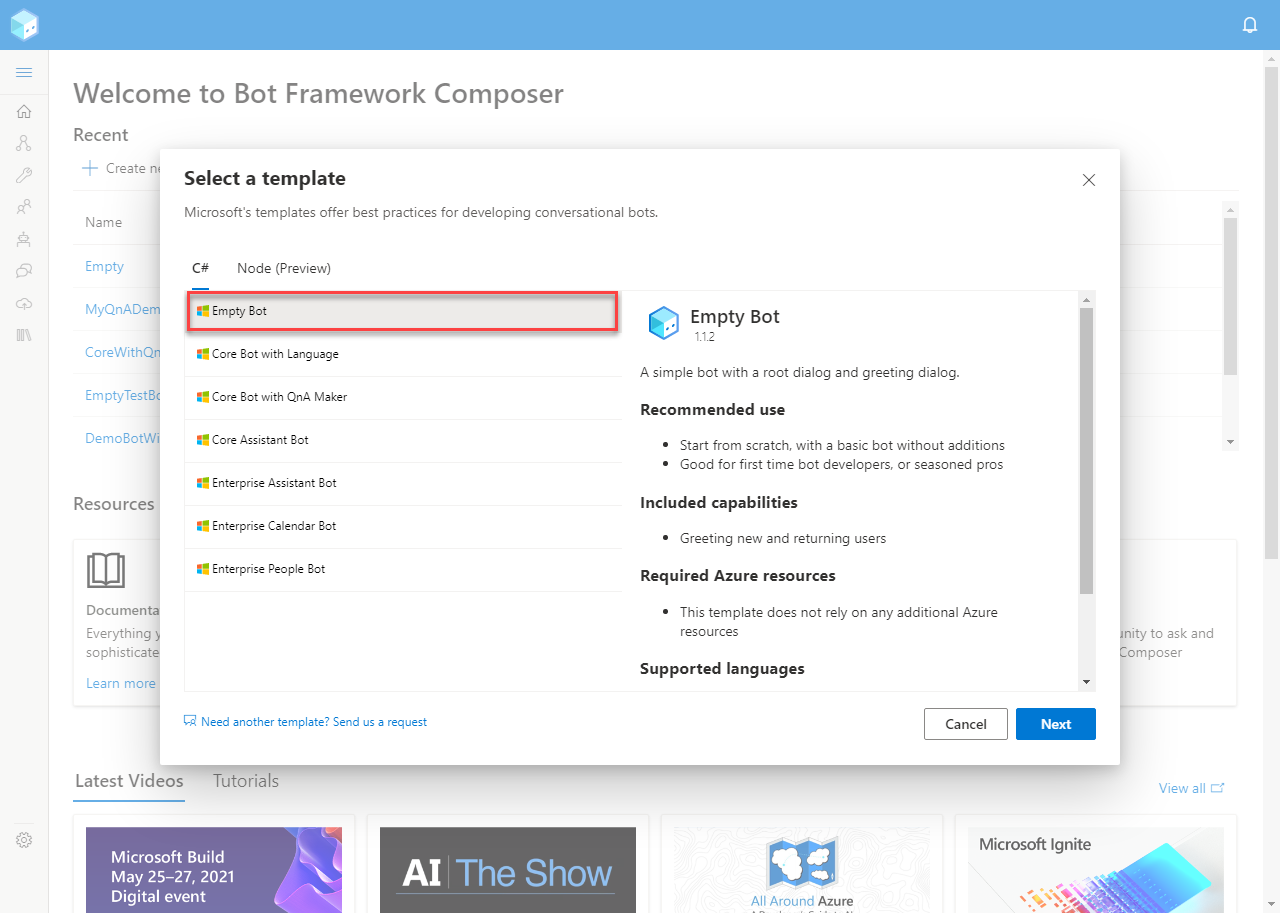
Give a name to your bot and click Next.

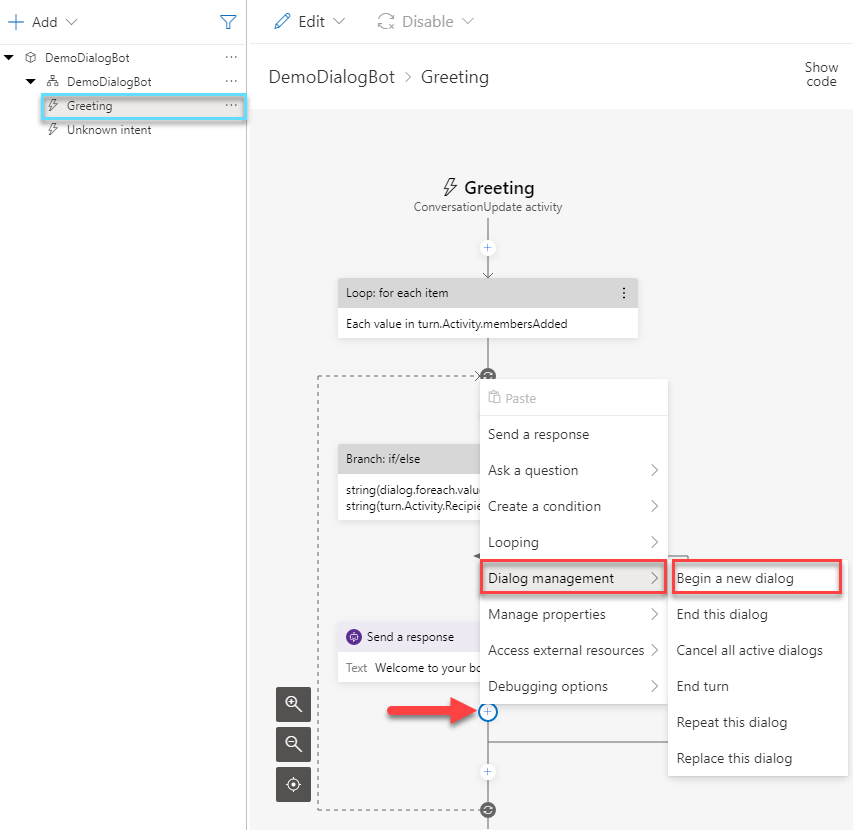
In the Greeting trigger click on the little “+” sign bellow the last response. Then, choose the Begin a new dialog option from Dialog management.
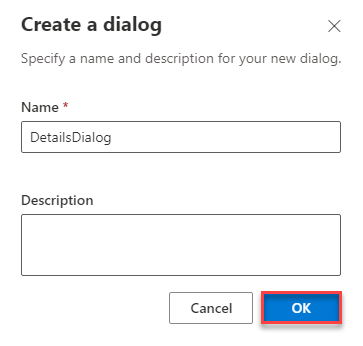
Press the arrow in the Dialog name field and click Create new dialog.
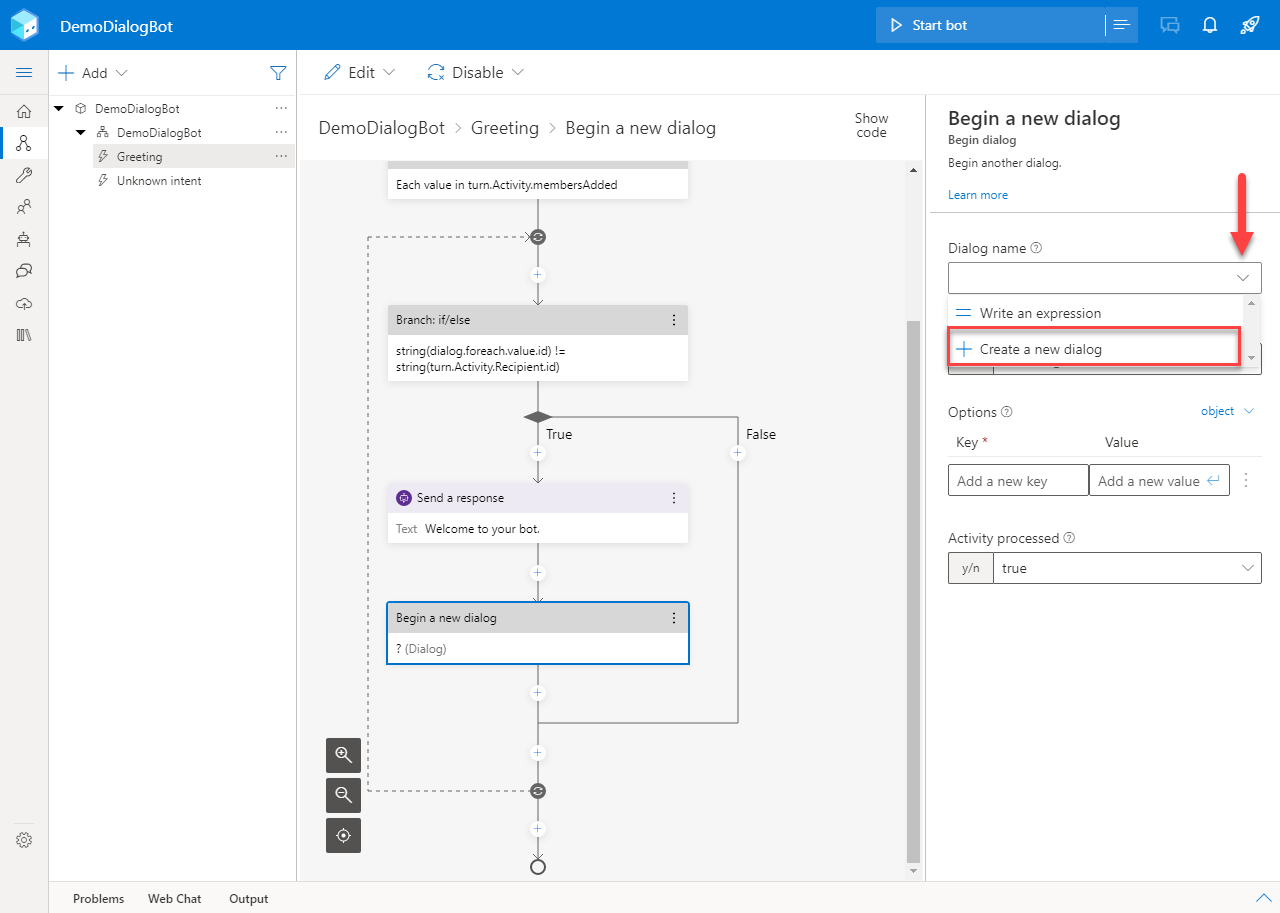
Give a name to your dialog and click OK.
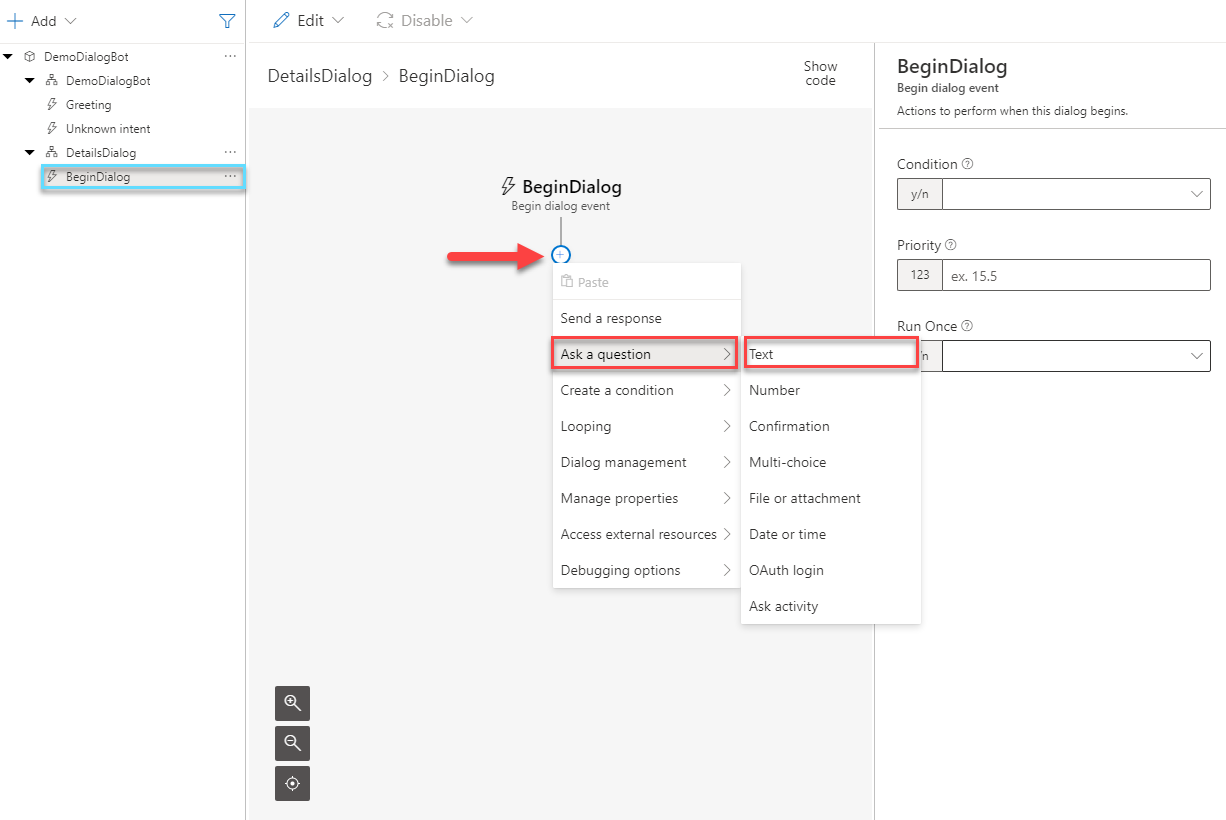
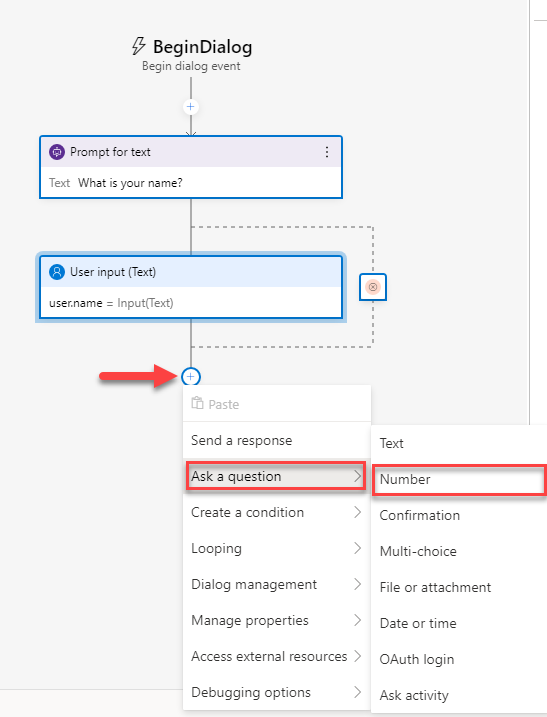
In your new dialog, navigate to the new trigger. Press the “+” sign and select Text from the Ask a question list.
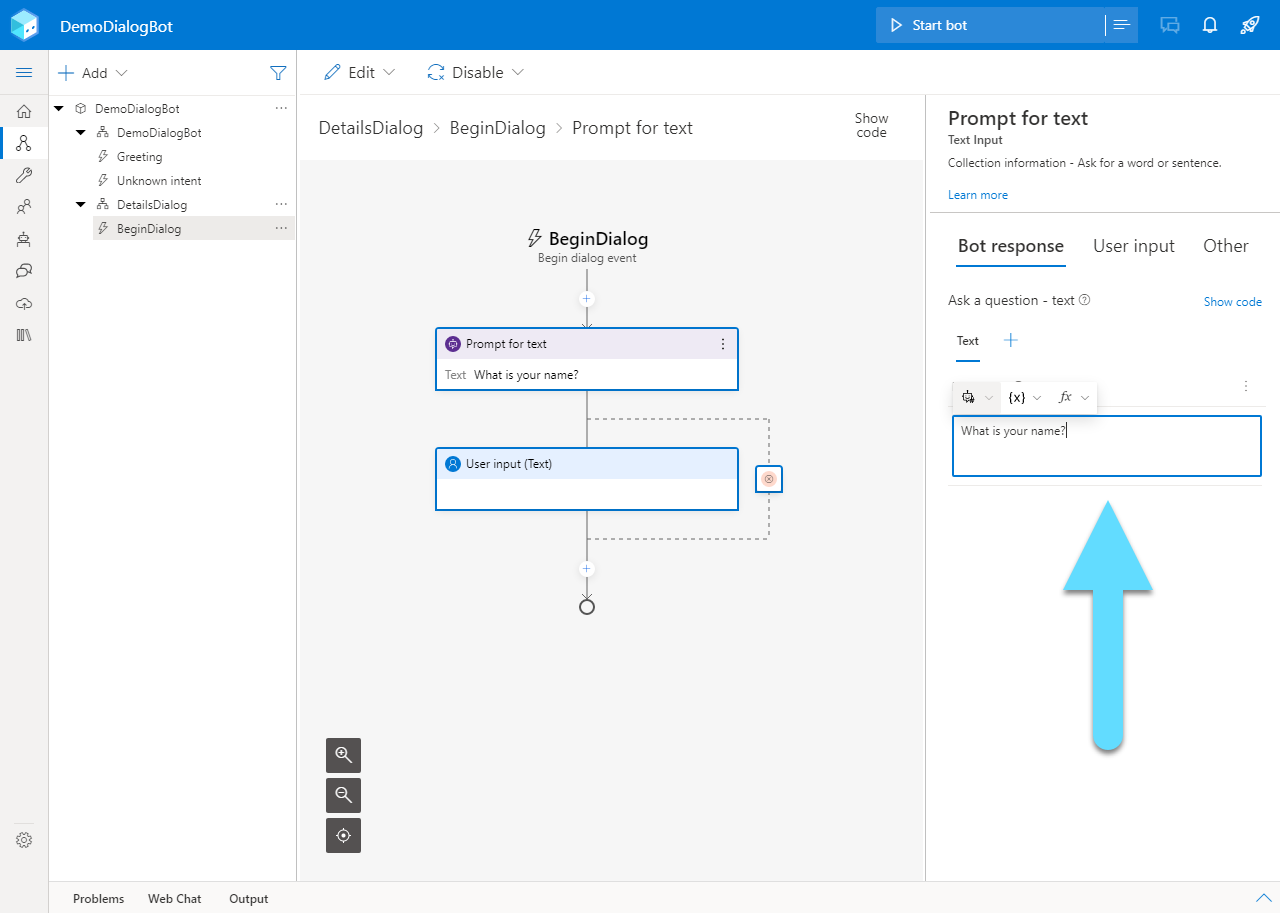
Here you can enter the contents of your new question.
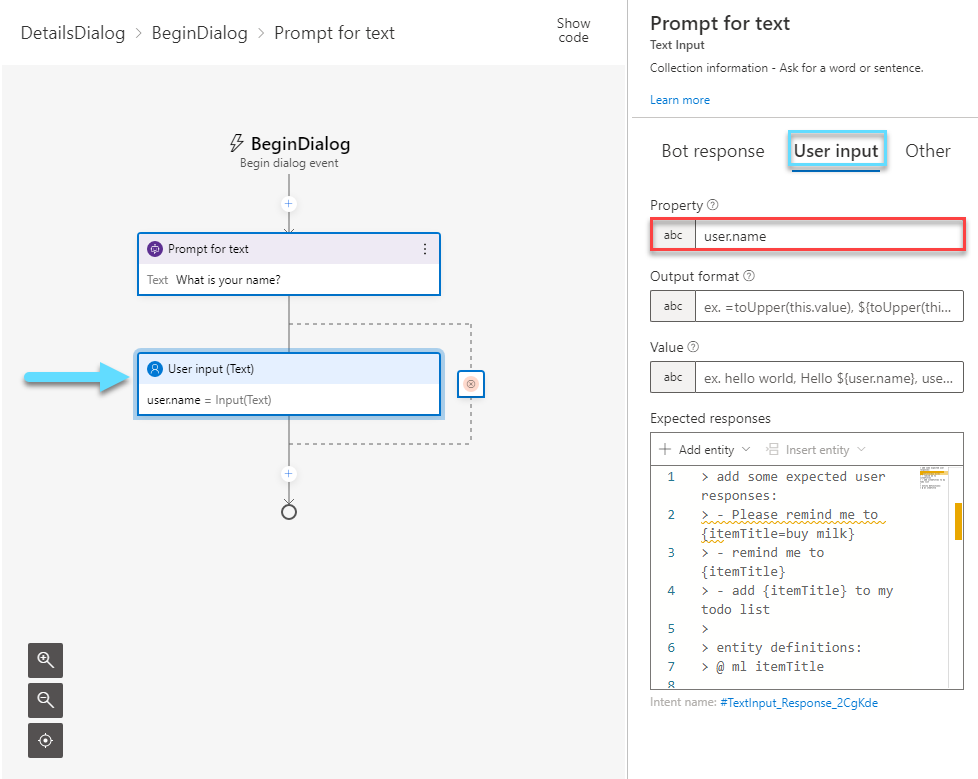
In the Property field of the new User Input, put the name of the variable that stores the user’s answer. For example “user.name”.
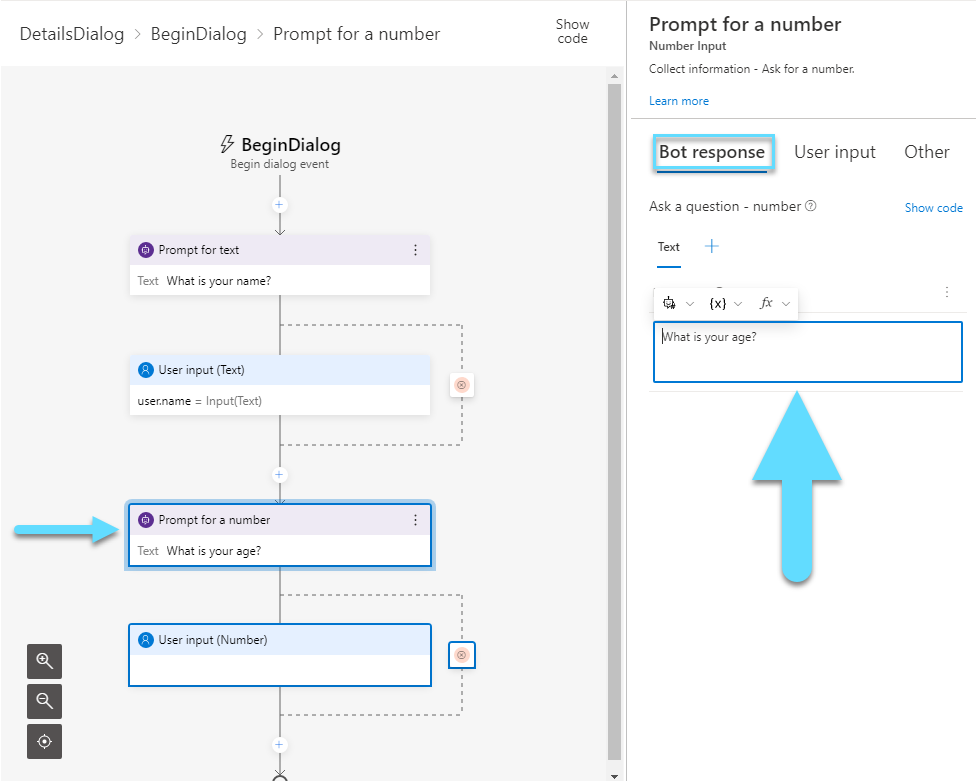
Continue with asking a Number question.
Enter a question that can be answered with a number.
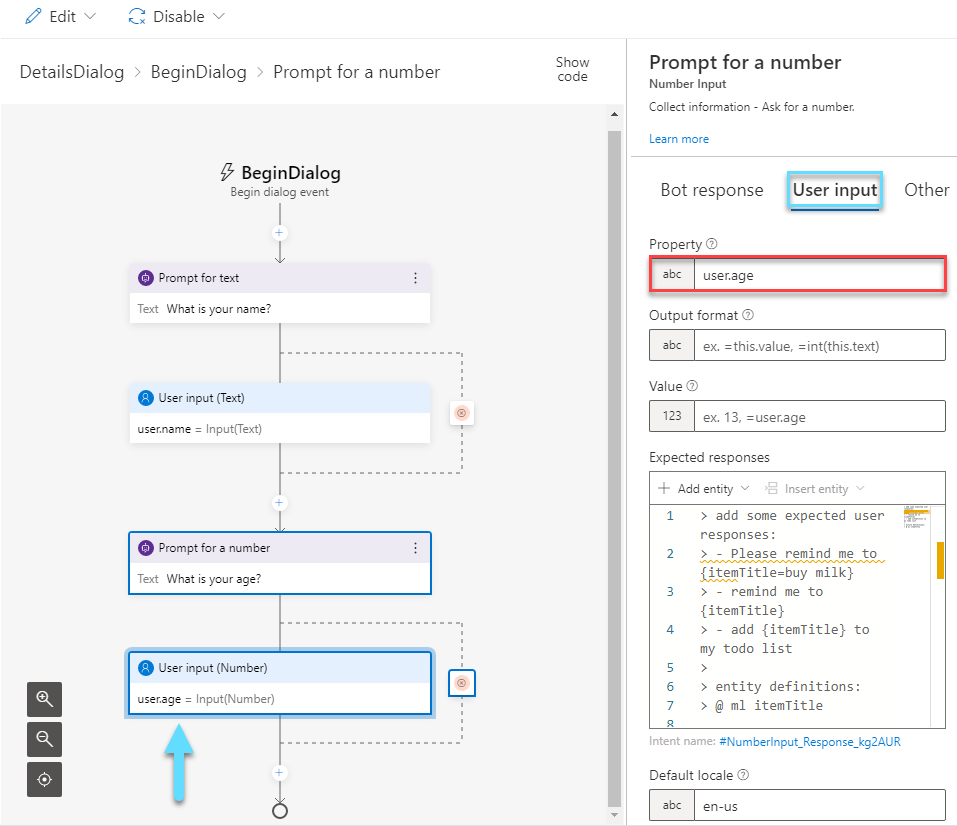
In the Property field of User input, you have to give a name to the variable again. For example “user.age”
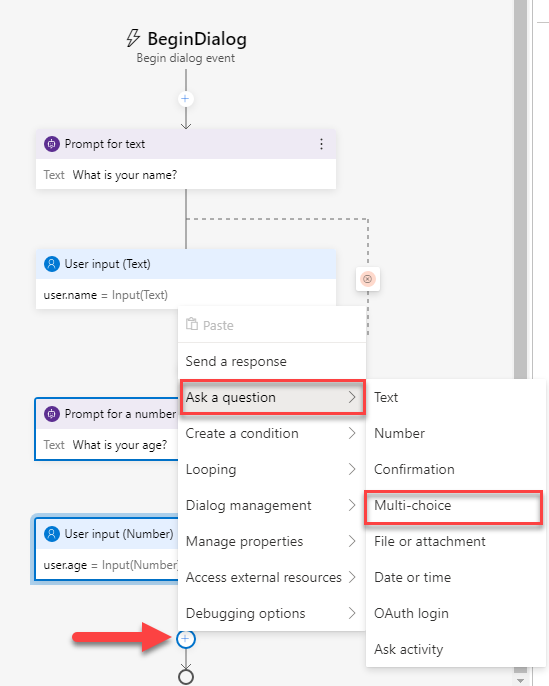
Now add a Multi-choice question.
Enter the text for your question.
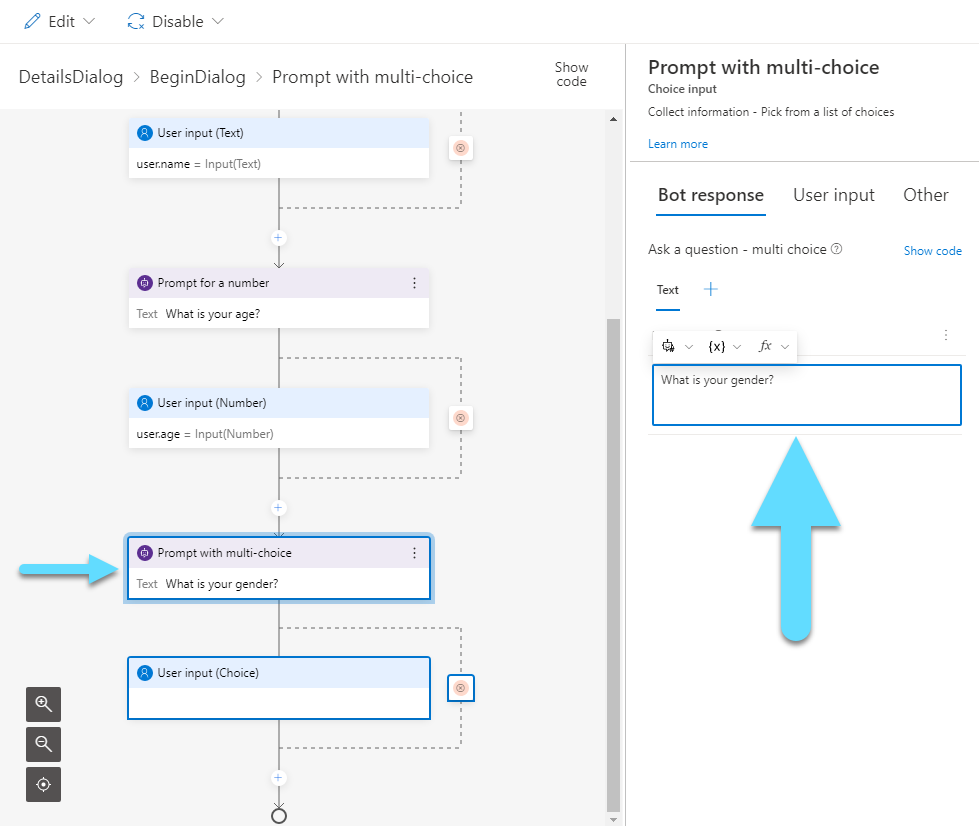
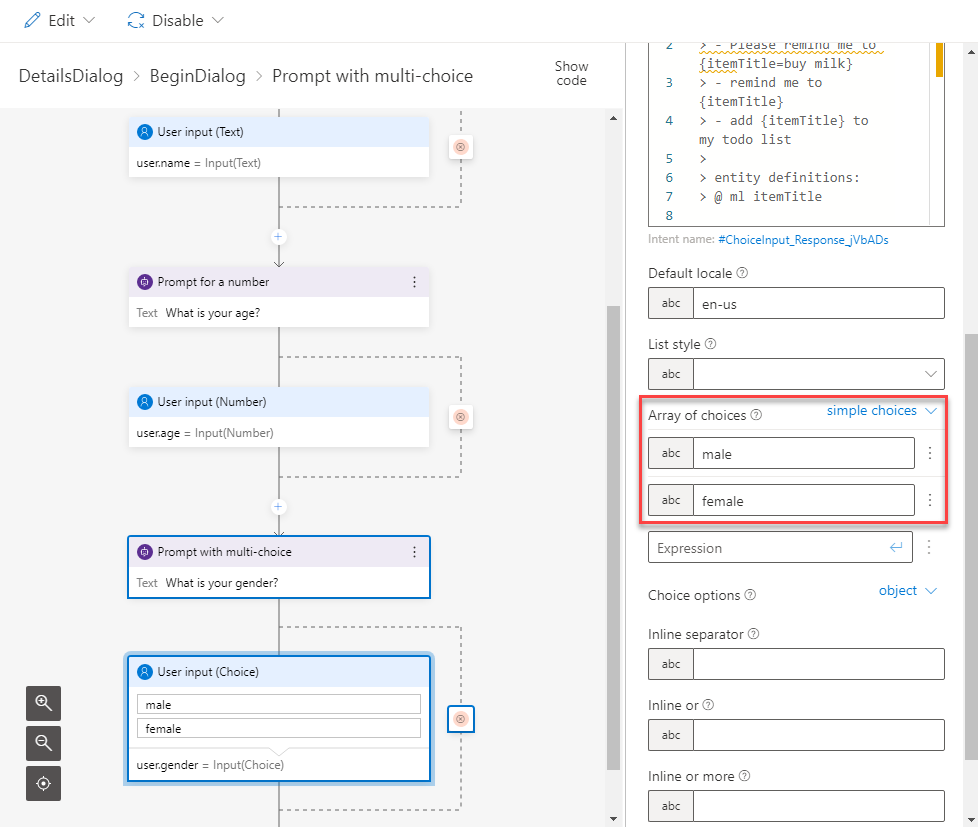
And again, enter the variable name in the Property field of User input, like “user.gender”.

If you scroll down, you will find an Array of choices. Here you can add all the choices that will be available to the user as answers.
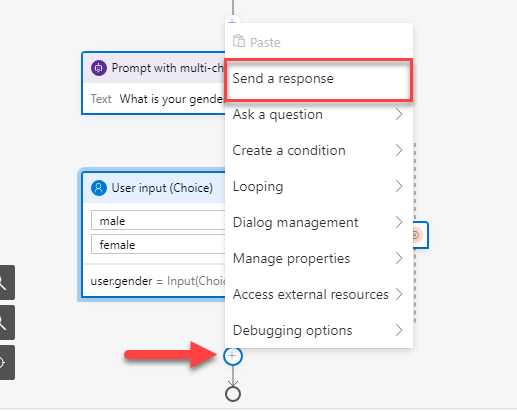
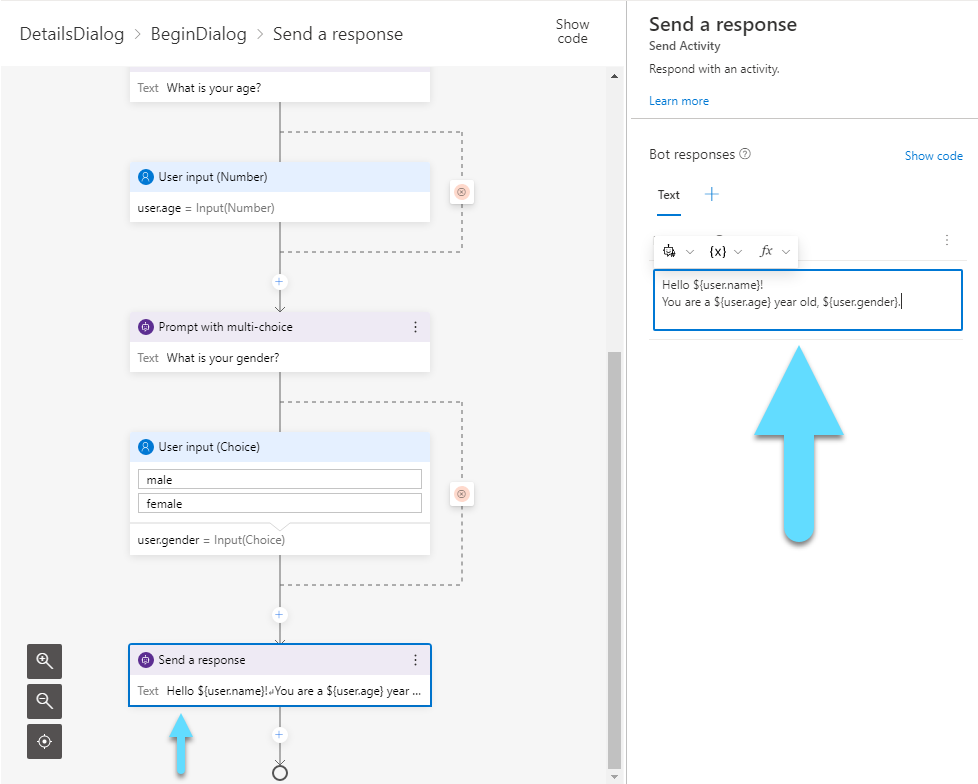
Now, let’s send a message to the user with all the info we gathered. Click the “+” and select Send a response.
You can find all of your variables under the {x} list.
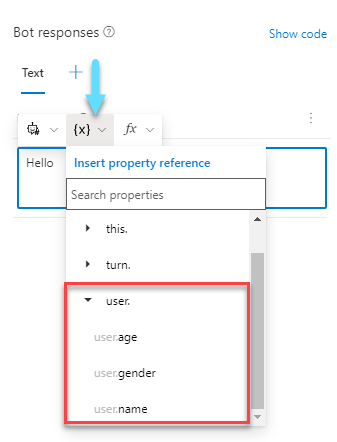
Use the variables above to compose your message.
Adaptive Card
Another way of presenting information to the user, is with Adaptive Cards. They look more appealing to the user and provide a better user experience. If you want to learn more about Adaptive Cards, check out this post.
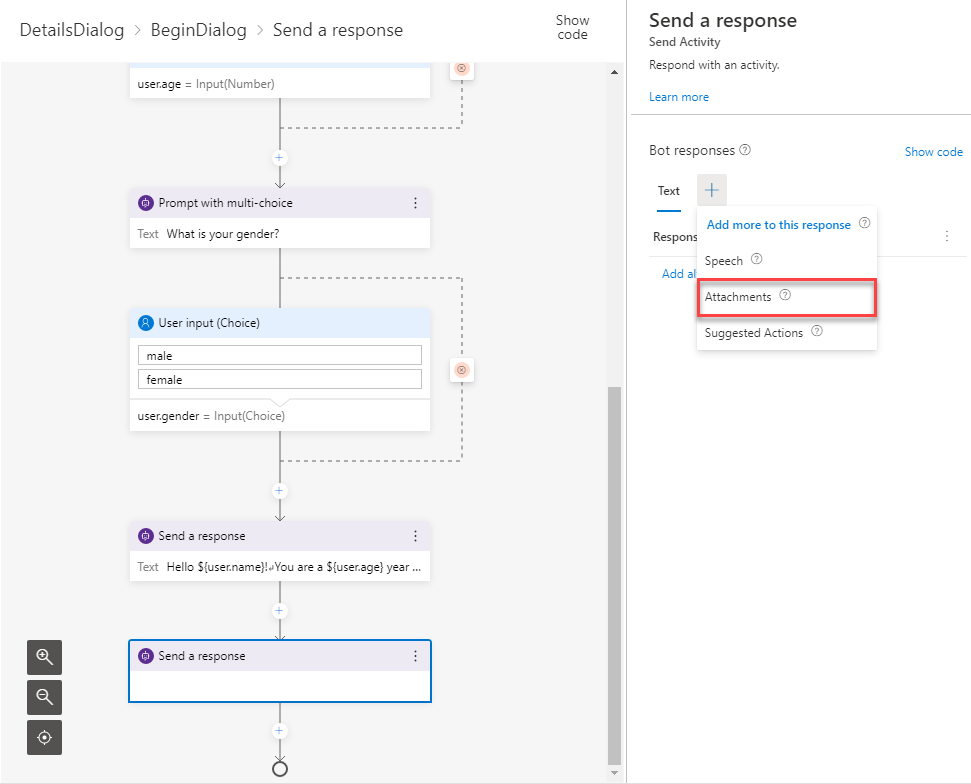
After you select a new response, click on the big “+” sign at Bot responses. From there select Attachments.
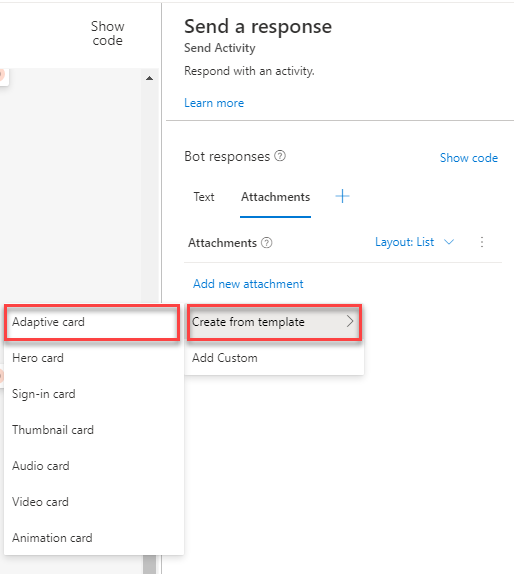
Select Add new attachment -> Create form template -> Adaptive card.
Click the icon at your right to enlarge the code box.
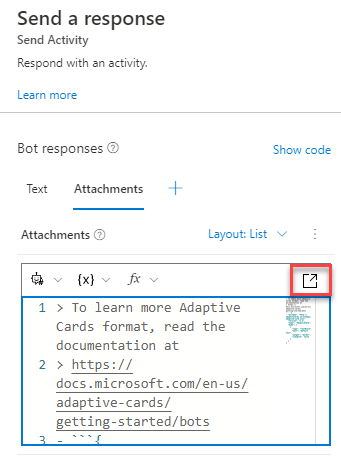
Relpace your card’s body with the JSON bellow.
"body": [
    {
      "type": "TextBlock",
      "text": "Name",
      "weight": "bolder",
      "isSubtle": false
    },
    {
      "type": "TextBlock",
      "text": "${user.name}",
      "isSubtle": false
    },
        {
      "type": "TextBlock",
      "text": "Age",
      "weight": "bolder",
      "isSubtle": false
    },
    {
      "type": "TextBlock",
      "text": "${user.age}",
      "isSubtle": false
    },
        {
      "type": "TextBlock",
      "text": "Gender",
      "weight": "bolder",
      "isSubtle": false
    },
    {
      "type": "TextBlock",
      "text": "${user.gender}",
      "isSubtle": false
    }
  ]
Test
Now it is time to test our bot.
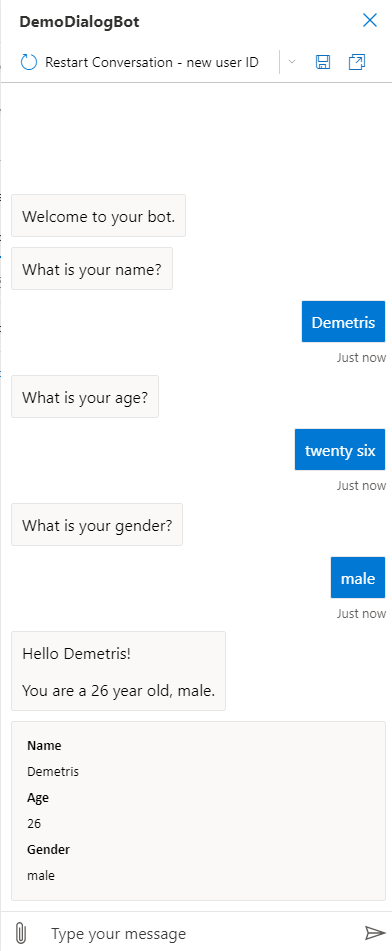
As you can see, our bot can hold the dialog pretty well and the card looks quite nice!
Intergrade QnA Maker to your bot using Bot Framework Composer
 July 12, 2021
QnA Maker is a cloud-based API service, part of Azure Cognitive Services, that lets you create a conversational question-and-answer layer over your existing data. It gives you the ability to build knowledge bases and extract questions and answers to incorporate in your bot.
Preface
QnA Maker offers a bot the ability to answer questions from a knowledge base. This is a subject that I have covered in the past at this blog. However this is a new, faster, easier and code-free way to implement it to your bots, so it deserves a new post. Let us get into it!
Create
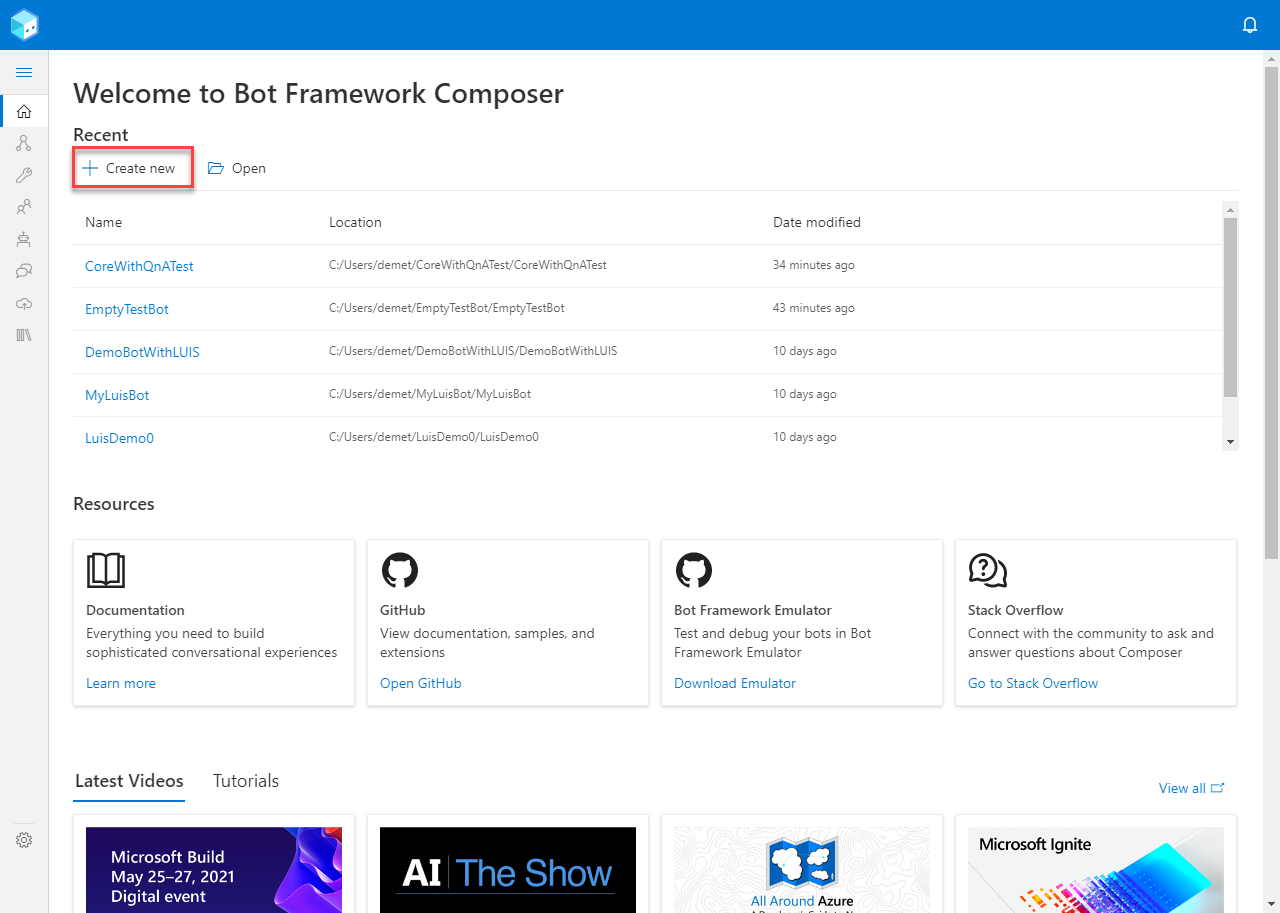
Open the Bot Framework Composer and click Create new to create your new bot.
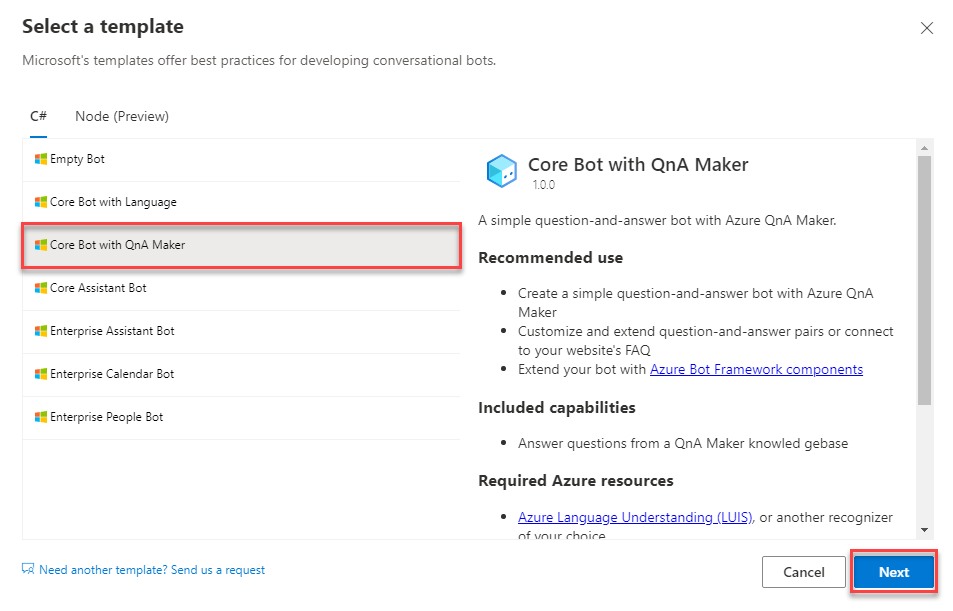
Choose the Core Bot with QnA Maker template and click Next.
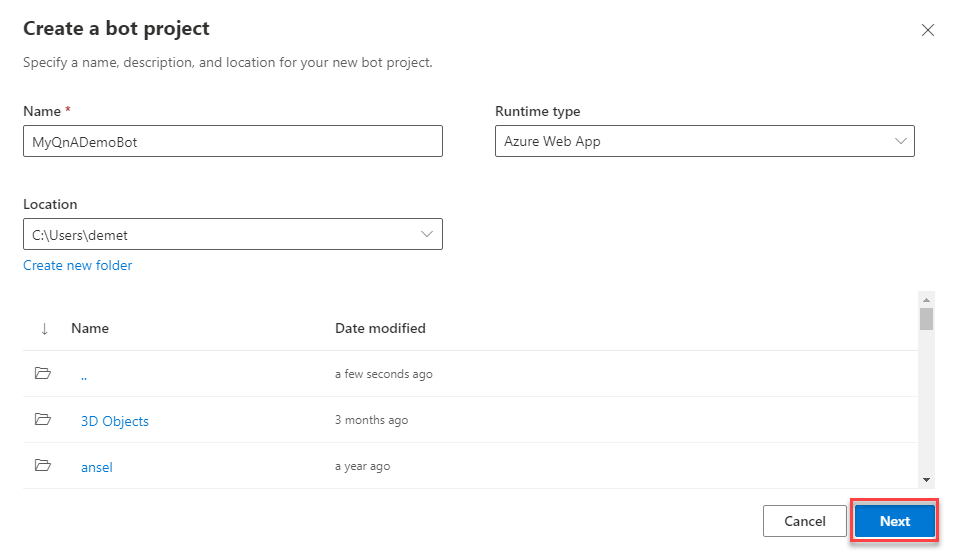
Fill in the deatails about your bot (including your bot’s name) and click Next.
Now you will be asked to name your knowledge base and give a URL contaning all of the answered questions. We will use the same URL we used last time, and click Create.

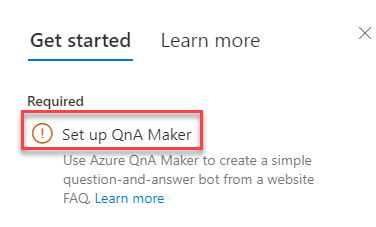
Once your bot is created, you will notice a notification requiring you to Set up QnA Maker. You can click the title of the notification as it is a link.
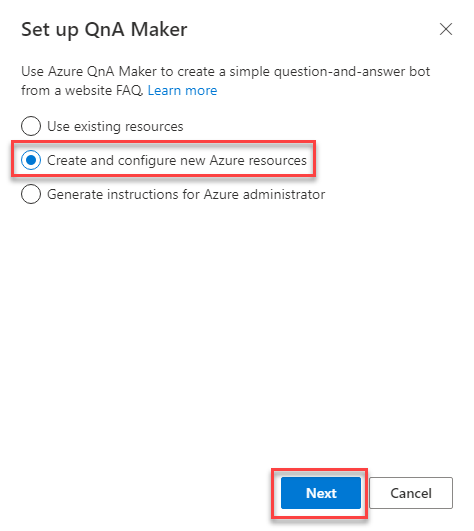
After clicking the notification, you will be prompted to Set up the QnA Maker. Select the Create and configure new Azure resources option, if you have not created any resources. Then click Next.
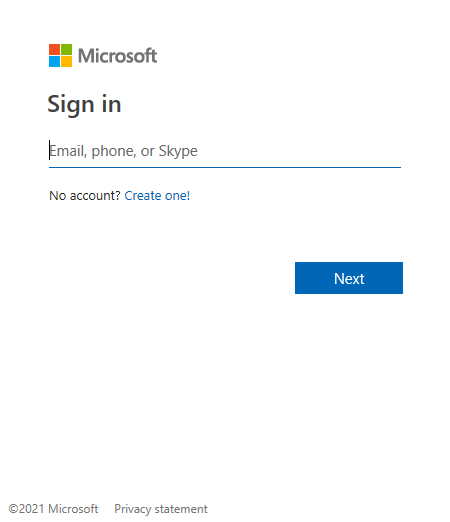
You will now need to Sign in to your Azure account.
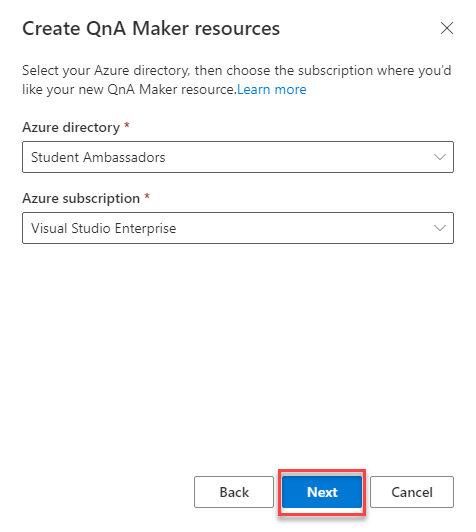
Enter the directory and subscription for the new resources and click Next.
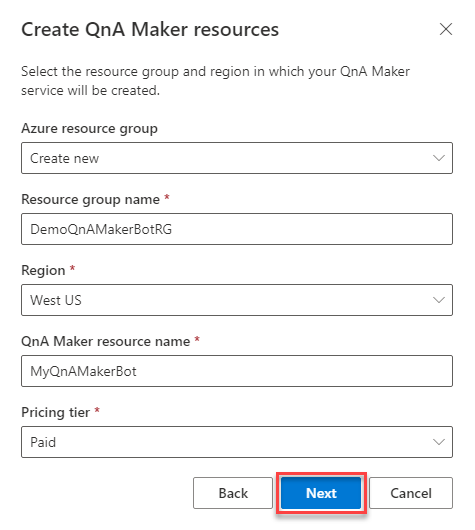
You now have the ability to create a new resource group for your new resources and choose their Pricing tier. Fill in the details and click Next.
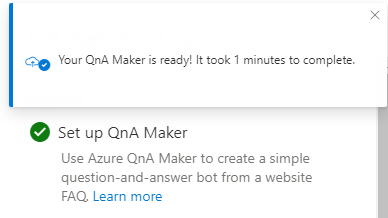
Once the process is complete you will receive a notification. Now your bot is fully working!
The new resources are available in your azure account. If you would like to have a look at your knowledge base and tinker with it, you can visit the QnA Maker portal and you can find everything about your knowledge base there.

Test
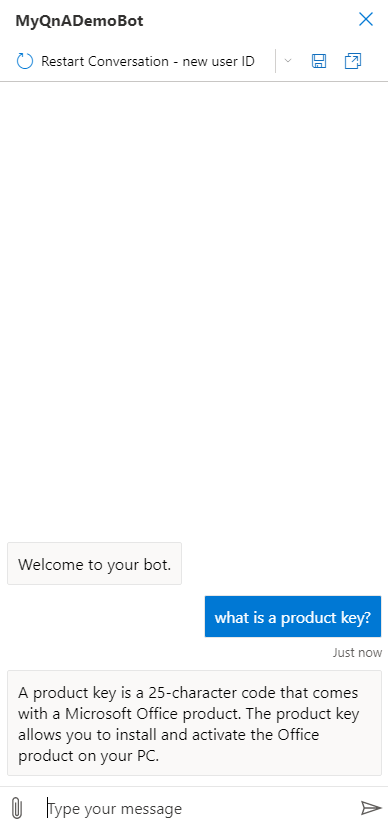
To test the capabilities of your bot, click the Start bot button in the Bot Framework Composer, and open your bot in the Web Chat.

Ask your bot a question, which is included in the site we included in our knowledge base and observe how well it responds. Within the current implimentation, it seems to be working pretty well!
And this is an easier way of connecting your bot with a knowledge base without the need for any code!
Intergrade LUIS to your Azure Bot
 July 02, 2021
LUIS (Language Understanding) is a cloud-based conversational AI service that applies custom machine-learning intelligence to a user’s conversational, natural language text to predict overall meaning, and pull out relevant, detailed information. Learn more about it here.
A client application for LUIS is any conversational application that communicates with a user in natural language to complete a task. It becomes especially usefull when creating a chatbot to provide the ability to comunicate using human language. The communication between LUIS and Azure Bot is done using JSON.
Create
Go to the Azure Portal and create an Azure Bot. You can learn how to do it in this post. Open your newly created bot using the Bot Framework Composer.
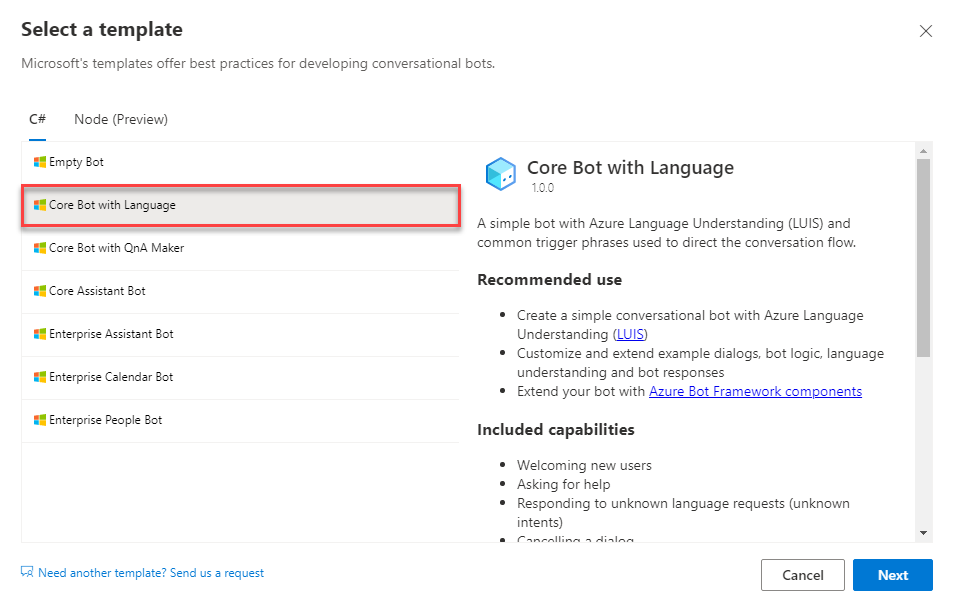
In the Bot Framework Composer select the Core Bot with Language template and click Next. This will allow you to create a sample bot with LUIS capabilities.
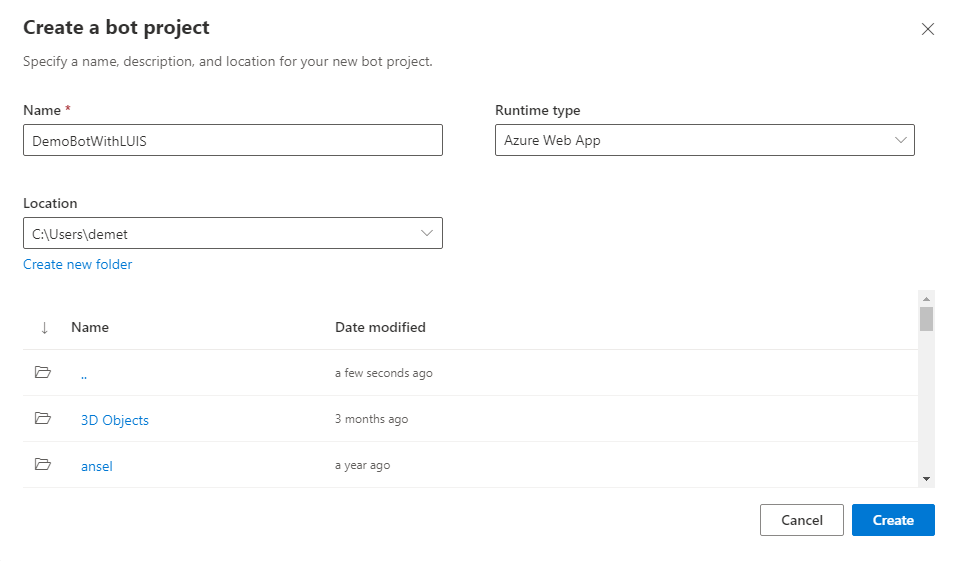
Name your bot accordingly and then click Create.
You might be asked to login using your Microsoft account.
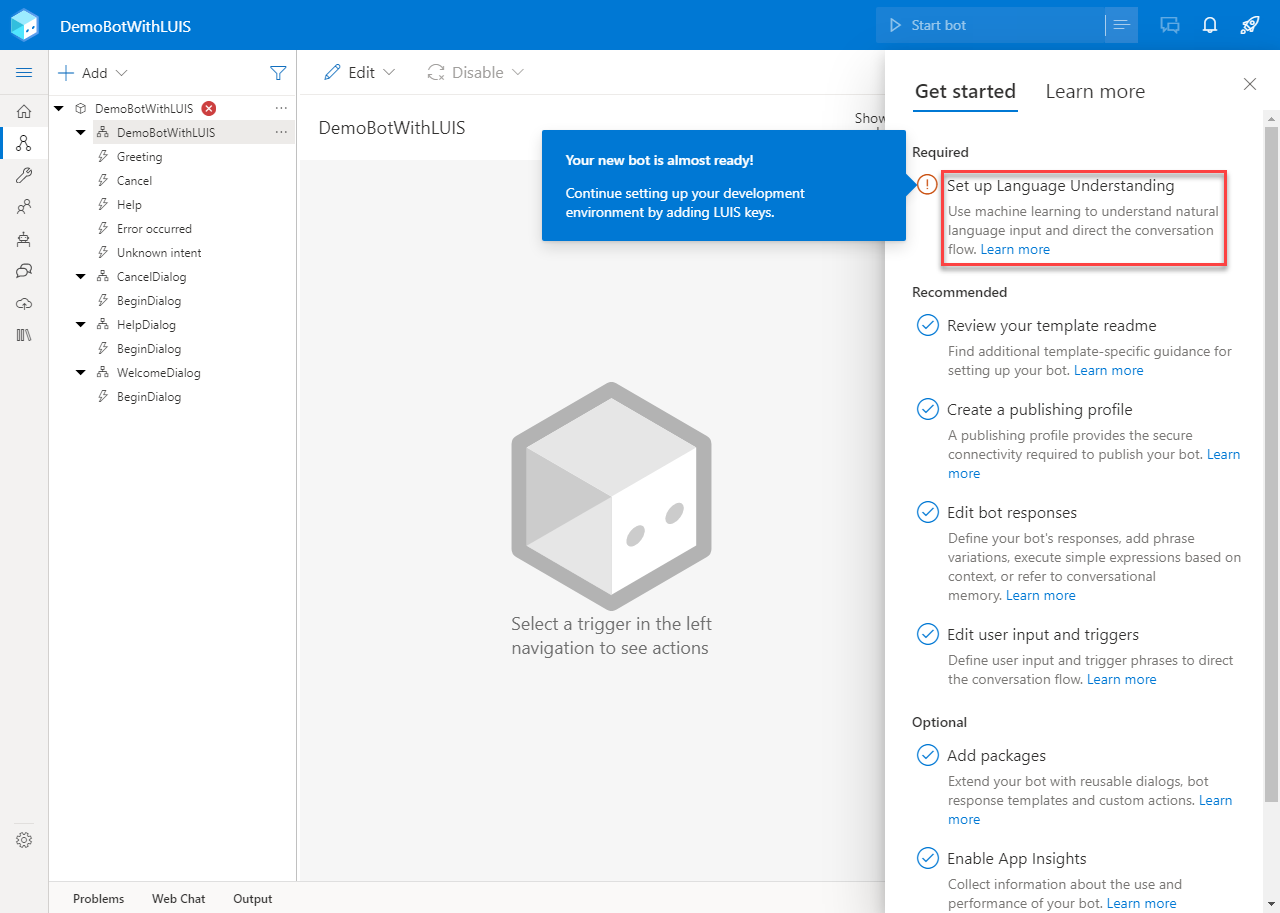
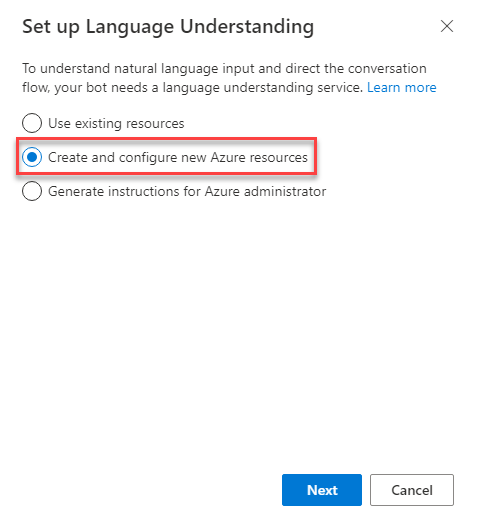
Once your bot is created, you will se an error pop up. Select the Set up Language Understanding requirement to proceed with LUIS.
Select the Create and configure new Azure resources option to create a new LUIS resource. Then click Next.
You might need to login to your Microsoft account again. Then select your Azure directory and subscription. Click Next to continue.

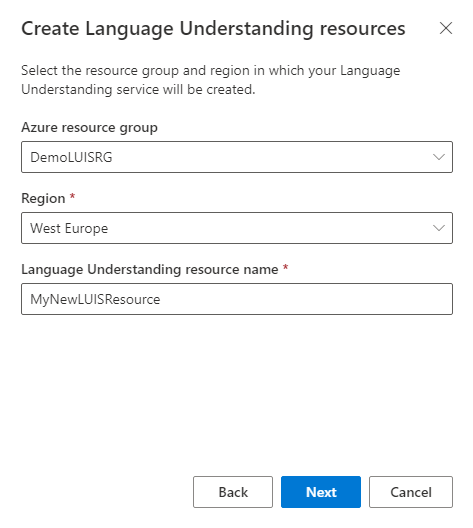
Pick a name for your LUIS resource, the resource group you want to include it and your preferred region. After that click Next to proceed.
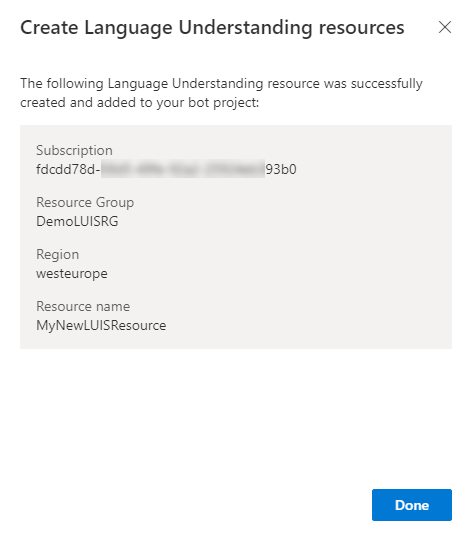
Once you hit Done, your LUIS resource has been already created!
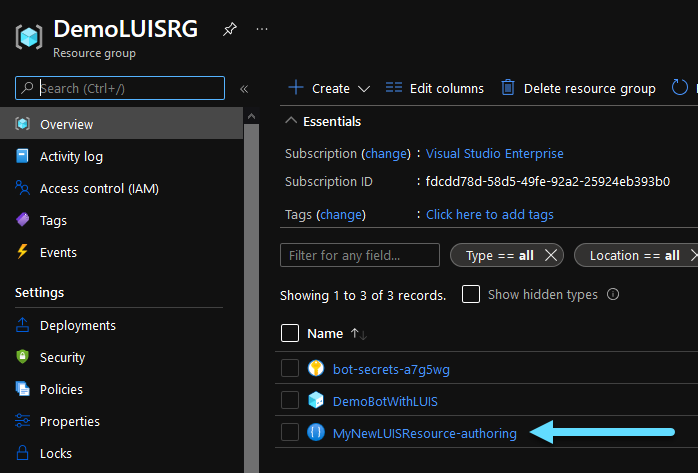
If you take a look in your resource group you will now find a new LUIS resource available.
CLick Start bot in the composer to run your bot.
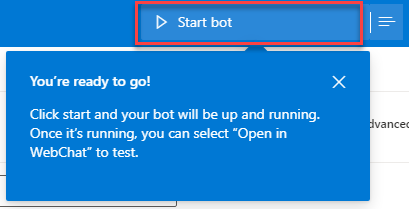
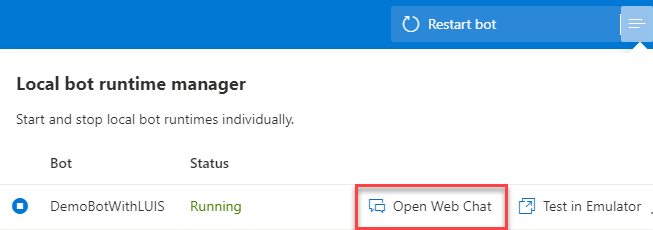
Once your bot is up and running you can test it using the emulator or the Web Chat. We will use the Web Chat for now, so you do not need to download the emulator. However for larger projects, downloading the emulator is adviced.
Add an Intent
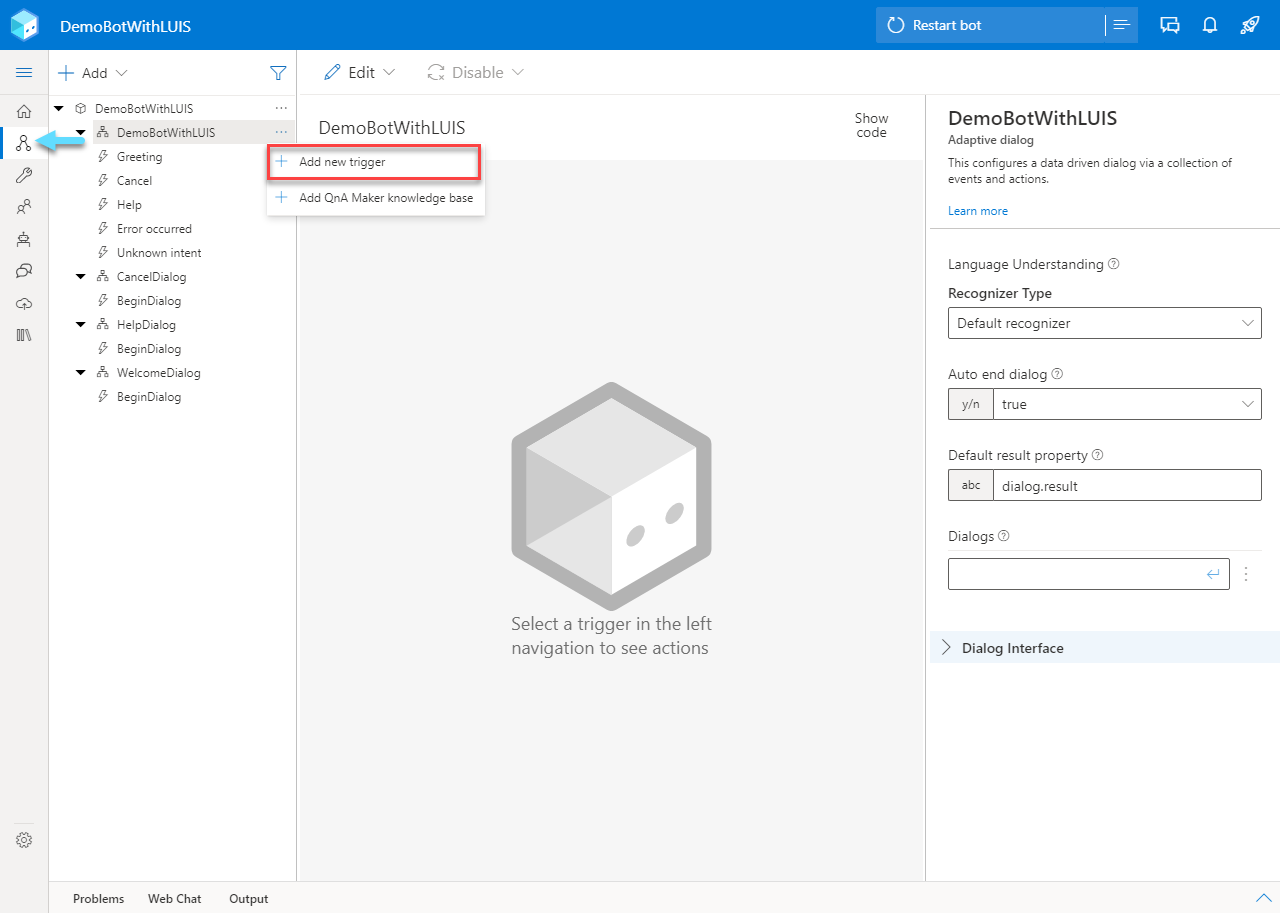
Once you are sure that your bot works as expected, you can add new intents to LUIS. If you want to learn more about intents and how LUIS works, you can read about it in this post. To add an intent, navigate to the Create tab of the composer, click the three dots next to your bot’s name and select Add New Trigger.
Leave the first field as Intent recognized. The second field is the name of your intent (or trigger). The Trigger phrases field should contain the utterances that correspond to your intent. It is very important to start each utterance with “- “ in a new line.
For this example we will create a How Are You intent and the utterances we will use are presented below.
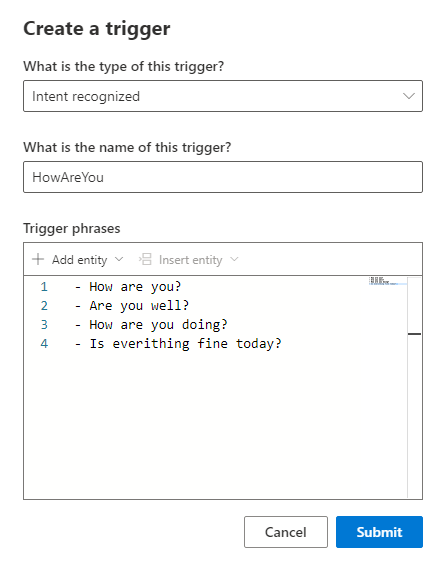
- How are you?
- Are you well?
- How are you doing?
- Is everithing fine today?
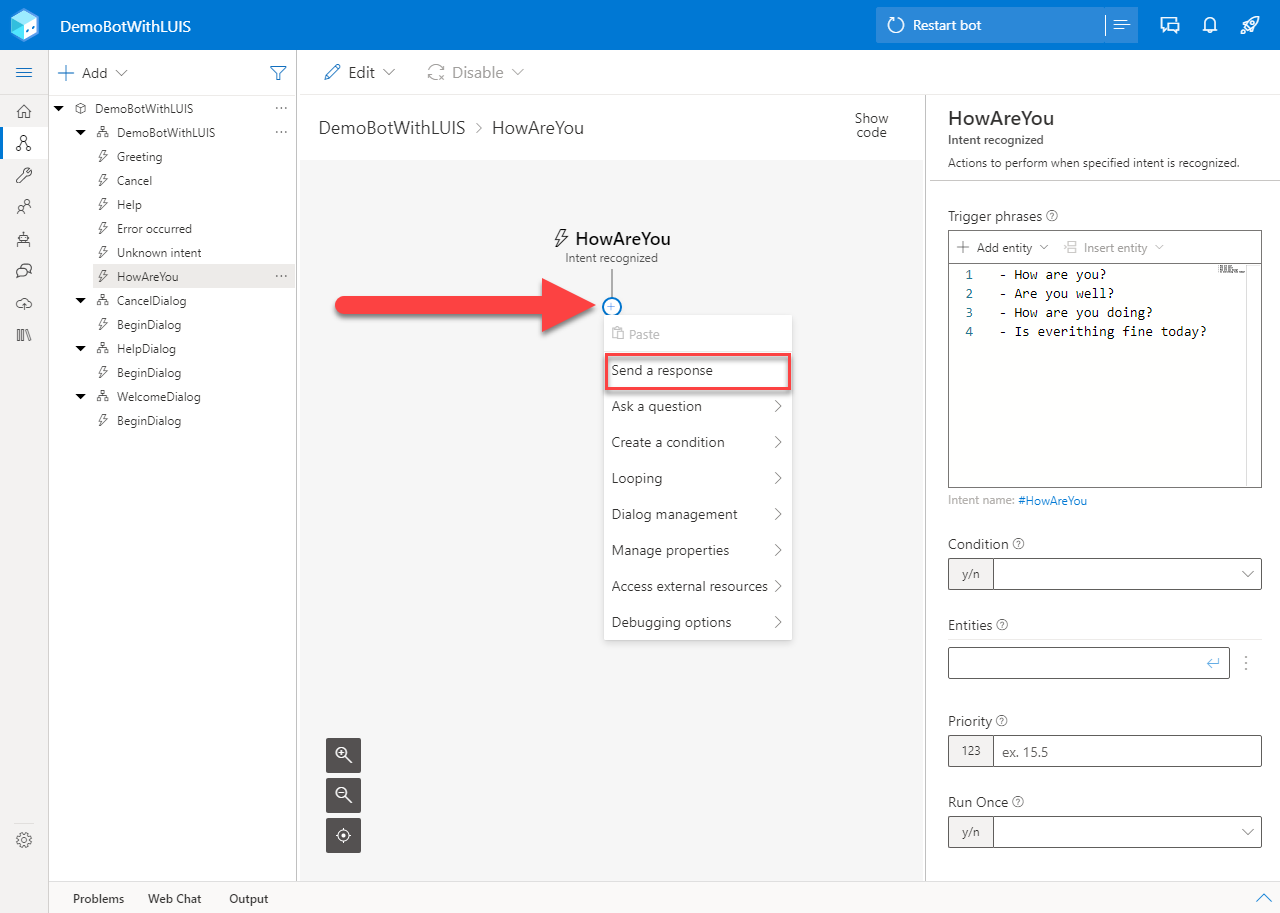
Now you can see in front of you the newly created trigger, which corresponds to one LUIS intent. Click the “+” icon and then Send a response to customize the massage that will appear after this intent is detected.
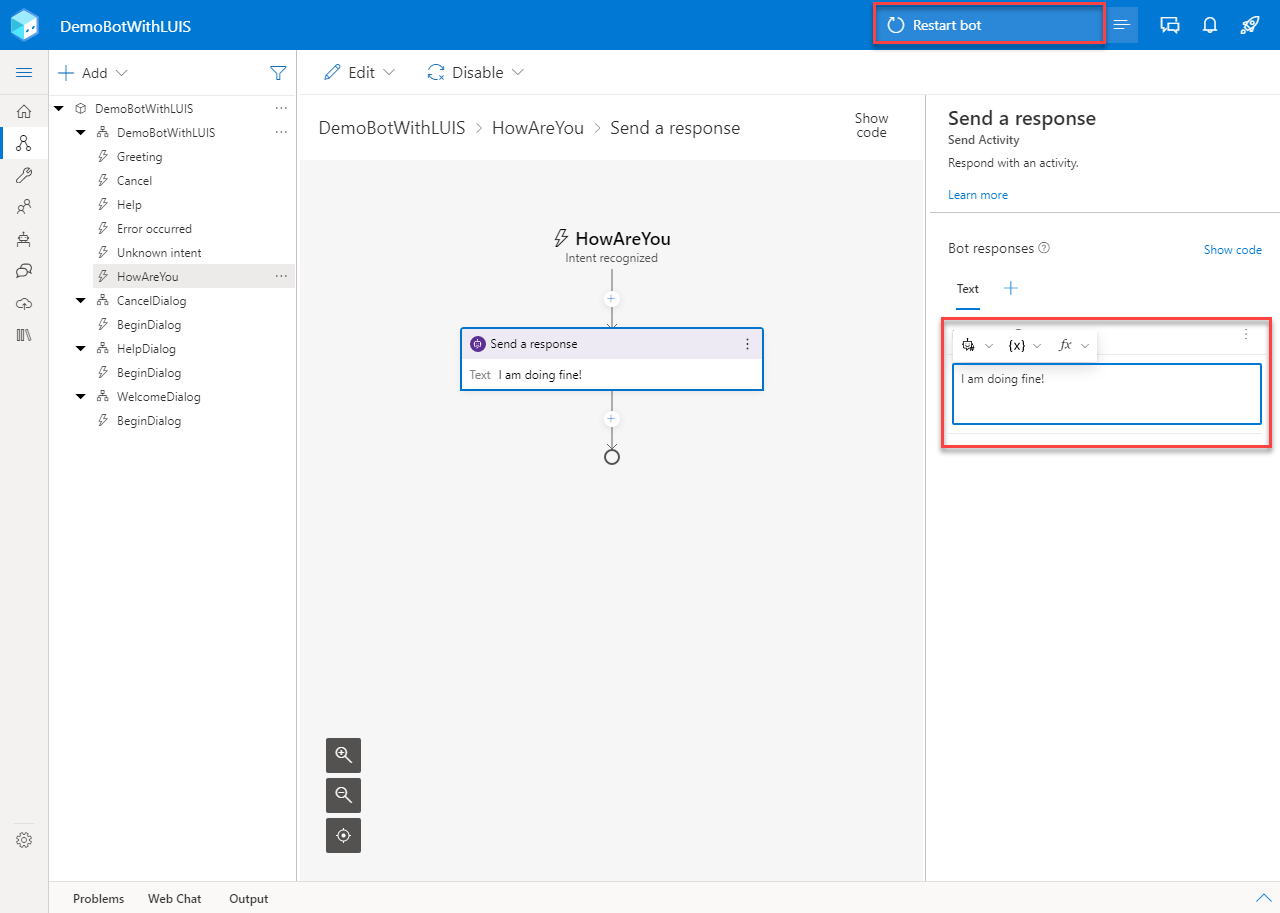
Write your bot’s response in the Text field and click Restart bot to run you bot.
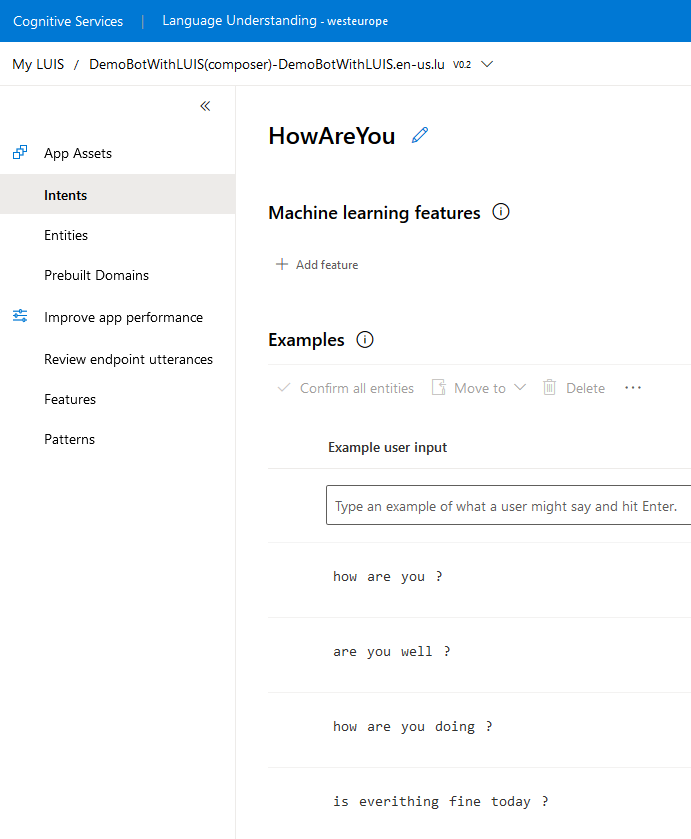
If you take a look at your new LUIS resource at https://www.luis.ai/, you will find the new intent you just created along with all the utterances synced automatically.
Test
Back to the bot, while it is running open the Web Chat and try your new intent. The bot should be responding with your custom text.
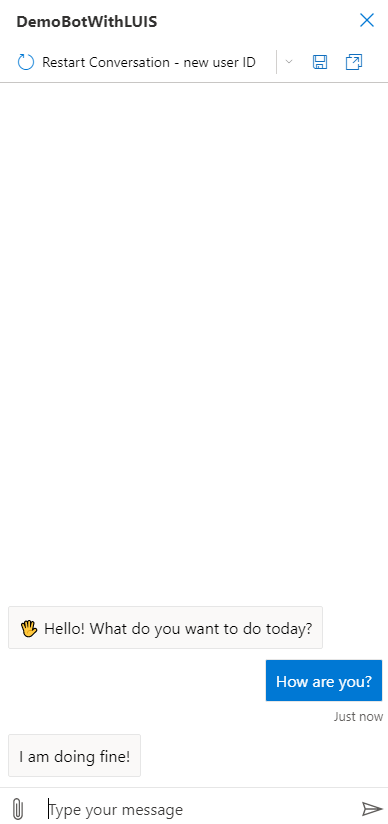
And this is how to intergrade LUIS into an Azure Bot!
First look at Azure Bot resource
 June 22, 2021
Azure Bot Service is a comprehensive development environment for designing and building enterprise-grade conversational AI.
Prephase
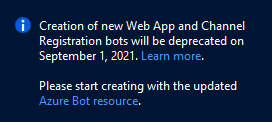
You might have seen this notification when trying to create your own Web App Bots. It prompts you to create your bots using the Azure Bot resource, as the old and trusty Web App Bot slowly starts to become deprecated. So, let’s dive in and see what’s new!
Create
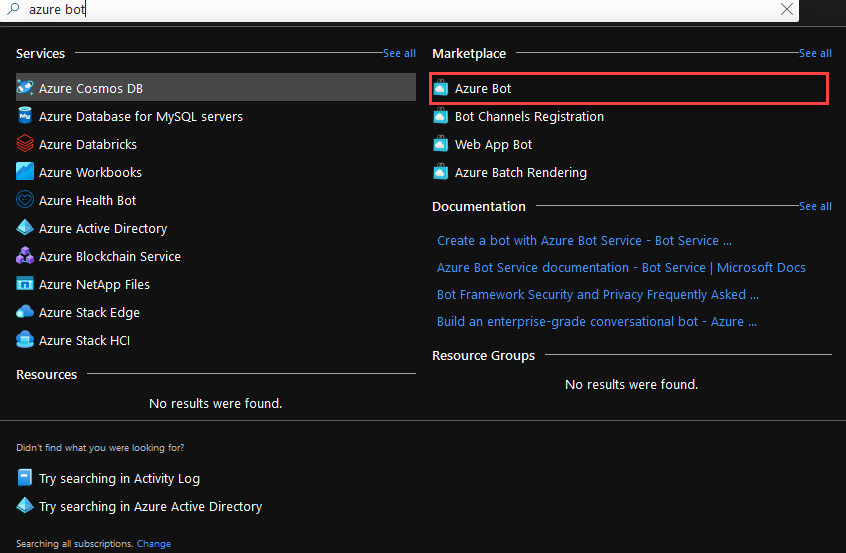
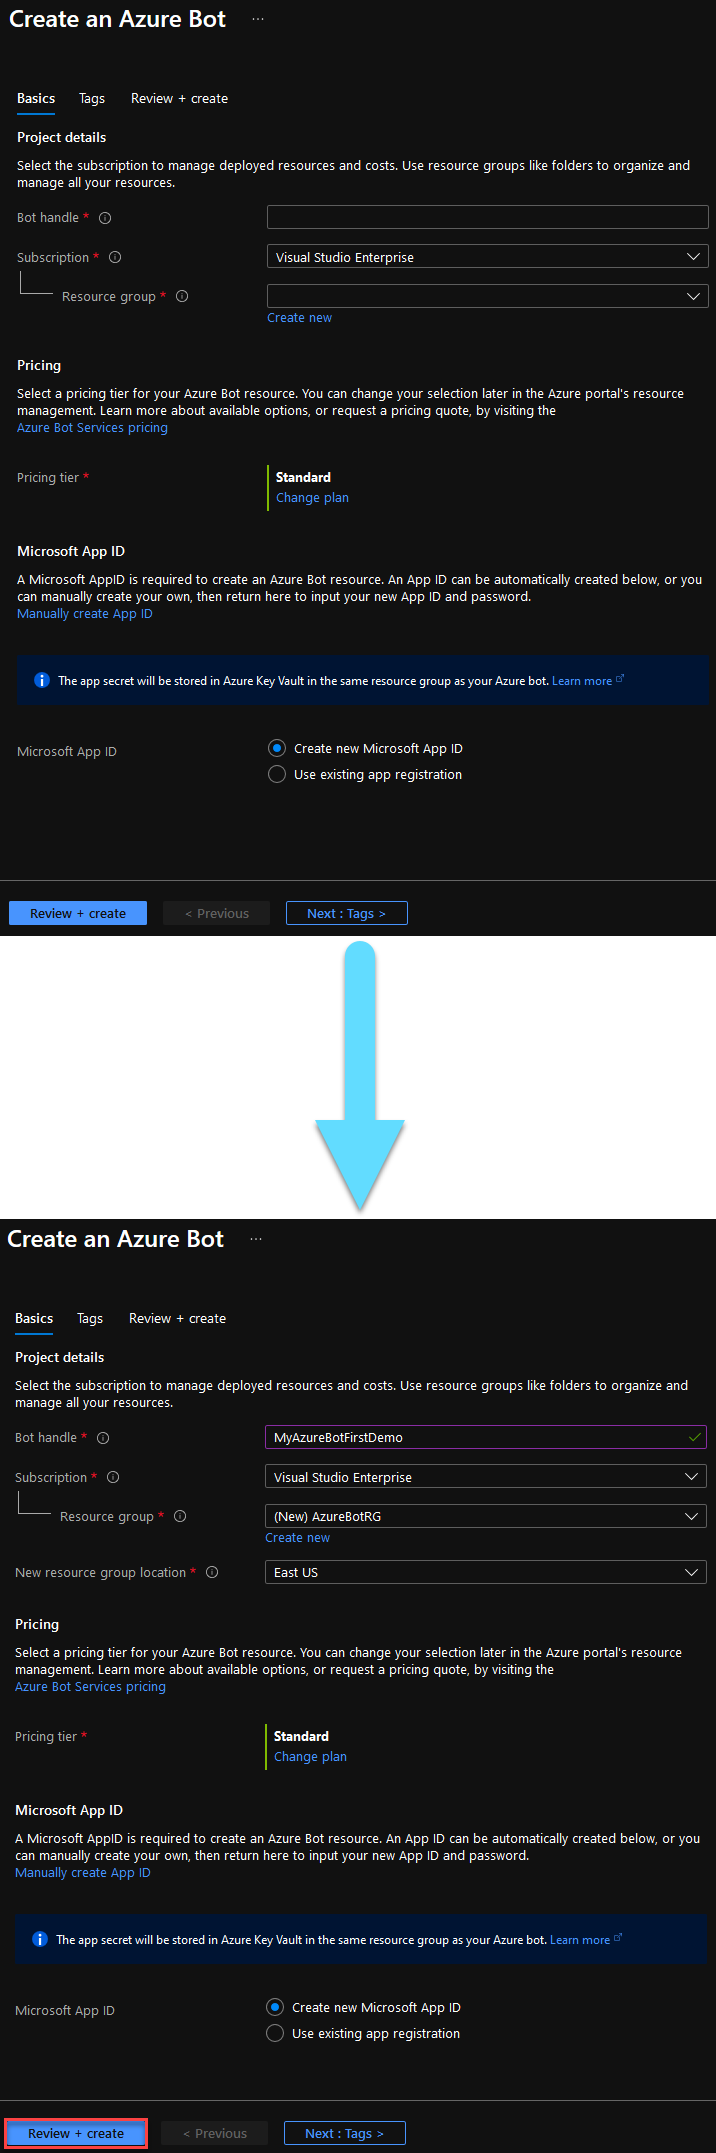
Search for the Azure Bot resource, you can easily find it in the Marketplace.
Unlike Web App Bot, in the Azure Bot resource you only need to provide the Bot handle and the Resource Group, in order to create the resource.
Let’s have a look on what each field does.
Only the fields with the ‘*’ are mandatory.
- The Bot Handle is a unique identifier to your bot.
- The Subscription field is populated by default with your default azure subscription.
- Resource Group is the group that will contain the resources you are creating now. You can either create a new one, ore use an existing one.
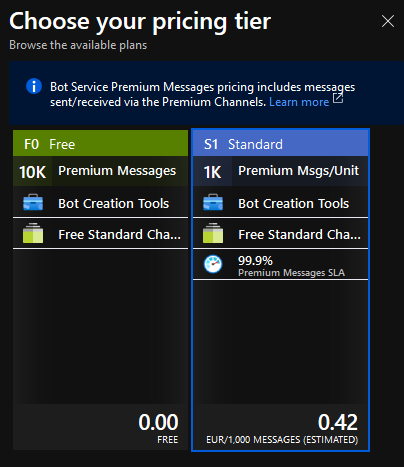
- Choose the Pricing Tier that suits the needs of your bot. It is automatically payed using your Azure credits. Here are your options:
- Lastly on Microsoft App ID you can choose your own App ID and password for your bot, or you can leave it as is, to automatically create one for you.
As you can see, a LUIS app is not created by default, so you will most propably need to create it afterwards.
When you are ready click the Review + create button.
This is the final validation before you create your bot. If everithing went as planned, click Create to deploy your resource.
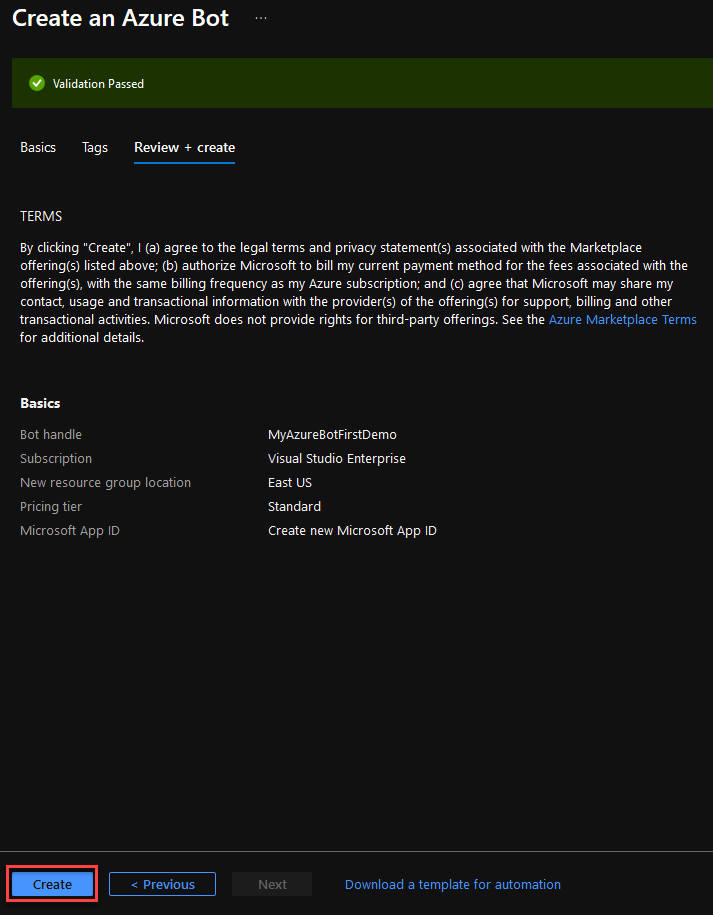
You will be notified once the deployment is complete and you can go to your newly created resource. The deployment process should not take longer than a few minutes.

As a side note, if we take a look in our resource group we only see two resources. Our Azure Bot and a Key Vault. The Azure Bot resource handles everithing regarding our new bot, and is where we can publish our bot’s code.

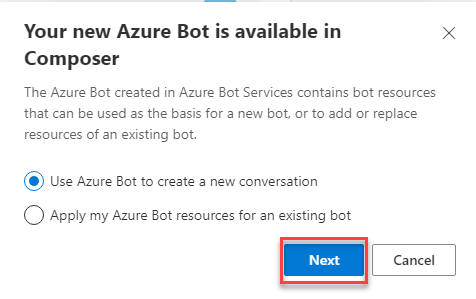
Back to our Azure Bot resource, as you can see, no code is created for us automaticaly and for a good reason. This process is now part of the Bot Framework Composer. Download the composer from here and click on the Open in Composer button to start creating your bot.

The composer should now pop up. Unless you have a bot already that you wish to publish, select the first option and click Next.
And this is where you can chose the type of your bot and have it populated with code. Keep in mind that, bots that require cognitive services like LUIS or QnA Maker will not create an app to those services automatically, so you will need to create them on your own afterwards.
For this example we are going to use the Core Bot with Language. This requires linking with LUIS, which will be covered in another post. However it does gives us a glimpse of how the Composer works.
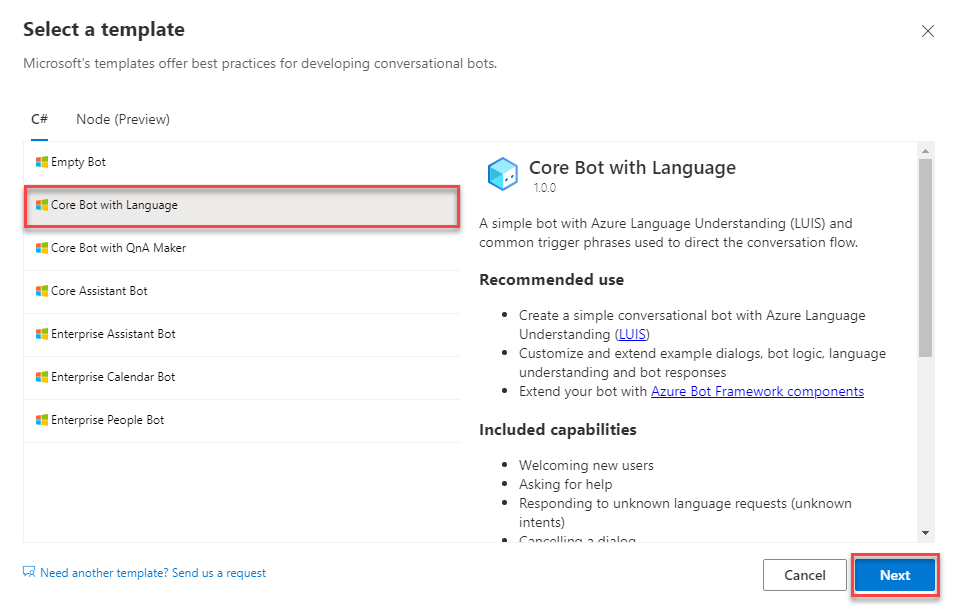
Give a name to your bot and click Create.
If you navigate, for example, to the Greeting trigger, you are greeted with an intuitive flowchart of how the trigger works. This aims to make the production process of the chatbot easier to understand and expand on. Here you can start the development of your bot.
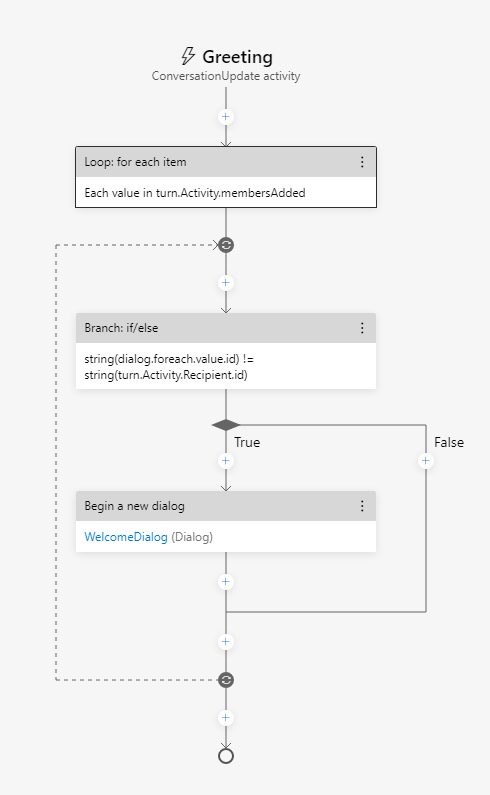
And that is your first look at the Azure Bot resource!
Use Adaptive Cards as dialog in Bot Framework
 June 12, 2021
Adaptive Cards are platform-agnostic snippets of UI, authored in JSON, that apps and services can openly exchange. When delivered to a specific app, the JSON is transformed into native UI that automatically adapts to its surroundings. It helps design and integrate light-weight UI for all major platforms and frameworks.
The use of Adaptive Cards as dialog, provides the ability for the developer to gather user information that is not easily conveyed through natural language, in a controlled UI.
Create
In this post we will be using a Basic Bot. To create one follow this post.
Adaptive cards in Bot Framework work in turns. That means that they can be used to give some information to the user and then continue with the rest of the dialog step, ending in a prompt. Since Adaptive Cards connot be used as prompts, the user cannot give information to the card, hit a button and then expect the dialog to continue. To fix that, we are going to create our own prompt!
Create a new class and name it AdaptiveCardPrompt.cs. Then paste the following code.
using Microsoft.Bot.Builder;
using Microsoft.Bot.Builder.Dialogs;
using Microsoft.Bot.Schema;
using Newtonsoft.Json.Linq;
using System;
using System.Collections.Generic;
using System.Threading;
using System.Threading.Tasks;

namespace Microsoft.BotBuilderSamples
{
    public class AdaptiveCardPrompt : Prompt<JObject>
    {
        public AdaptiveCardPrompt(string dialogId, PromptValidator<JObject> validator = null)
            : base(dialogId, validator)
        {

        }
        protected override async Task OnPromptAsync(ITurnContext turnContext, IDictionary<string, object> state, PromptOptions options, bool isRetry, CancellationToken cancellationToken = default)
        {
            if (turnContext == null)
            {
                throw new ArgumentException(nameof(turnContext));
            }

            if (options == null)
            {
                throw new ArgumentException(nameof(options));
            }

            if (isRetry && options.Prompt != null)
            {
                await turnContext.SendActivityAsync(options.RetryPrompt, cancellationToken).ConfigureAwait(false);
            }
            else if (options.Prompt != null)
            {
                await turnContext.SendActivityAsync(options.Prompt, cancellationToken).ConfigureAwait(false);
            }
        }

        protected override Task<PromptRecognizerResult<JObject>> OnRecognizeAsync(ITurnContext turnContext, IDictionary<string, object> state, PromptOptions options, CancellationToken cancellationToken = default)
        {
            if (turnContext == null)
            {
                throw new ArgumentException(nameof(turnContext));
            }

            if (turnContext.Activity == null)
            {
                throw new ArgumentException(nameof(turnContext));
            }

            var result = new PromptRecognizerResult<JObject>();

            if (turnContext.Activity.Type == ActivityTypes.Message)
            {
                if (turnContext.Activity.Value != null)
                {
                    if (turnContext.Activity.Value is JObject)
                    {
                        result.Value = turnContext.Activity.Value as JObject;
                        result.Succeeded = true;
                    }
                }

            }

            return Task.FromResult(result);
        }
    }
}
We now need a class that will help us consume tha output of the card. Name this class AdaptiveCard.cs and populate it with the following code.
using System.IO;

namespace Microsoft.BotBuilderSamples
{
    public static class AdaptiveCard
    {
        public static string ReadCard(string fileName)
        {
            string[] BuildPath = { ".", "Cards", fileName };
            var filePath = Path.Combine(BuildPath);
            var fileRead = File.ReadAllText(filePath);
            return fileRead;
        }
    }
}
Here we are going to create our card. You can create as many cards you like this way.
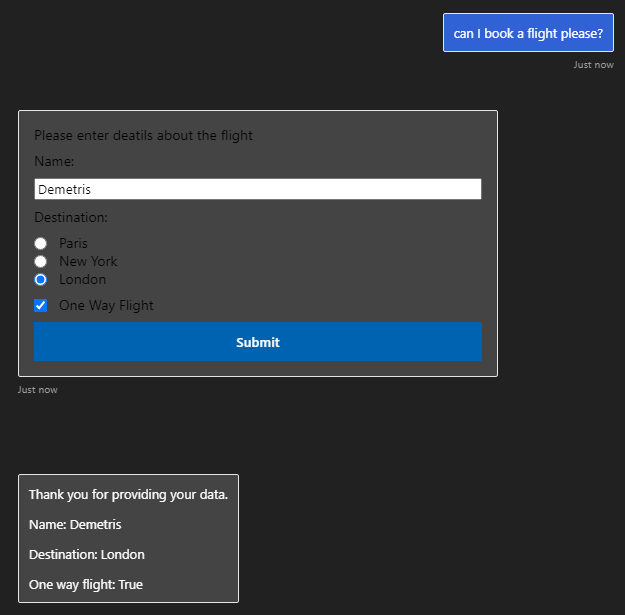
Create a file called bookingDetails.json, and populate it with the code below.
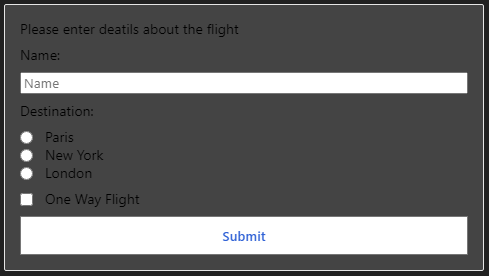
It contains a field to input text, a radio button, a checkbox, a regular button and a few text blocks.
{
  "$schema": "http://adaptivecards.io/schemas/adaptive-card.json",
  "type": "AdaptiveCard",
  "version": "1.0",
  "body": [
    {
      "type": "TextBlock",
      "text": "Please enter deatils about the flight"
    },
    {
      "type": "TextBlock",
      "text": "Name:"
    },
    {
      "type": "Input.Text",
      "id": "Name",
      "placeholder": "Name"
    },
    {
      "type": "TextBlock",
      "text": "Destination:"
    },
    {
      "type": "Input.ChoiceSet",
      "placeholder": "Destination",
      "choices": [
        {
          "title": "Paris",
          "value": "Paris"
        },
        {
          "title": "New York",
          "value": "New York"
        },
        {
          "title": "London",
          "value": "London"
        }
      ],
      "id": "Destination",
      "style": "expanded"
    },
    {
      "type": "Input.Toggle",
      "id": "OneWayFlight",
      "title": "One Way Flight",
      "value": "false"
    }
  ],
  "actions": [
    {
      "type": "Action.Submit",
      "title": "Submit"
    }
  ]
}
This is how the finished card will look like.
We also need to create a class that will hold the data gathered from the card, as it will be deserialized from JSON format. Create a new class called BookingDetailsJSON and add the code bellow. We only gether three variables from the card, so we will create these variables with their respective names.
public class BookingDetailsJSON
{
    public string Name { get; set; }
    public string Destination { get; set; }
    public bool OneWayFlight { get; set; }
}
Implement
Now go to the dialog that will use the new card prompt. You can create a new dialog, or use an existing one if you prefer.
Add the following using statement.
using Newtonsoft.Json;
Add the new prompt we created along with the rest of the prompts for the dialog.
AddDialog(new AdaptiveCardPrompt("adaptive"));
In the intro step, or the step that will show the card, add the following code.
var cardJson = AdaptiveCard.ReadCard("bookingDetails.json");

var cardAttachment = new Attachment()
{
    ContentType = "application/vnd.microsoft.card.adaptive",
    Content = JsonConvert.DeserializeObject(cardJson),
};

var options = new PromptOptions
{
    Prompt = new Activity
    {
        Attachments = new List<Attachment>() { cardAttachment },
        Type = ActivityTypes.Message
    }
};

return await stepContext.PromptAsync("adaptive", options, cancellationToken);
In the next step, we will consume the JSON from the card, show the information to the user and end the dialog.
var result = JsonConvert.DeserializeObject<BookingDetailsJSON>(stepContext.Result.ToString());

var messageText = $"Thank you for providing your data.\n\nName: {result.Name}\n\nDestination: {result.Destination}\n\nOne way flight: {result.OneWayFlight}";
var promptMessage = MessageFactory.Text(messageText, messageText, InputHints.ExpectingInput);
await stepContext.PromptAsync(nameof(TextPrompt), new PromptOptions { Prompt = promptMessage }, cancellationToken);
return await stepContext.EndDialogAsync(result, cancellationToken);
Lastly, a tricky part is that the Basic Bot has a class called CancelAndHelpDialog that handles the input text from the user. However since we are using the card to proceed in the dialog, the input text will be null, and CancelAndHelpDialog does not like that…
To fix this, go to the CancelAndHelpDialog.cs file and navigate to this line. It should be in line 35.
if (innerDc.Context.Activity.Type == ActivityTypes.Message)
Then replace it with the following line, to let it ignore null values.
if (innerDc.Context.Activity.Type == ActivityTypes.Message && innerDc.Context.Activity.Text != null)
And we are done! Let’s test our bot.
Test
The card appears normally, I enter my data, click Submit, the dialog continues and the bot gathers my information correctly!
That is how you can use Adaptive Cards to follow dialog and gather data from the user!
Value prediction using ML.NET
 June 02, 2021
ML.Net is an open source and cross-platform framework created by Microsoft that utilizes Machine Learning to give the user the ability to effortlessly manipulate data in their own volition. Using the available model creation, data can be transformed into a prediction in seconds. ML.NET runs on Windows, Linux, and macOS using .NET Core, or Windows using .NET Framework. 64 bit is supported on all platforms. 32 bit is supported on Windows, except for TensorFlow, LightGBM, and ONNX-related functionality. You can learn more here.
Value prediction uses machine learning to predict values based on the rest of the data given in a dataset.
Create Model
To setup ML.NET in your machine follow this post.
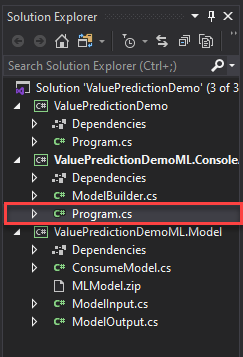
After you are done, launch Visual Studio and create a new Console App (.NET Core).
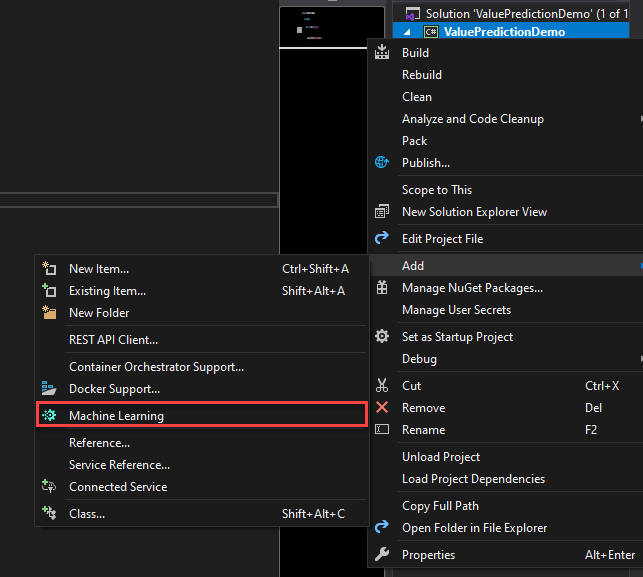
Then right click on your project in the Solution Explorer and select Add -> Machine Learning.
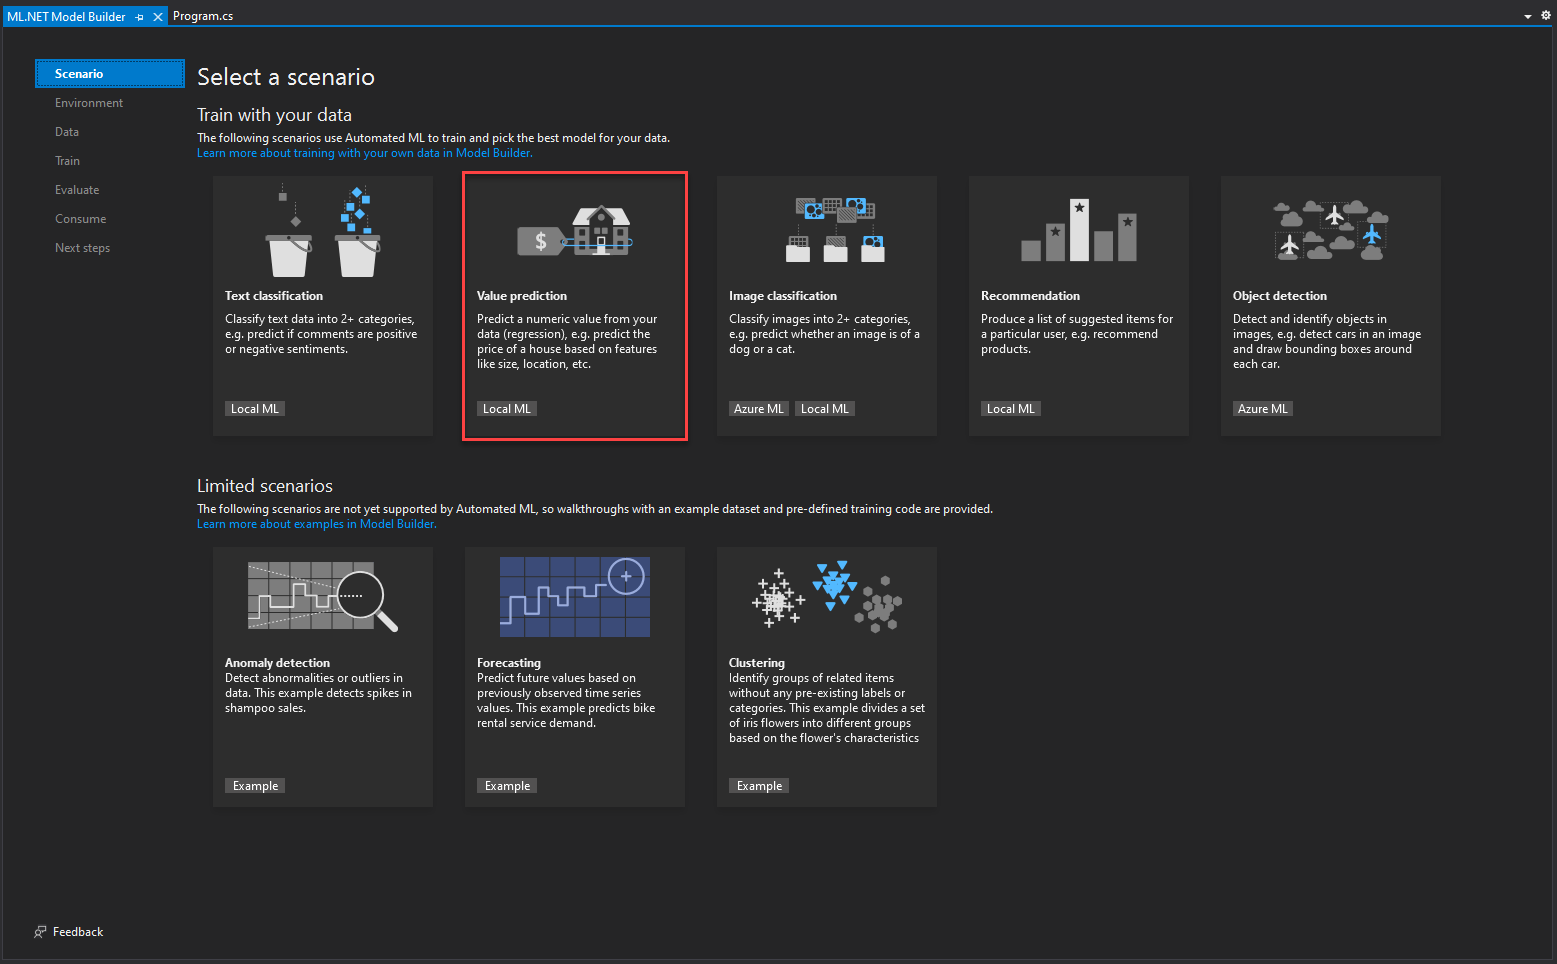
You will be presented with the ML.NET Model Builder. Select the Value prediction scenario.
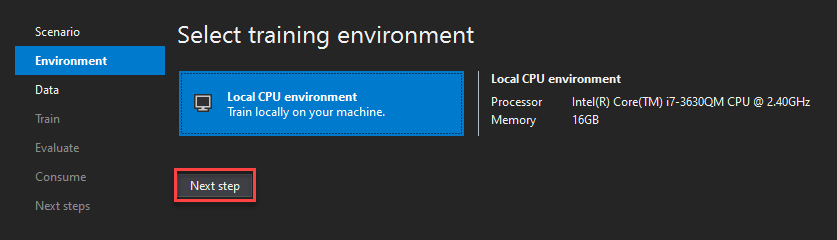
In this step you can choose where to run the model. You can choose your local machine and click Next step.
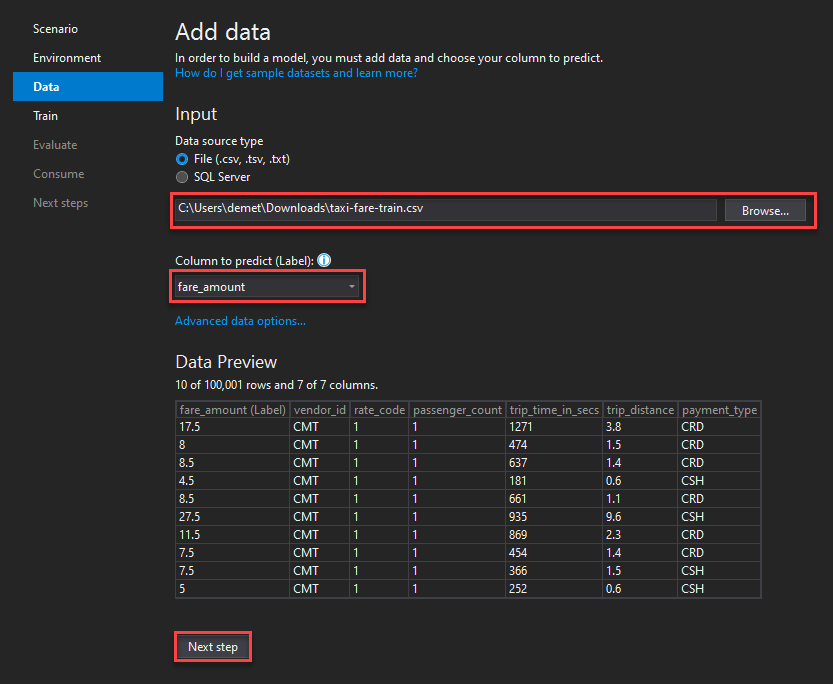
Here you can input your dataset. Ensure that you have the File option selected, but you can choose the SQL Server option if you happen to have one.
Click Browse and enter your dataset, We are using this sample dataset for this demo.
Next, in Column to predict you are choosing the column of the dataset that contains the values that are going to get predicted by the model. For this dataset you can choose the fare_amount column. Then click Next step.
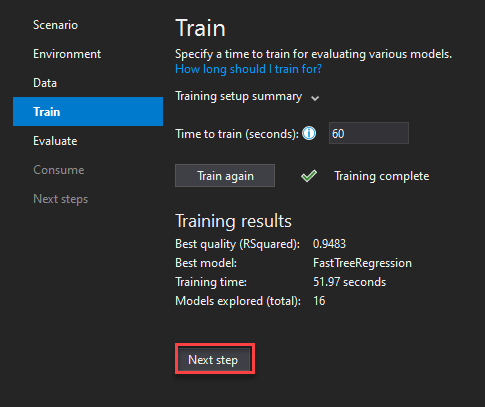
Here you can choose your training time, this depents on many variables such as your dataset size and your processor. You can find some estimates here. The default value is 10 seconds, but you can step it up to 60 to have a bit more time to train. Then click Start training.

After the training is complete you can see which is the best model for your use case. You do not need to do anything, just click Next step.
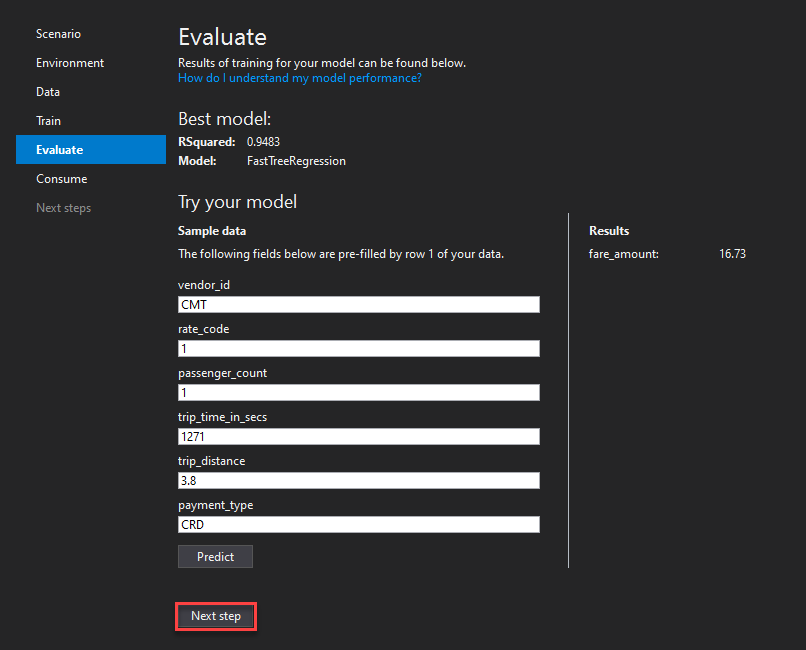
In the Evaluate step you can try some predictions to see if you are satisfied with your model. After that click Next step.
And you are ready to consume your model. Just click the Add to solution button to import it into your Console App.

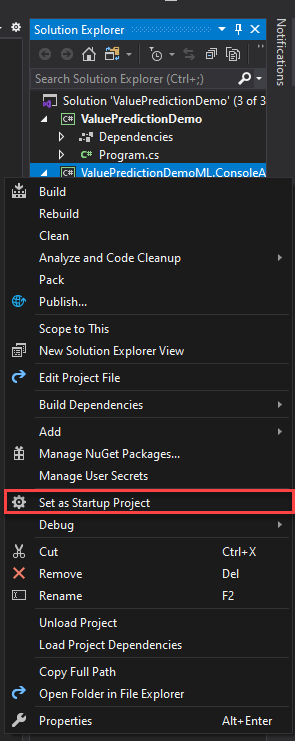
Go to the Solution Explorer, right click on the newly created Console App (Not the Model) and select Set as Startup Project.
Now navigate to Program.cs to make any changes you want to your project.
And you are all set. Your value prediction model is good to go. The only thing left to do, is to test it.
Test
Navigate to the Main() function of your newly created Program.cs file. The following code gives the input based on which the model will make the prediction. You can change the data here as you like.
ModelInput sampleData = new ModelInput()
{
    Vendor_id = @"CMT",
    Rate_code = 1F,
    Passenger_count = 1F,
    Trip_time_in_secs = 1271F,
    Trip_distance = 3.8F,
    Payment_type = @"CRD",
};
We run the solution and we get the results for the default input values.
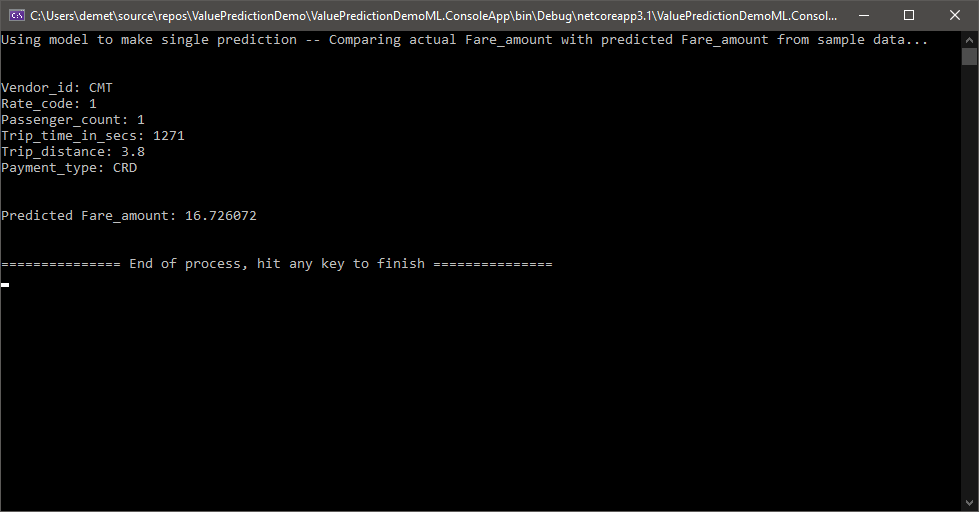
For the second test we changed the trip distance from 3.8 to 6.2 and as expected the predicted fare amount is significantly higher.

This is how you can use ML.NET to predict values in a fast and easy way!
Proactive Messages in Microsoft Teams
 May 22, 2021
Proactive messaging provides your bot the ability to notify the user with messages that can be written and modified by the developer. The ability to use them with any channel can bring confusion due to how each channel handles proactive messages and dialogs.
Preface
As you propably already know, not every piece of code will behave similarly in any supported channel, proactive messages being one of them. There are many implementations out there, but while it might work in the emulator and in the Web Chat, many major channels like Microsoft Teams might need some changes to get them to work correctly. This post aims to give you an implementation that will work in many major channels, including Microsoft Teams and will still allow you to have the full functionality of your bot in the web chat and emulator.
You can find the official proactive messages sample here and although it will work out of the box with Teams, it might not be suitable for every use case. For example you might need to create a dialog bot that has a slightly different structure and that’s what we are going to do in this post. Here is an older post showing proactive messages working in a dialog bot, and while this works fine with the Web Chat, Teams does not support it.
Microsoft Teams and many other channels never call the OnConversationUpdateActivityAsync() function, which is the function used to capture the converstation reference. In order to capture it we need to find a function that is called often enough (at every message) to collect the conversation reference, if we need to use our bot in these channels. That function is OnMessageActivityAsync().
Create
In this post we will be using a Basic Bot created by Azure Bot Service. You can find out how to create one in this post.
This is the controller that will handle the proactive messages. Create a new class named NotifyController.cs and paste in it the following code.
using System;
using System.Collections.Concurrent;
using System.Net;
using System.Threading;
using System.Threading.Tasks;
using Microsoft.AspNetCore.Mvc;
using Microsoft.Bot.Builder;
using Microsoft.Bot.Builder.Integration.AspNet.Core;
using Microsoft.Bot.Schema;
using Microsoft.Extensions.Configuration;

namespace ProactiveBot.Controllers
{
    [Route("api/notify")]
    [ApiController]
    public class NotifyController : ControllerBase
    {
        private readonly IBotFrameworkHttpAdapter _adapter;
        private readonly string _appId;
        private readonly ConcurrentDictionary<string, ConversationReference> _conversationReferences;

        public NotifyController(IBotFrameworkHttpAdapter adapter, IConfiguration configuration, ConcurrentDictionary<string, ConversationReference> conversationReferences)
        {
            _adapter = adapter;
            _conversationReferences = conversationReferences;
            _appId = configuration["MicrosoftAppId"] ?? string.Empty;

            if (string.IsNullOrEmpty(_appId))
            {
                _appId = Guid.NewGuid().ToString(); //if no AppId, use a random Guid
            }
        }

        public async Task<IActionResult> Get()
        {
            foreach (var conversationReference in _conversationReferences.Values)
            {
                await ((BotAdapter)_adapter).ContinueConversationAsync(_appId, conversationReference, BotCallback, default(CancellationToken));
            }

            // Let the caller know proactive messages have been sent
            return new ContentResult()
            {
                Content = "<html><body><h1>Proactive messages have been sent.</h1></body></html>",
                ContentType = "text/html",
                StatusCode = (int)HttpStatusCode.OK,
            };
        }

        private async Task BotCallback(ITurnContext turnContext, CancellationToken cancellationToken)
        {
            await turnContext.SendActivityAsync("This is a proactive message");
        }
    }
}
Implement
Find the file named DialogBot.cs and insert the following using statement.
using System.Collections.Concurrent;
Add the ConcurrentDictionary inside the class.
protected readonly ConcurrentDictionary<string, ConversationReference> _conversationReferences;
Replace the class’s constructor with this one which passes the conversationReferences in lines 1 and 7.
public DialogBot(ConversationState conversationState, UserState userState, T dialog, ILogger<DialogBot<T>> logger, ConcurrentDictionary<string, ConversationReference> conversationReferences)
{
    ConversationState = conversationState;
    UserState = userState;
    Dialog = dialog;
    Logger = logger;
    _conversationReferences = conversationReferences;
}
Add the AddConversationReference function later in the file to collect the conversation reference.
private void AddConversationReference(Activity activity)
{
    var conversationReference = activity.GetConversationReference();
    _conversationReferences.AddOrUpdate(conversationReference.User.Id, conversationReference, (key, newValue) => conversationReference);
}
In the OnMessageActivityAsync() function, add the following line.
AddConversationReference(turnContext.Activity as Activity);
Next, open the DialogAndWelcomeBot.cs class and insert this using statement.
using System.Collections.Concurrent;
Change the constructor to the following one to account for the conversation reference in lines 1 and 2.
public DialogAndWelcomeBot(ConversationState conversationState, UserState userState, T dialog, ILogger<DialogBot<T>> logger, ConcurrentDictionary<string, ConversationReference> conversationReferences)
    : base(conversationState, userState, dialog, logger, conversationReferences)
{
}
Lastly, open the Startup.cs file and add these two using statements.
using Microsoft.Bot.Schema;
using System.Collections.Concurrent;
Include the ConcurrentDictionary service by pasting the following line inside the class.
services.AddSingleton<ConcurrentDictionary<string, ConversationReference>>();
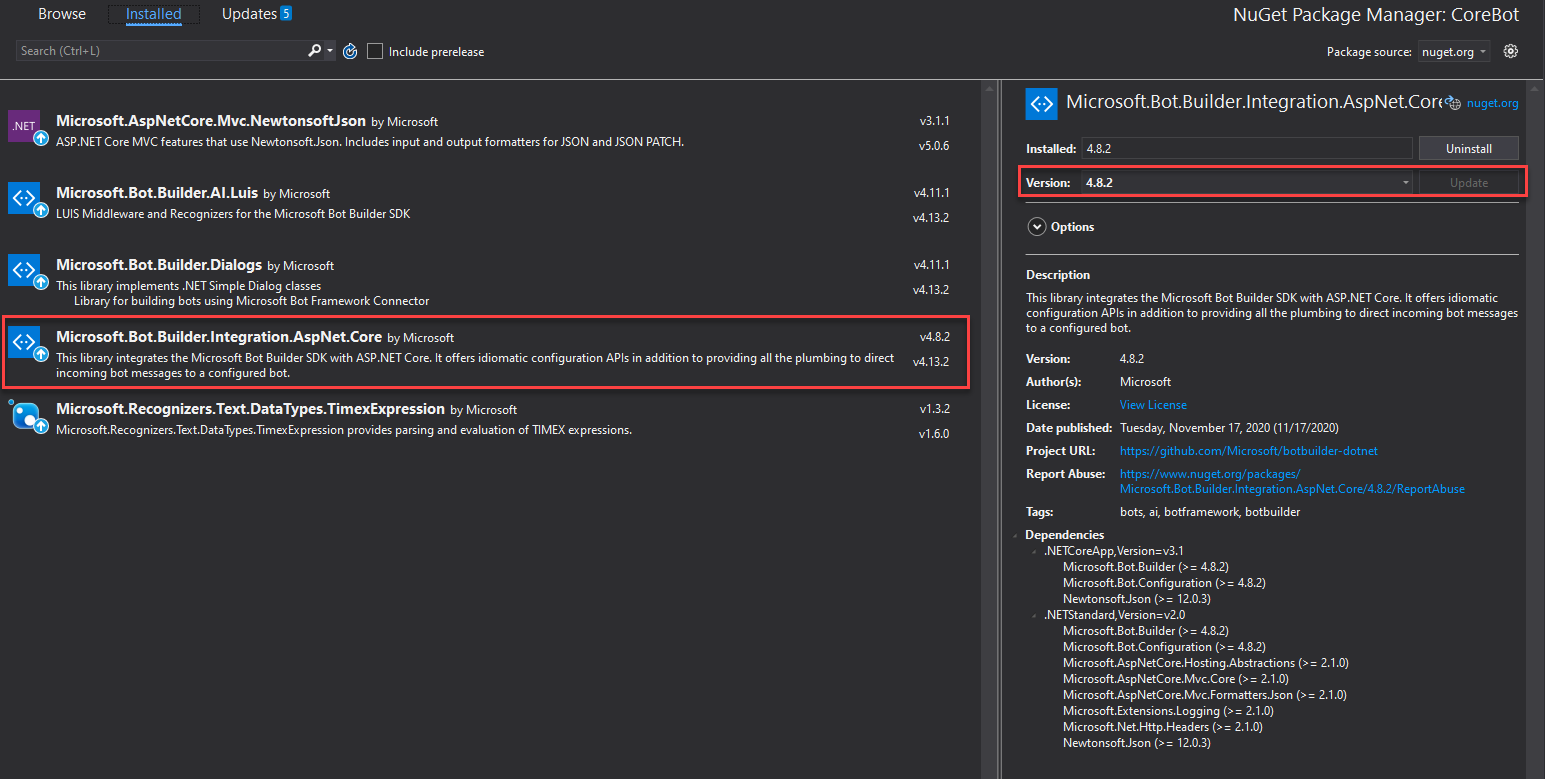
Now functionality may vary depending on the NuGet packages you use, and more specifically on the Microsoft.Bot.Builder.Integration.AspNet.Core package. I am using the 4.8.2 version. I you are having difficulties with getting your proactive messages to appear consider changing the version to the one we are using in this post.
You are now ready to go. Publish your bot in Azure and test it using Microsoft Teams.
Test
Once you have published your bot start talking to it using Teams to capture the new conversation reference. After that call the notify endpoint to get your proactive messages. Your endpoint will look like this: BOT_NAME.azurewebsites.net/api/notify with BOT_NAME being the name of your web app bot.

Here is the bot working in Microsoft Teams!

This way you can have proactive messages appear in your Teams chat! This post may also work in other channels that the previous implementation was not supported.
Get started with Speech Studio
 May 12, 2021
Speech Studio serves as a customization portal for the Azure Speech resource. It provides all the tools you need to transcribe spoken audio to text, perform translations and convert text to lifelike speech.
Create
The aim of this post is to get you familiar with the interface and capabilities of Speech Studio.
Let’s dive in!
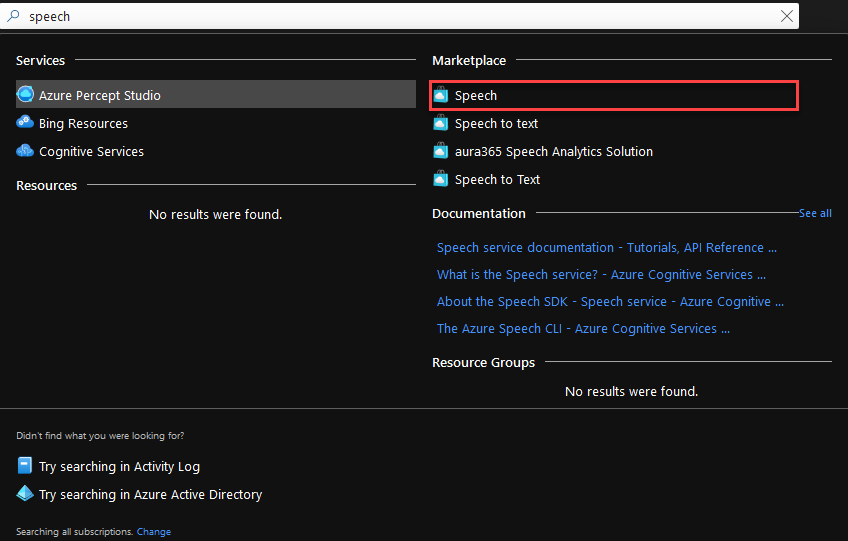
Go to the Azure Portal and find the Speech resource from the marketplace.
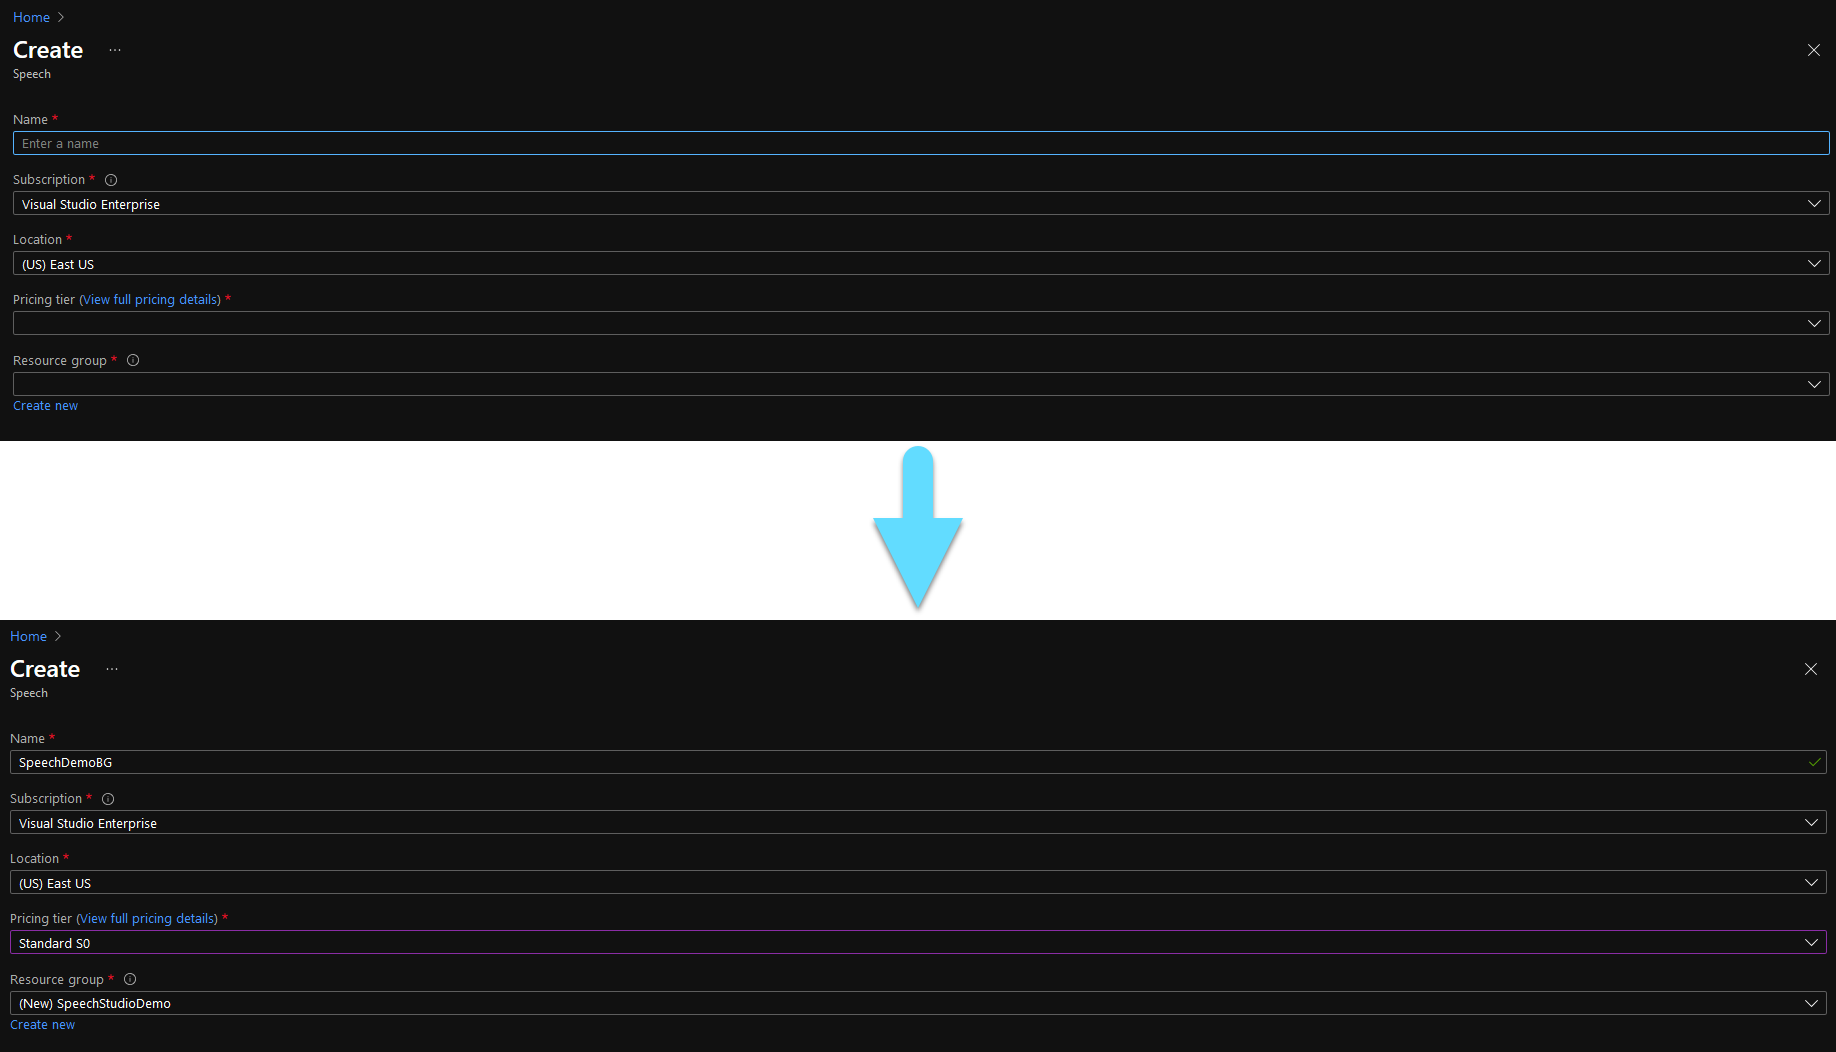
Fill the form. The fields with the ‘*’ are mandatory.
- Name, is the name you need to give to your speech resource.
- Subscription should already be filled in with your default subscription.
- Location is preoccupied by the default location, but you can change it if you like.
- Choose the Pricing tier that best meets your needs.
- For Resource Group, you can use an existing one, or create a new one.
Then click Create.
Wait a few minutes for your resource to get deployed.
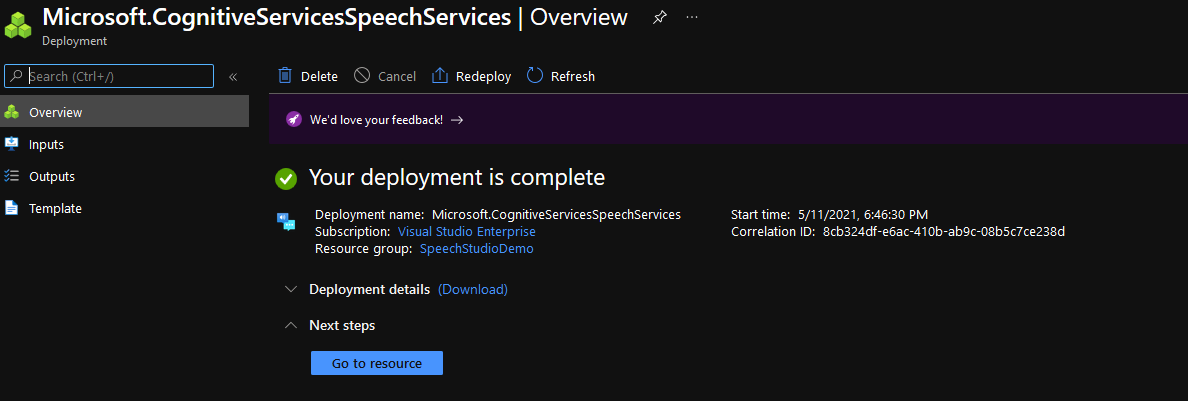
Now visit the Speech Studio portal, select the Speech resource you just created and click Go to Studio.

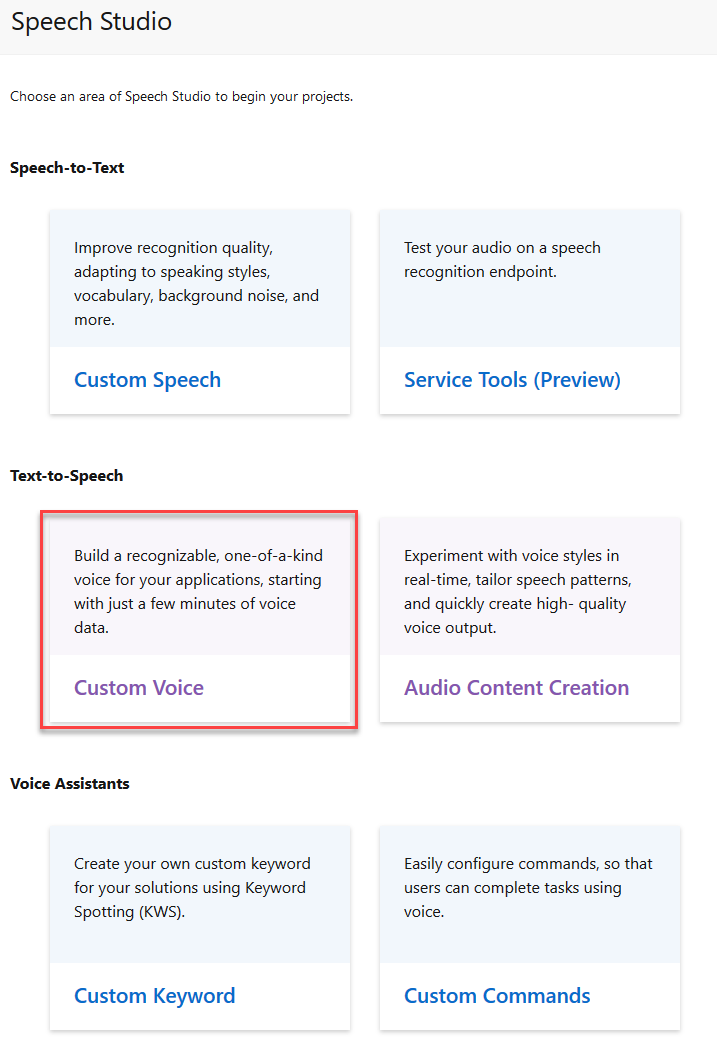
Here you can see all the capabilities of the Speech Studio.
You can create a model that transcripes audio to words, you can configure custom commands for your voice assistant and even create your own text to speech models that can read aloud the text given to them.
We will go with Custom Voice for this demo.
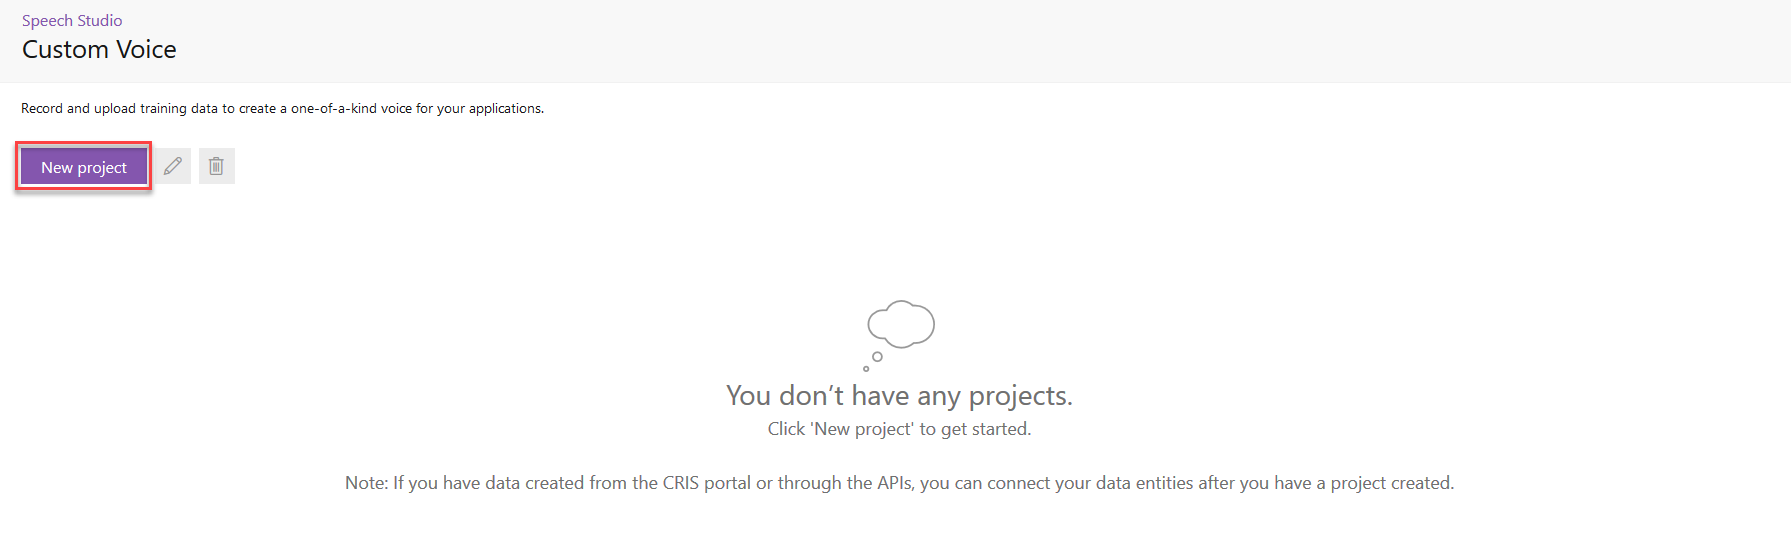
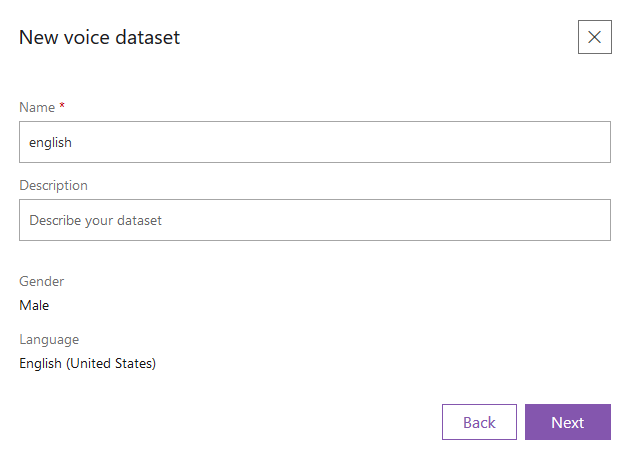
Click on New project to create your project.
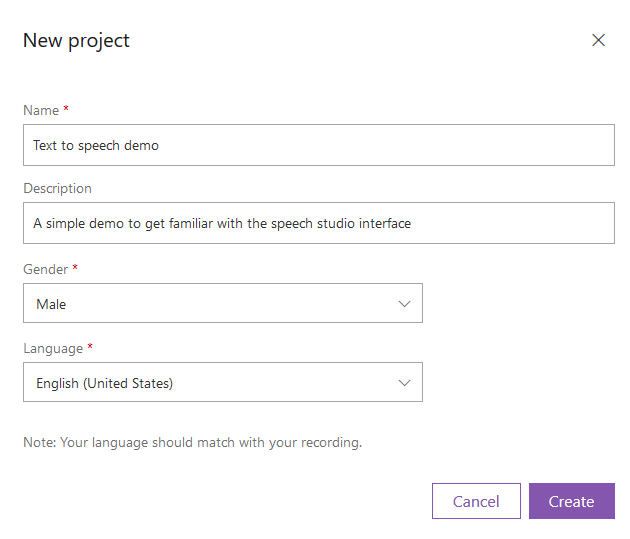
Give your project a name and description. The gender field covers the gender of the person that your model will represent and the language, is the language that will be supported from your model.
Click on your newly created project and upload data.

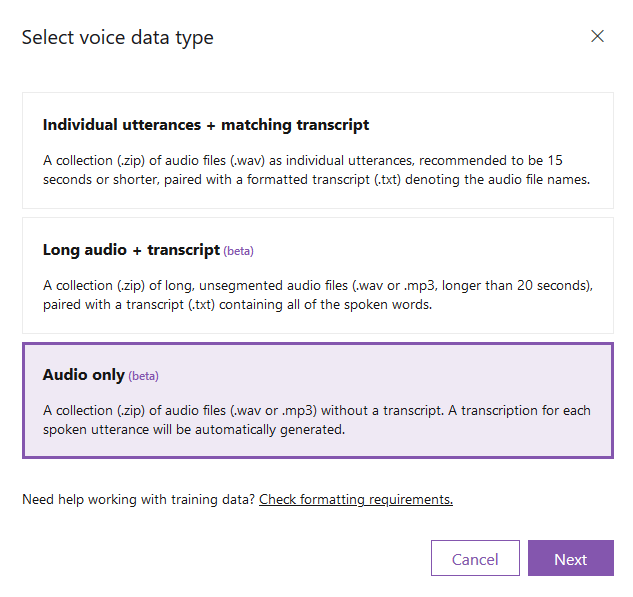
You can find some sample datasets in kaggle and zenodo. However it is preferred to find a relatively big dataset with transcribed text from only one person. Once you find your dataset click on the option that best fits your data and click Next.
Give a name to your new dataset and click Next.
Here you have the option to import a dataset from Azure Blob Storage. If you have your dataset locally, just pick the from local machine option and then click Browse files… to choose which files to upload. Then click Next.

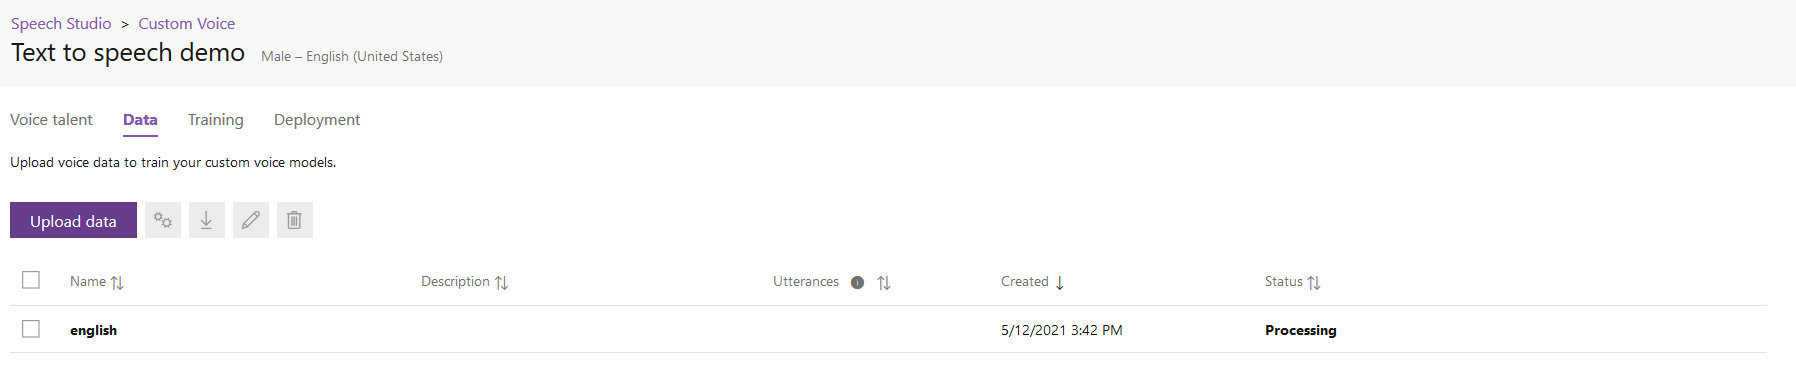
Check the Create a transcription from my voice recordings checkbox and click upload to start uploading your dataset.
Once your dataset is uploads you will begin to see it’s Status as Processing and you might need to wait a few minutes.
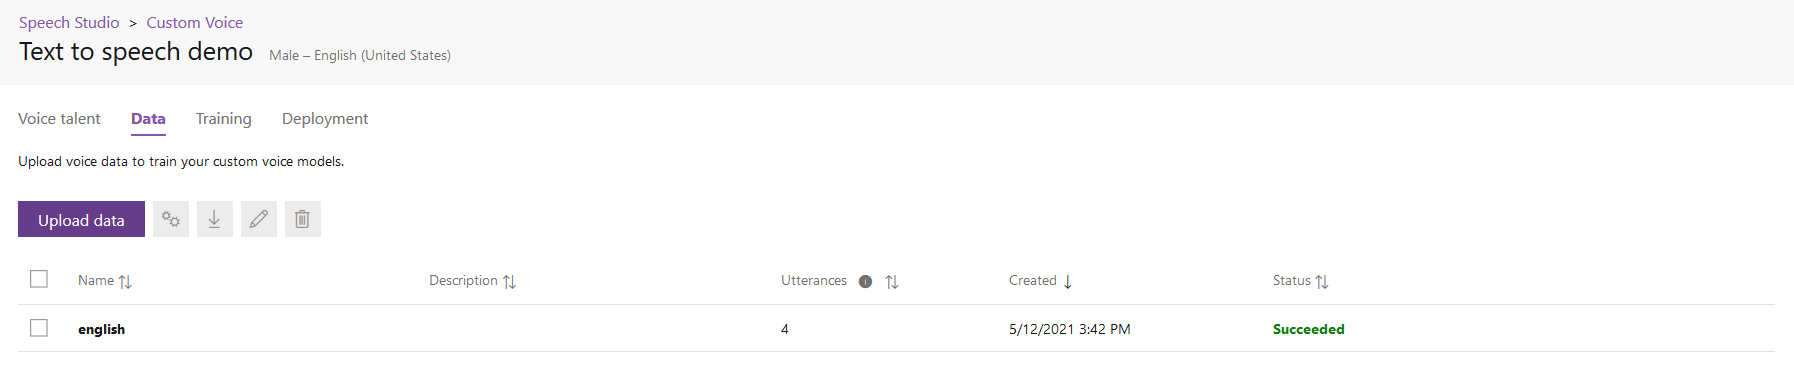
If everything worked out correctly you should see a Succeeded Status for your dataset. After that you are good to go.
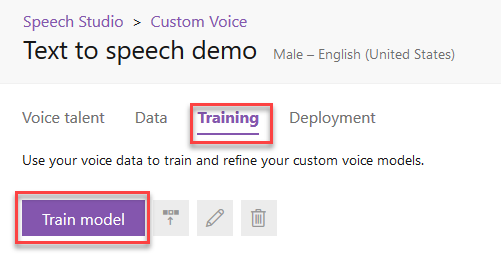
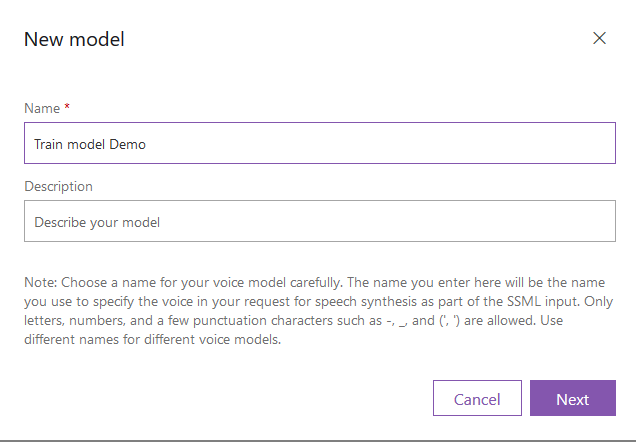
Go to the Training tab and click Train model.
Give a name to your model and click Next.
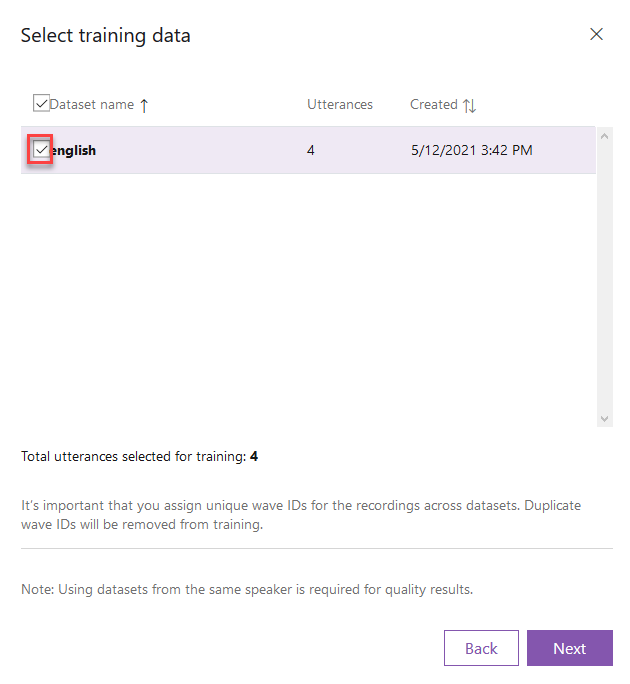
Select your dataset and click Next again.
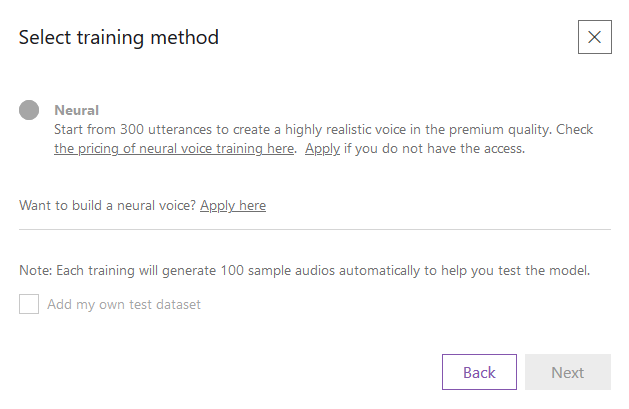
To start the training you will need at least 300 utterances in order to train the model. Once you have enough choose the Neural method and start training. You might also want to take a look at the pricing of neural voice training.
Once you have trained your model, you are now ready to publish it. Go to the Deployment tab and click Deploy model.
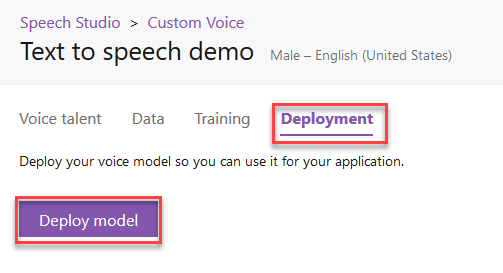
Once your model is deployed you will have an endpoint to your model to utilise for text to speech as a normal Speech resource. You can see how to import it tou your project using this post.
Get familiar with Azure Machine Learning
 May 01, 2021
Azure Machine Learning is an enterprise-grade machine learning service to build and deploy models faster. Learn more about it here.
Create
This post aims to show you how to run your models the easy way using Azure Machine Learning.
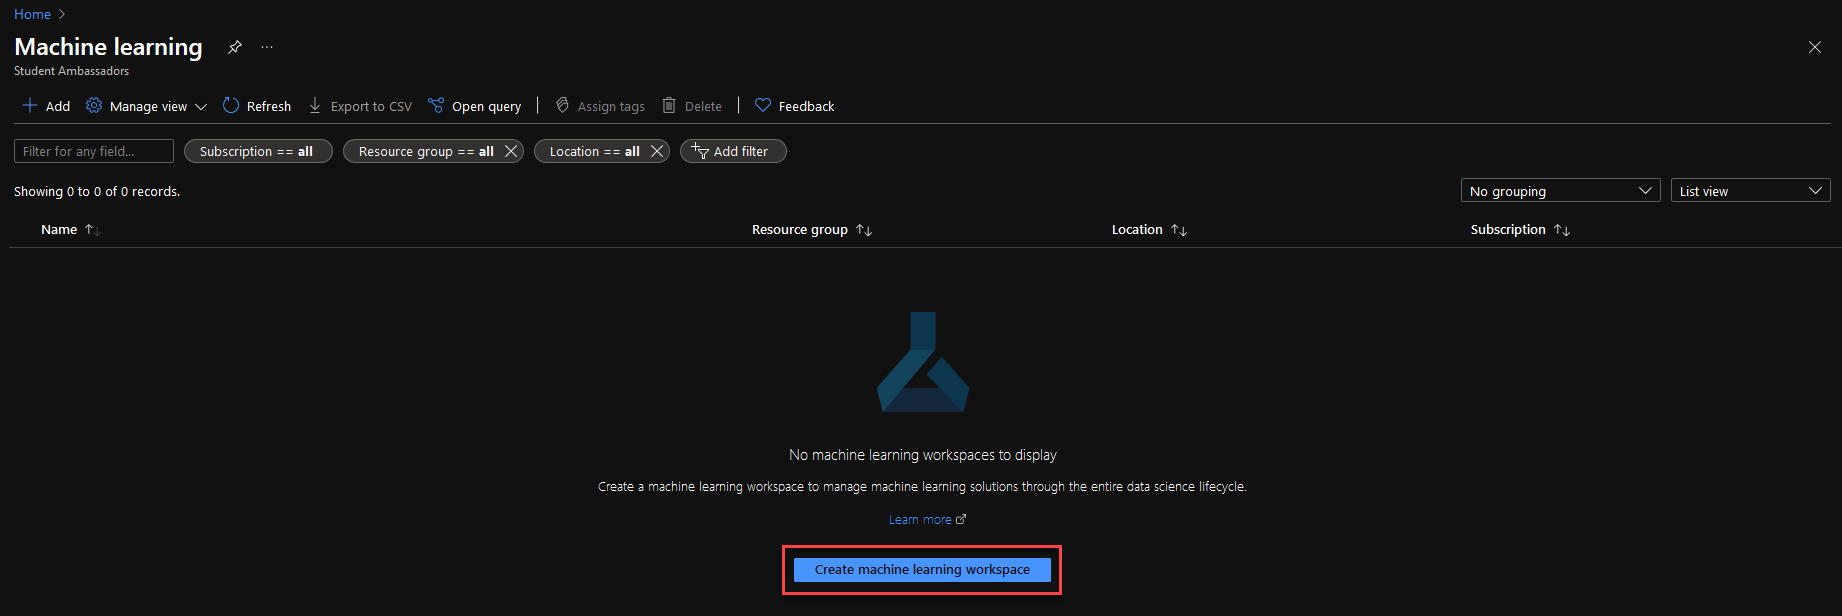
To start, go to the Azure portal, find the Machine Learning resource and click on the Create machine learning workspace button.
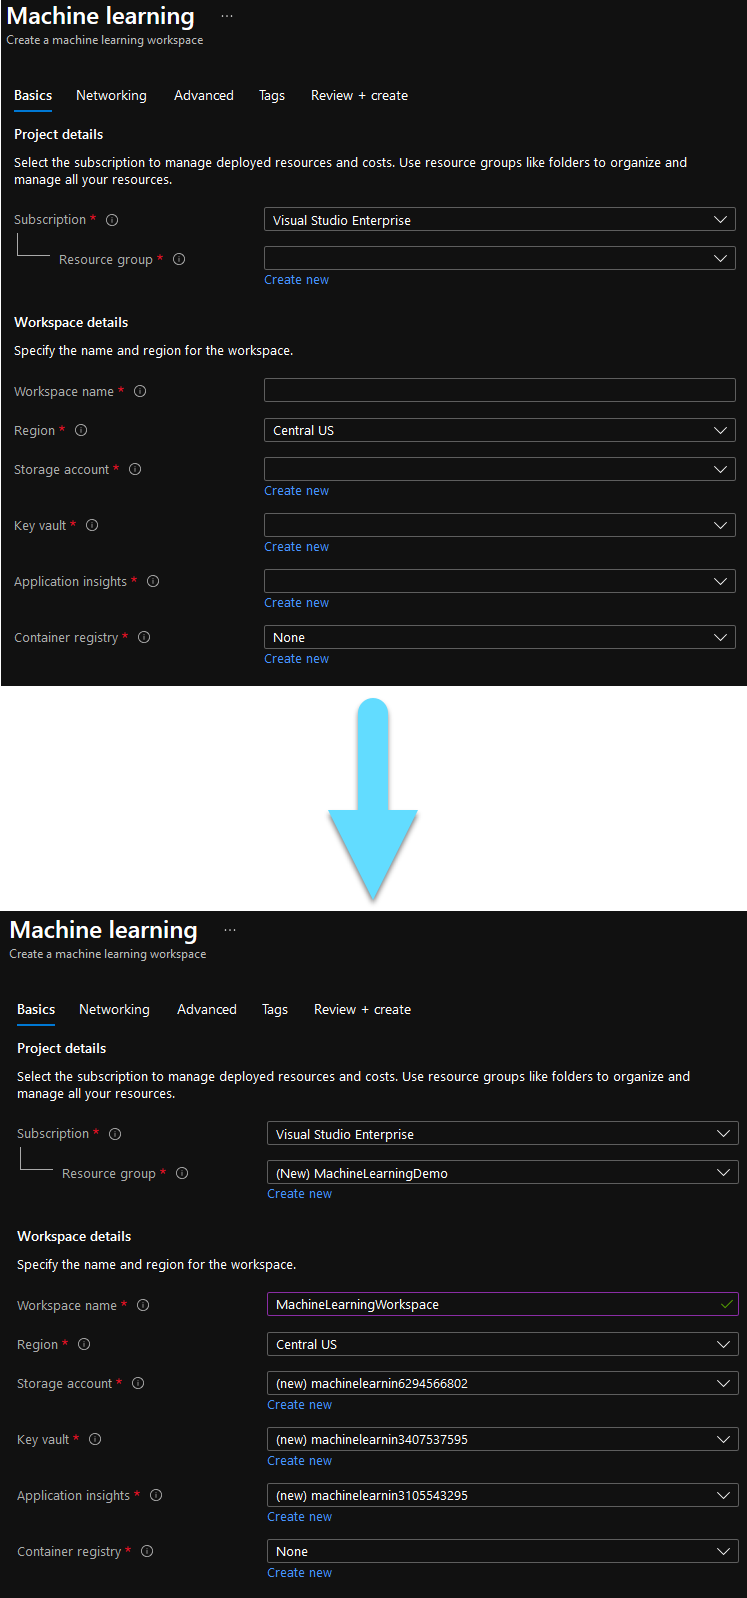
Fill the form. The fields with the ‘*’ are mandatory.
- Subscription should already be filled in with your default subscription.
- For Resource Group, you can use an existing one, or create a new one.
- Workspace Name is the name of your new Workspace.
The rest of the fields should auto-populate.
Then click Create.
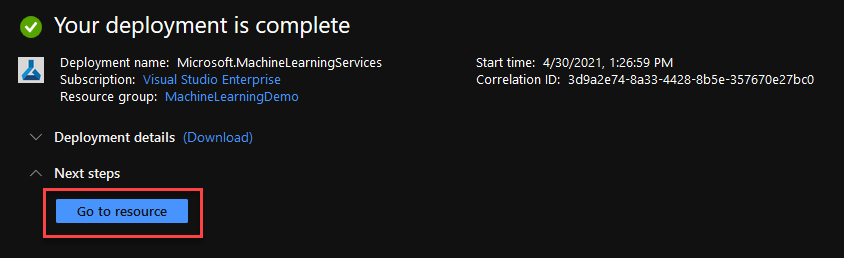
Wait until the deployment is complete and then click Go to your resource.
Now click the Launch studio button to navigate to the Azure Machine Learning Studio.
Import or choose Dataset
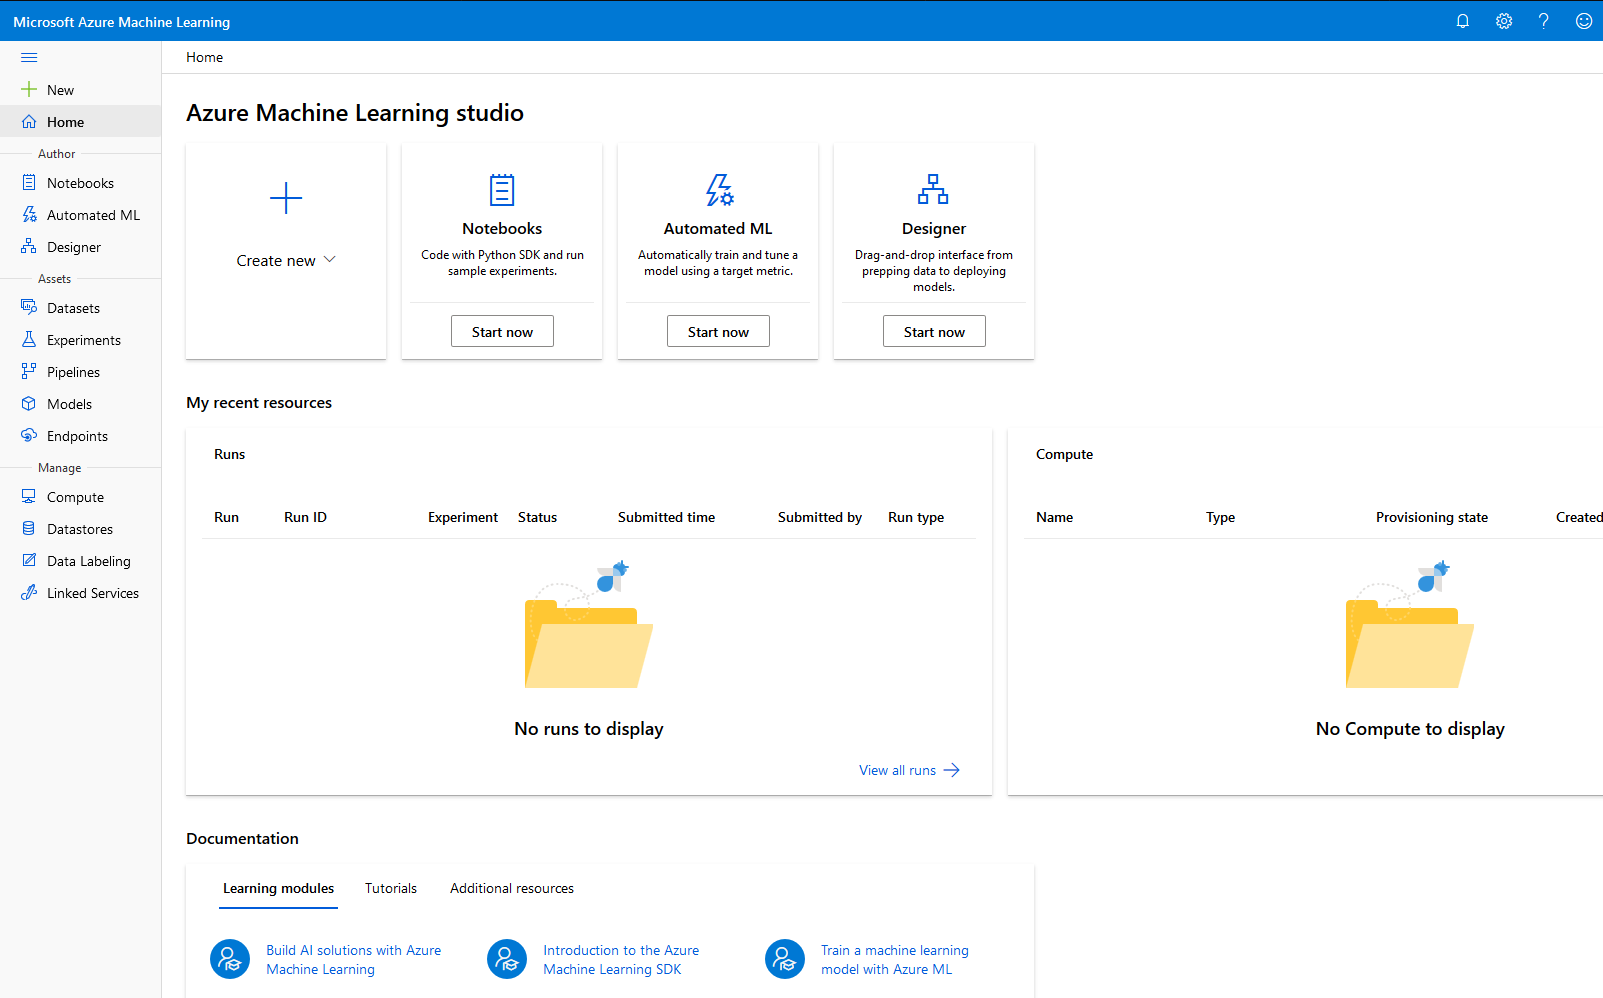
Here you can see the homepage of Azure Machine Learning Studio.
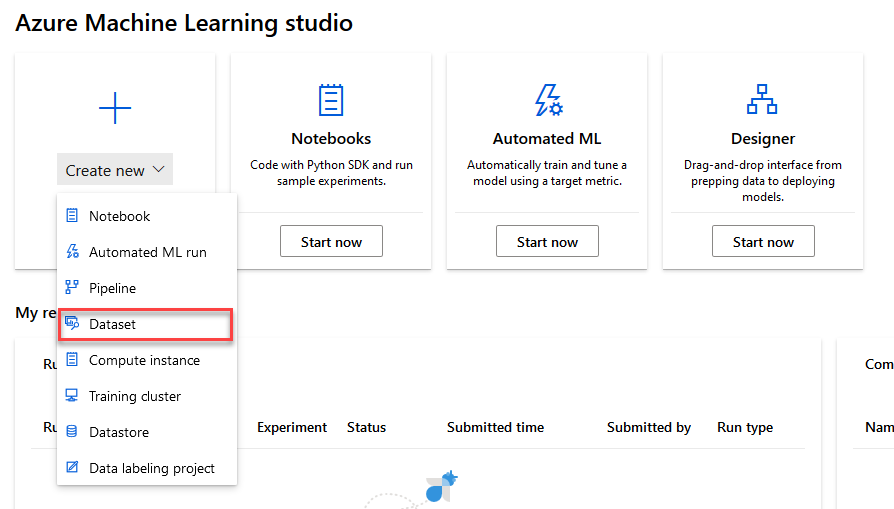
Go to Create new -> Dataset to create or import your dataset.
You can choose one from the open datasets to get familiar with the service, as we will do in this example.
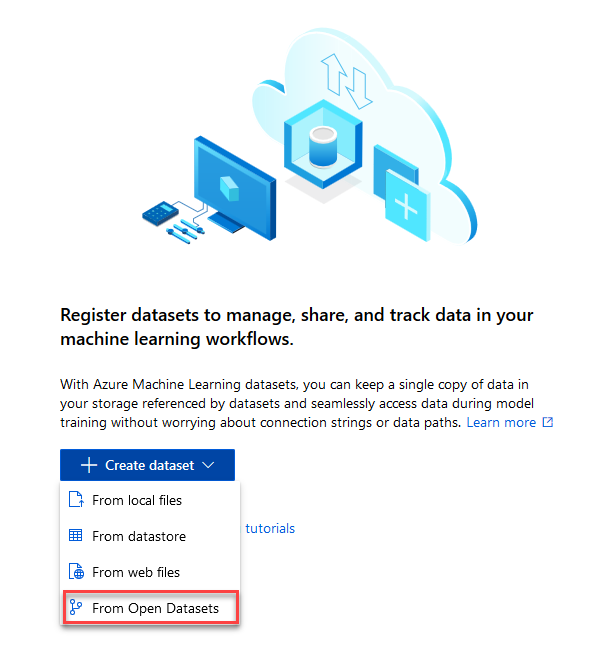
We are going to choose the US National Employment Hours and Earnings for our dataset and the click Next.
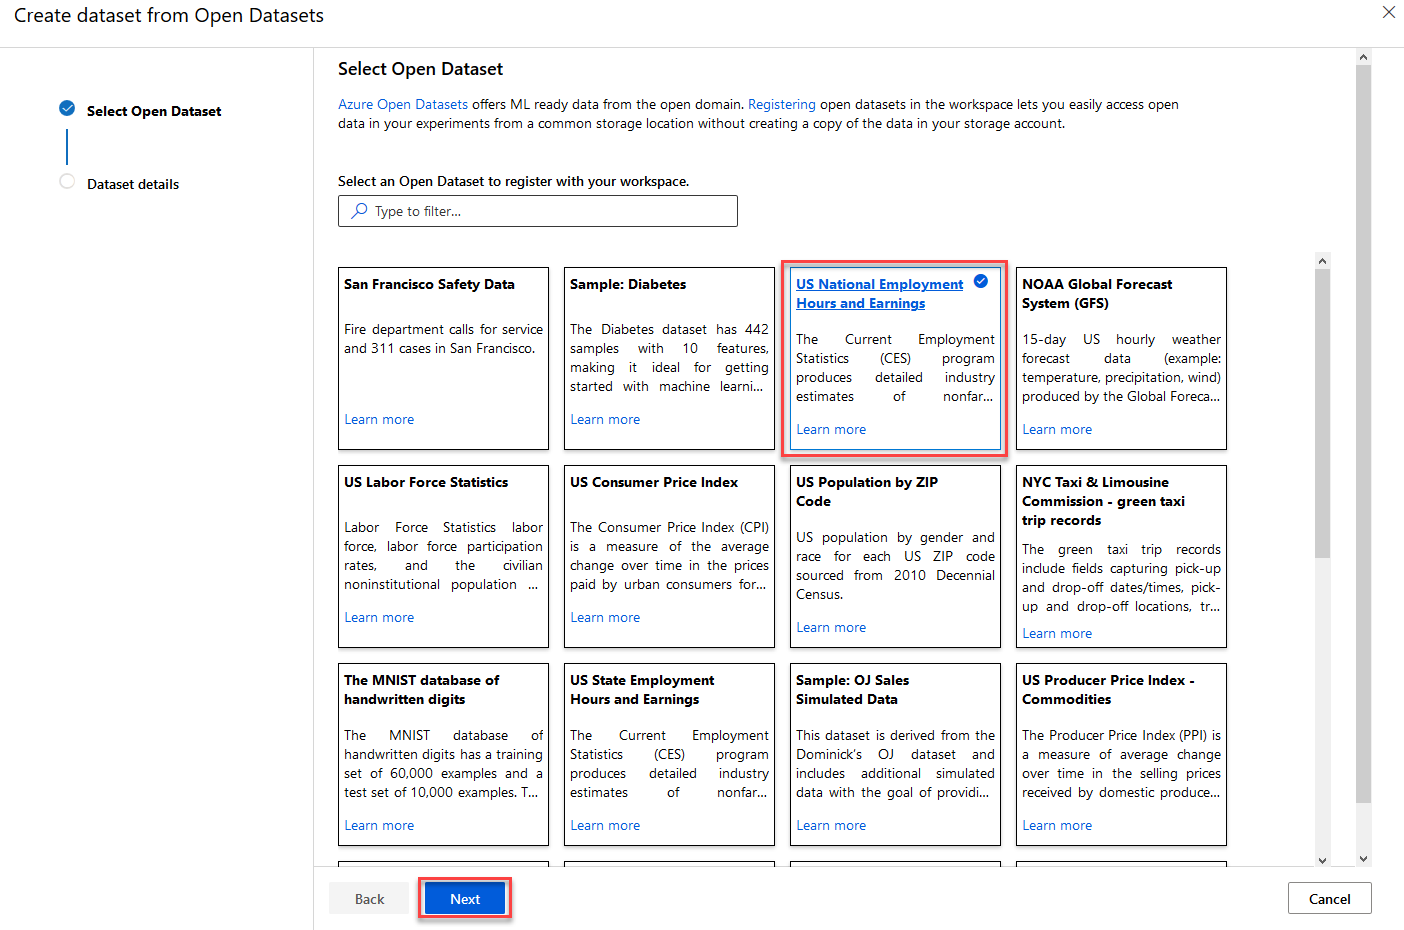
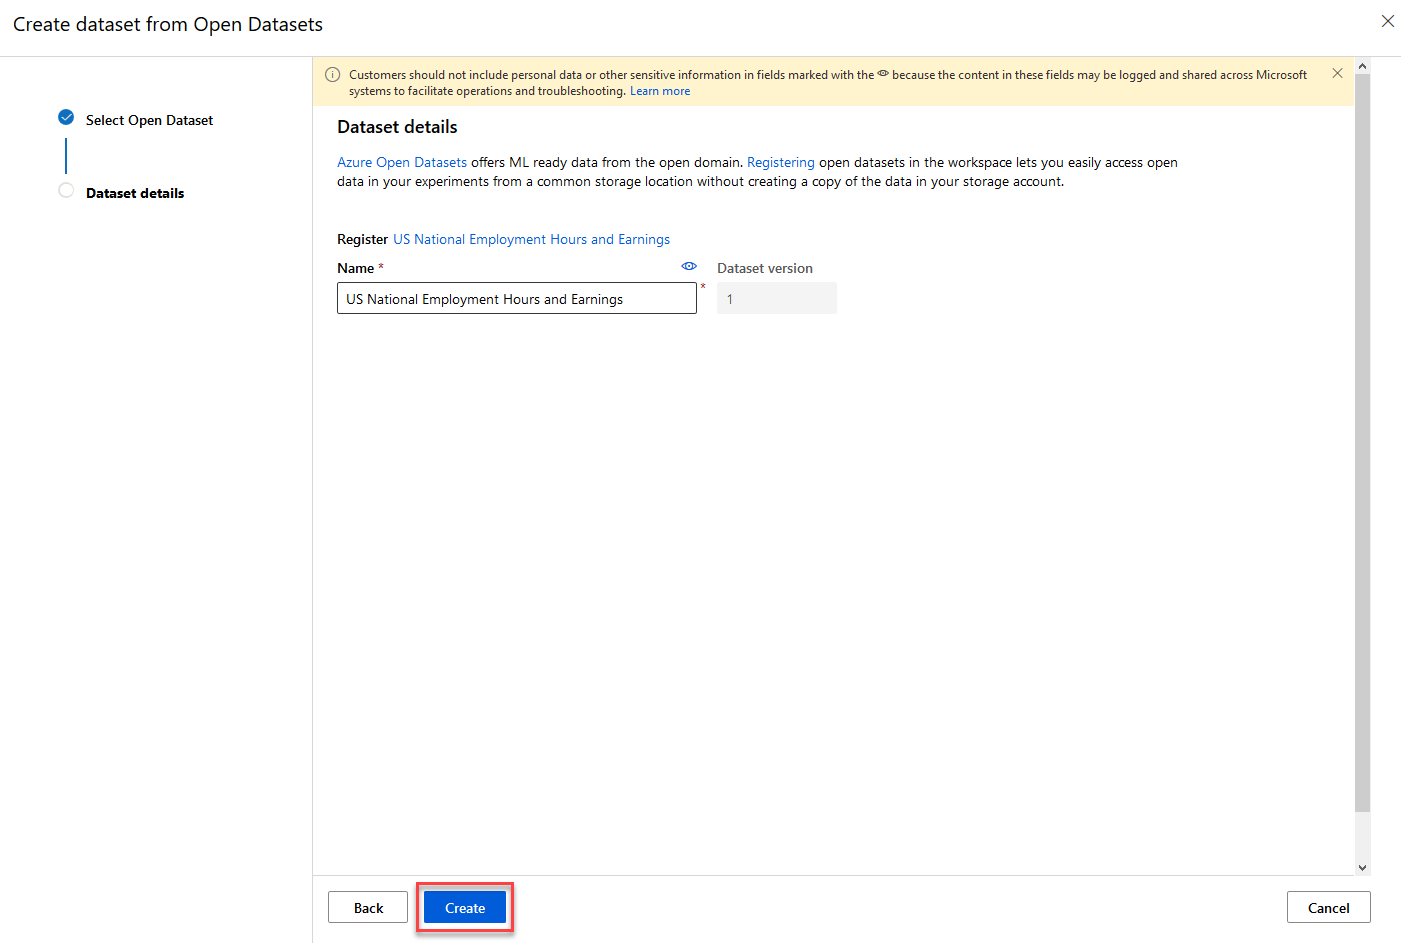
Here you can change the name of your dataset if you like, then click Create.
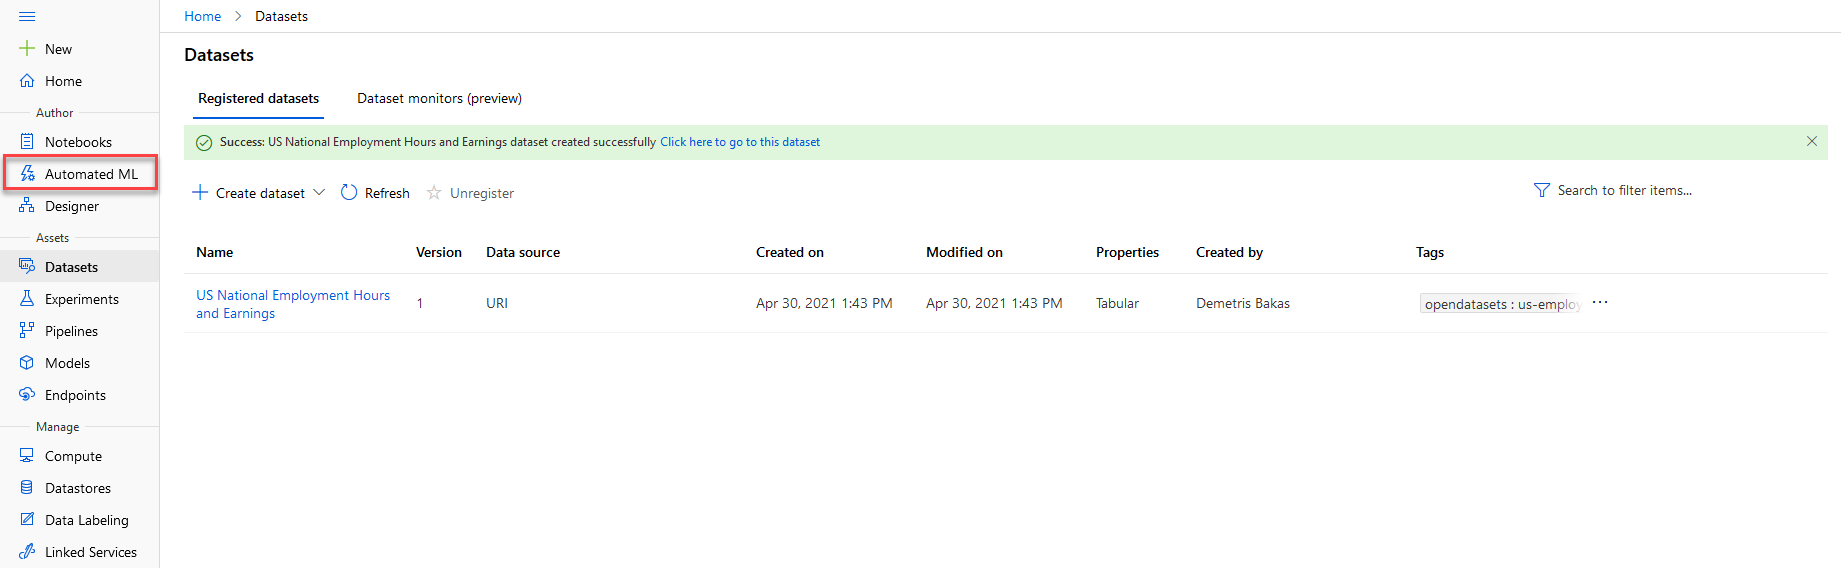
Implement Model
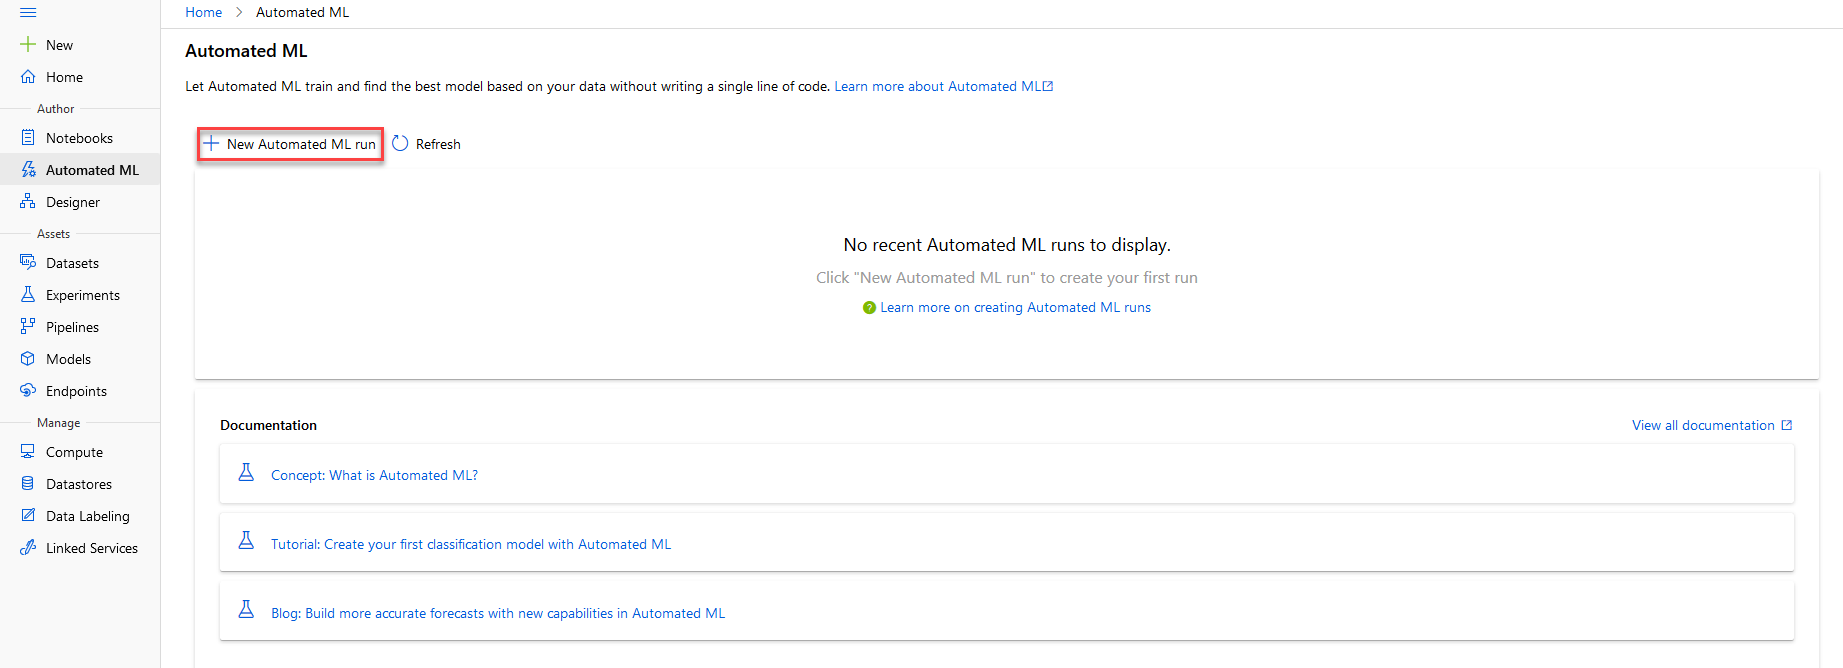
As you can see your new dataset is created. Now navigate to the Automated ML tab on the left to apply a model.
Click on the New Automated ML run button to configure your run.
Select the dataset you would like to use and click Next.
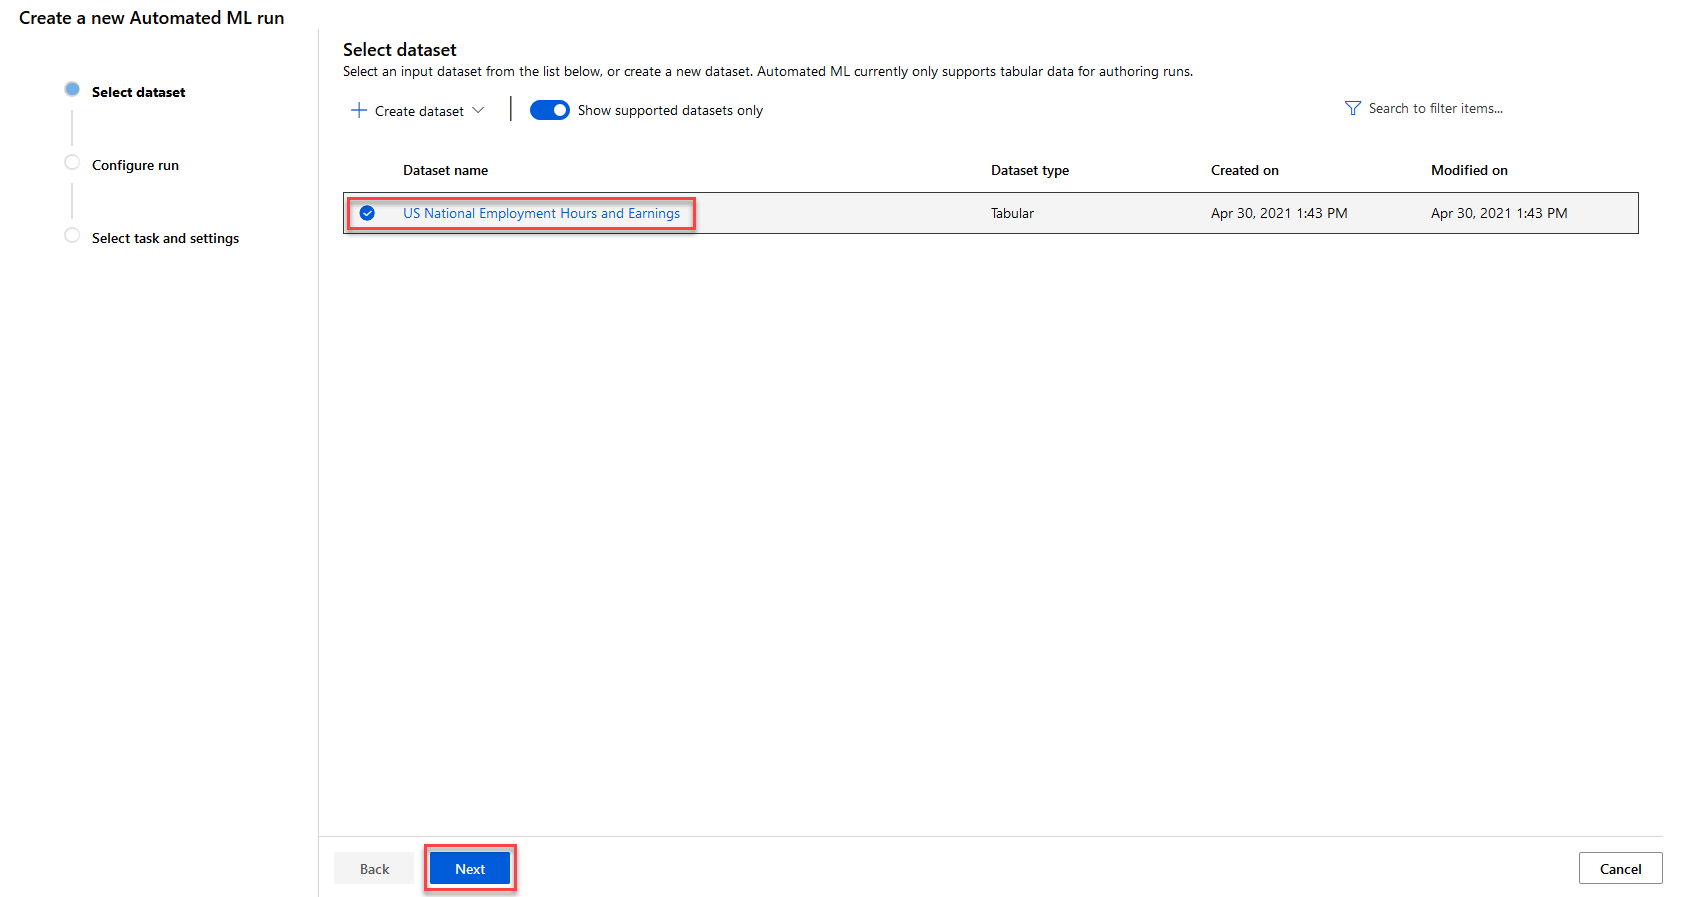
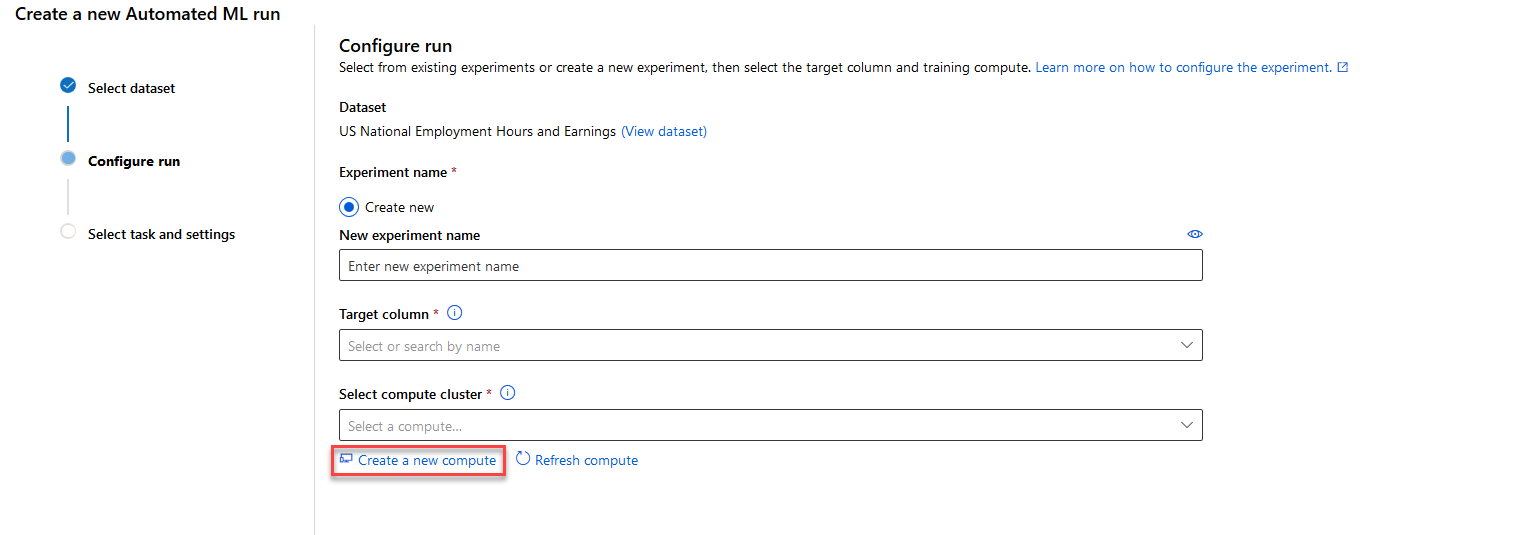
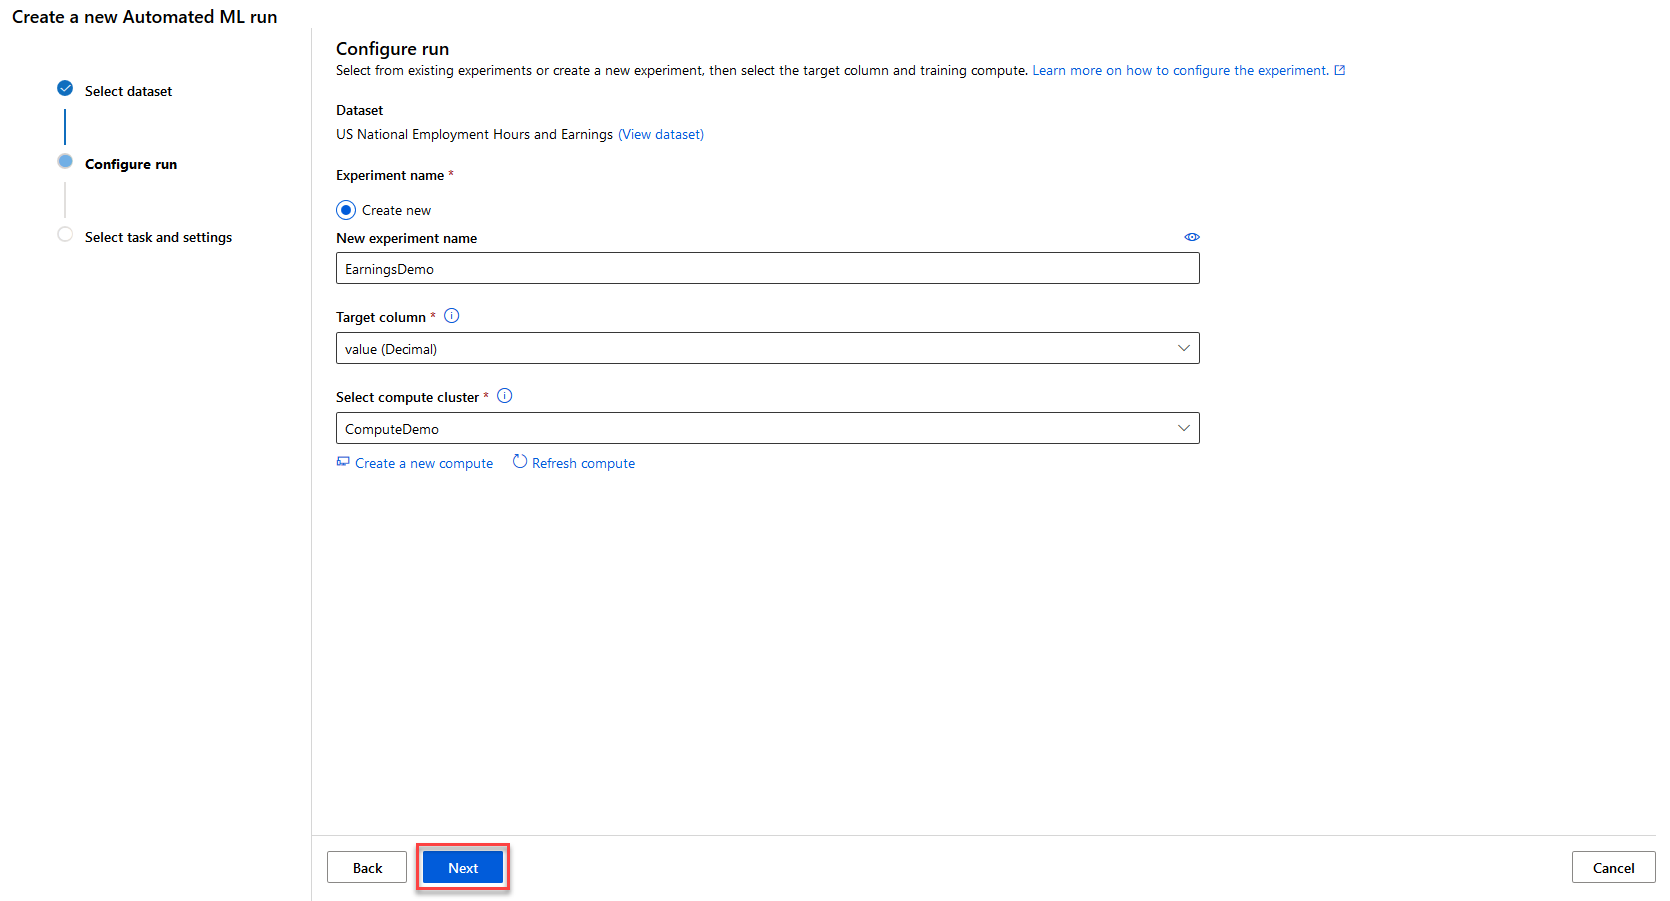
Fill the form. The fields with the ‘*’ are mandatory.
- New experiment name is the name of your experiment.
- Target column is the column you would like your experiment to focus on.
- Select compute cluster is the virtual machine that will run your experiment.
Click on Create a new compute to setup your virtual machine.
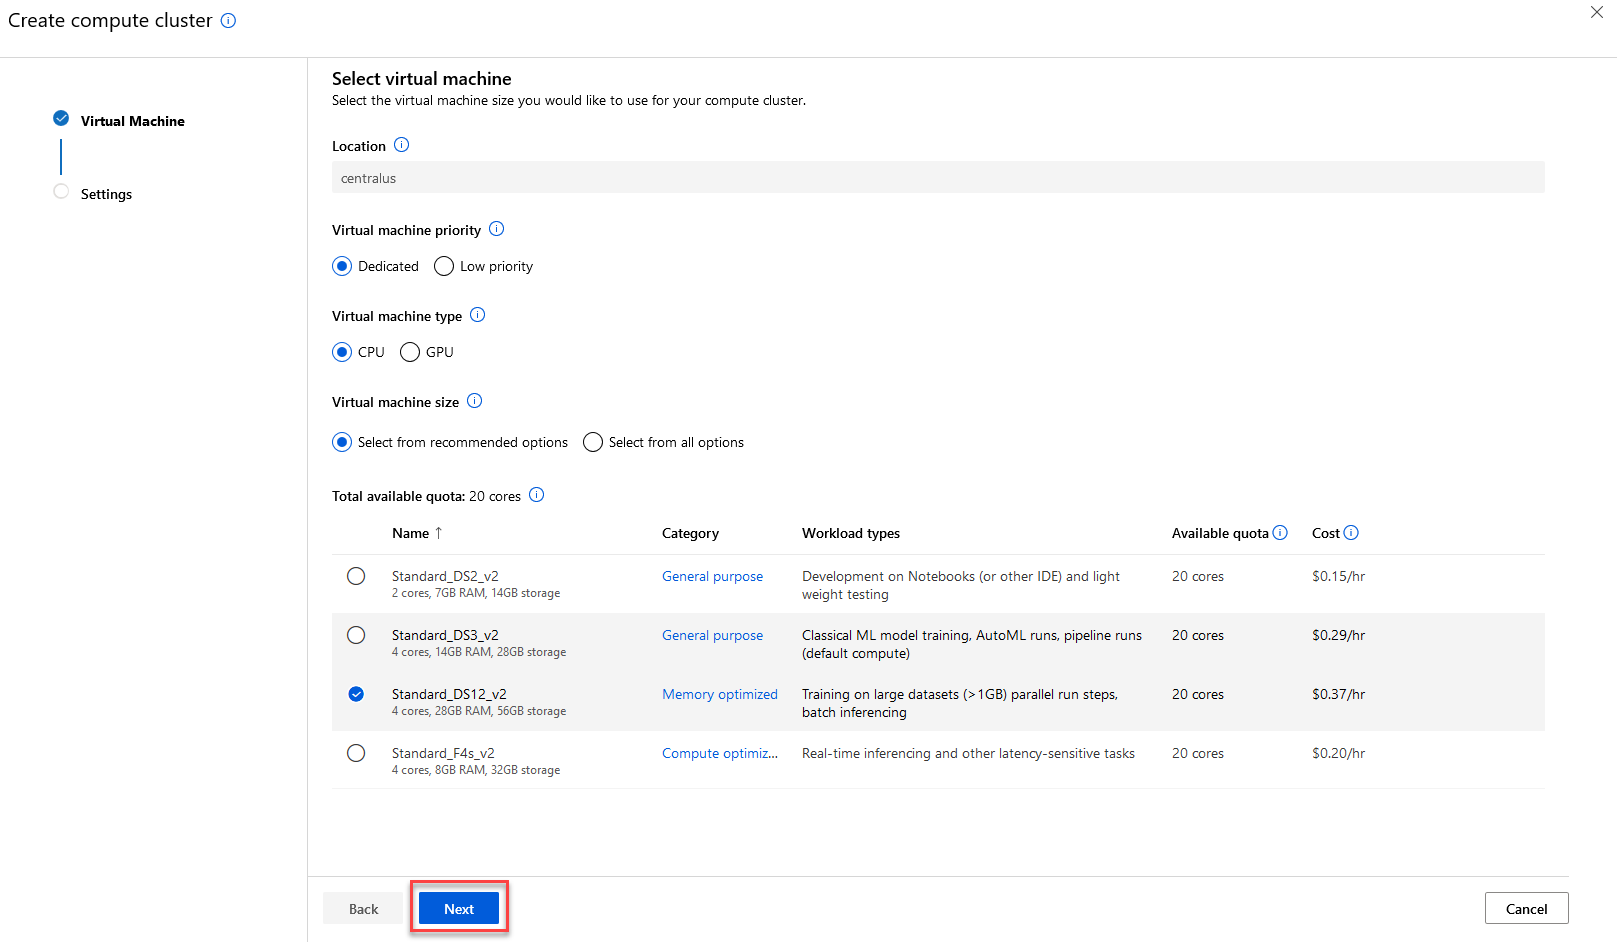
Here you can setup the specifications of your virtual machine. The more powerful your virtual machine is, tha faster your experiment will run.
After completing it, click Next.
Give a name to your virtual machine and setup some more options. It is adviced to have as many number of nodes as possible, for your experiment to run faster.
Then click Create to create your compute module.
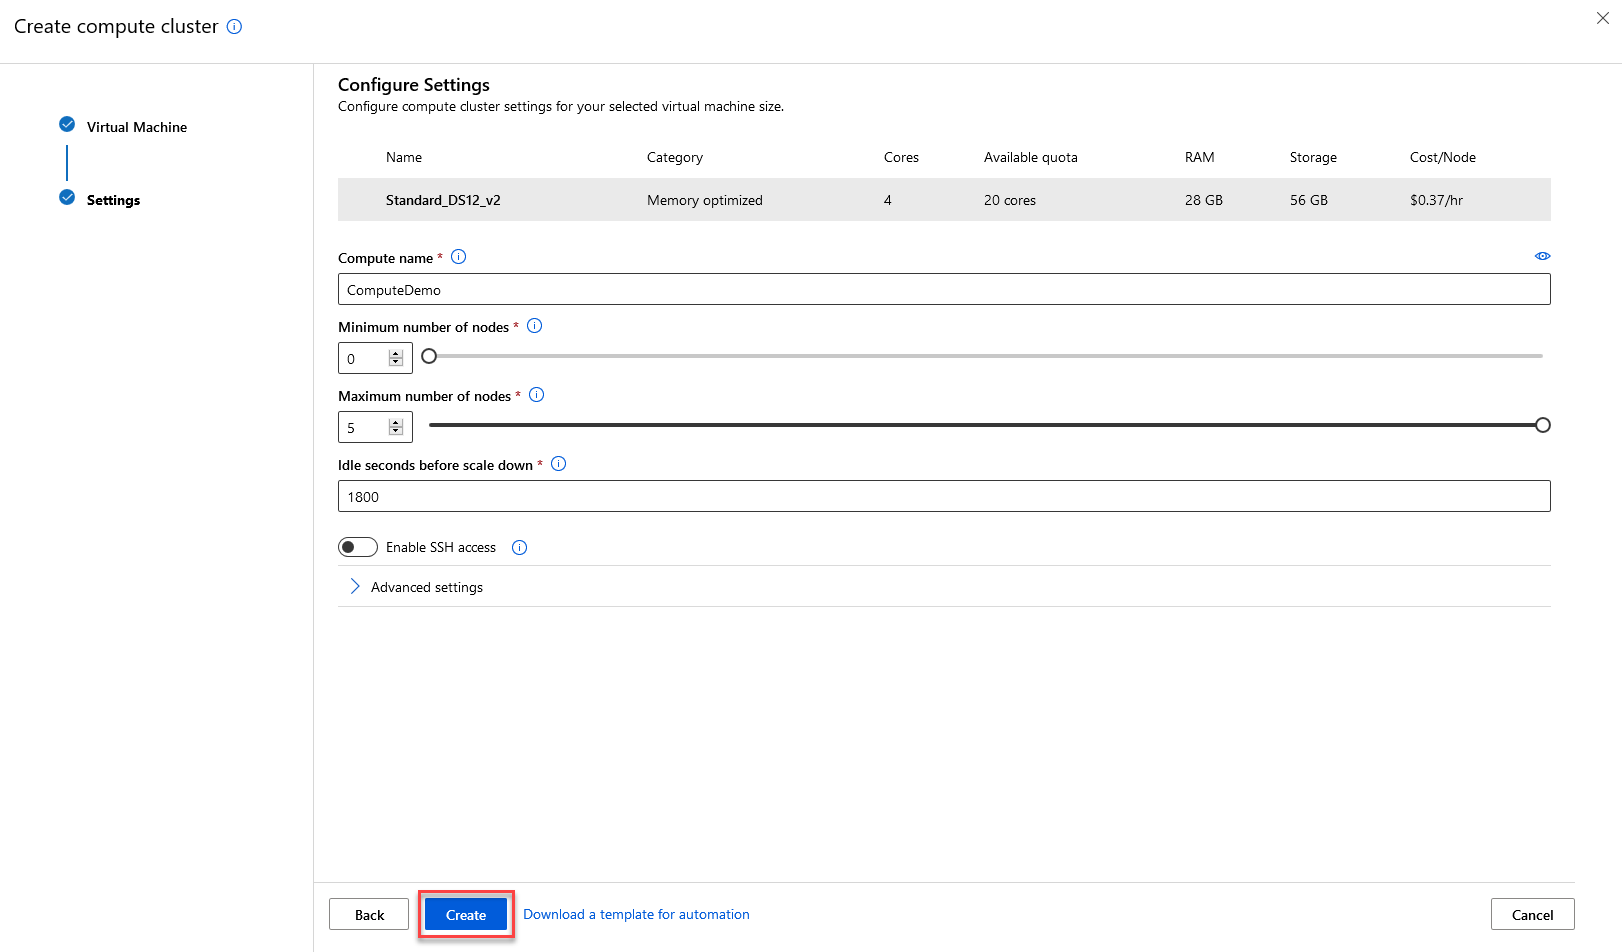
When everything is completed, click Next.
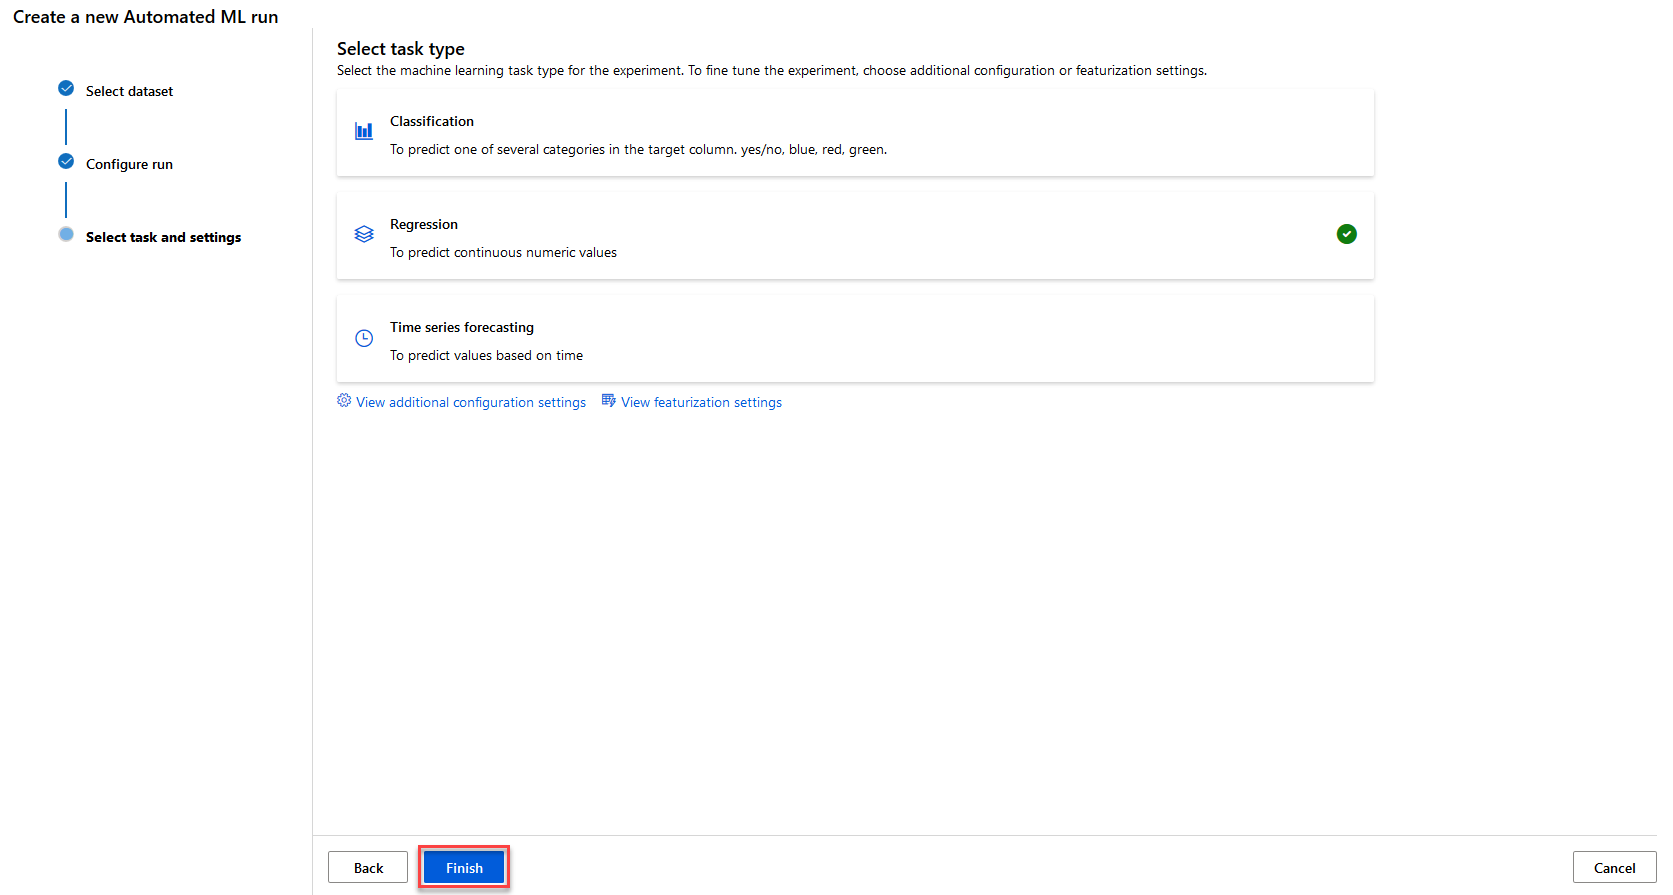
Now choose your model. We are going to choose a standard Regression model for this example, but you can choose watever you like.
After choosing, click Finish.
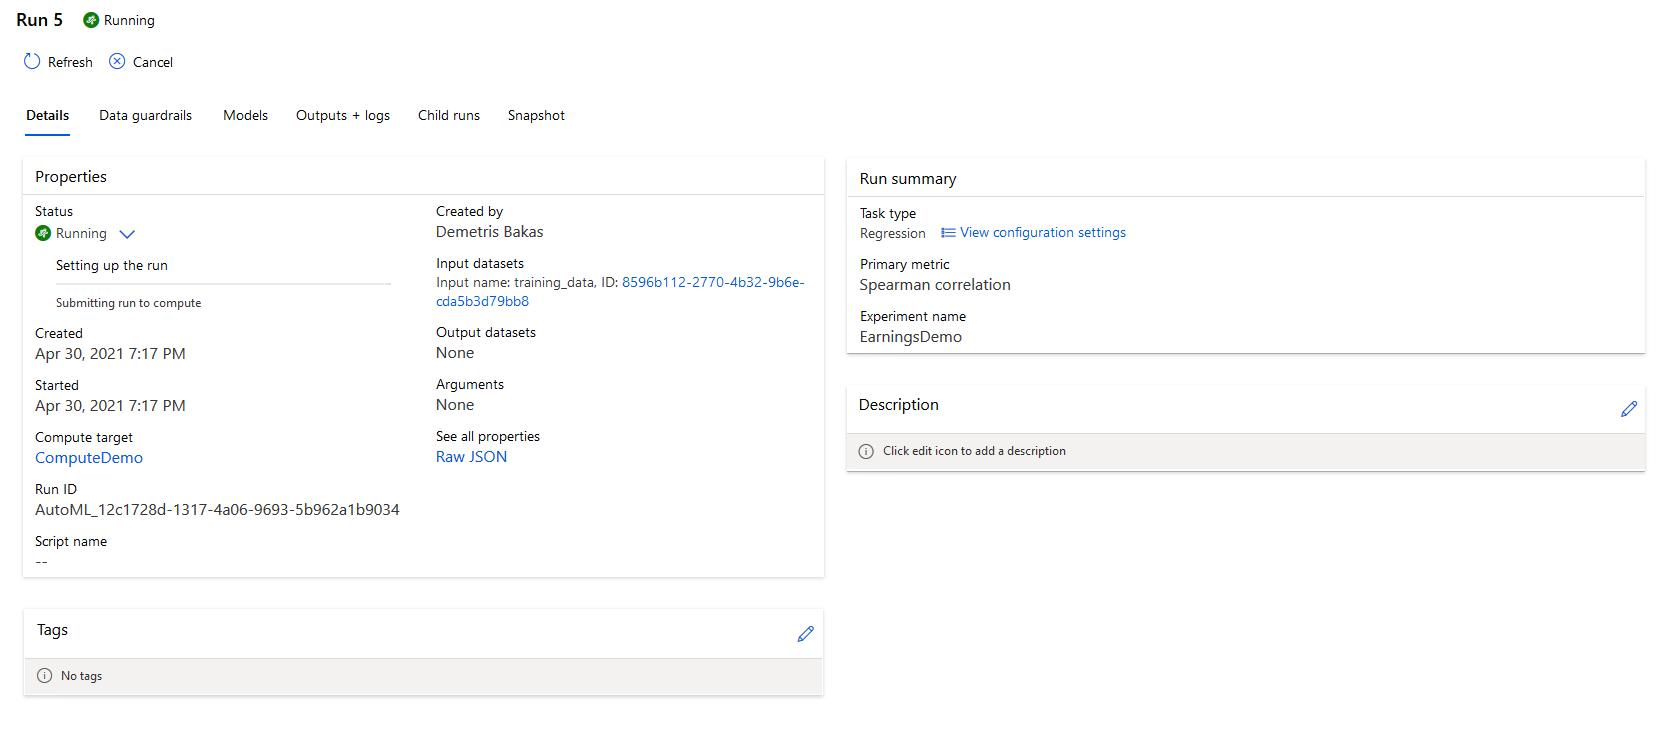
Now your experiment is running. It might take several minutes (or hours) depending of the nature of the experiment and the processing power of your compute module.
And here it is, your run has completed!
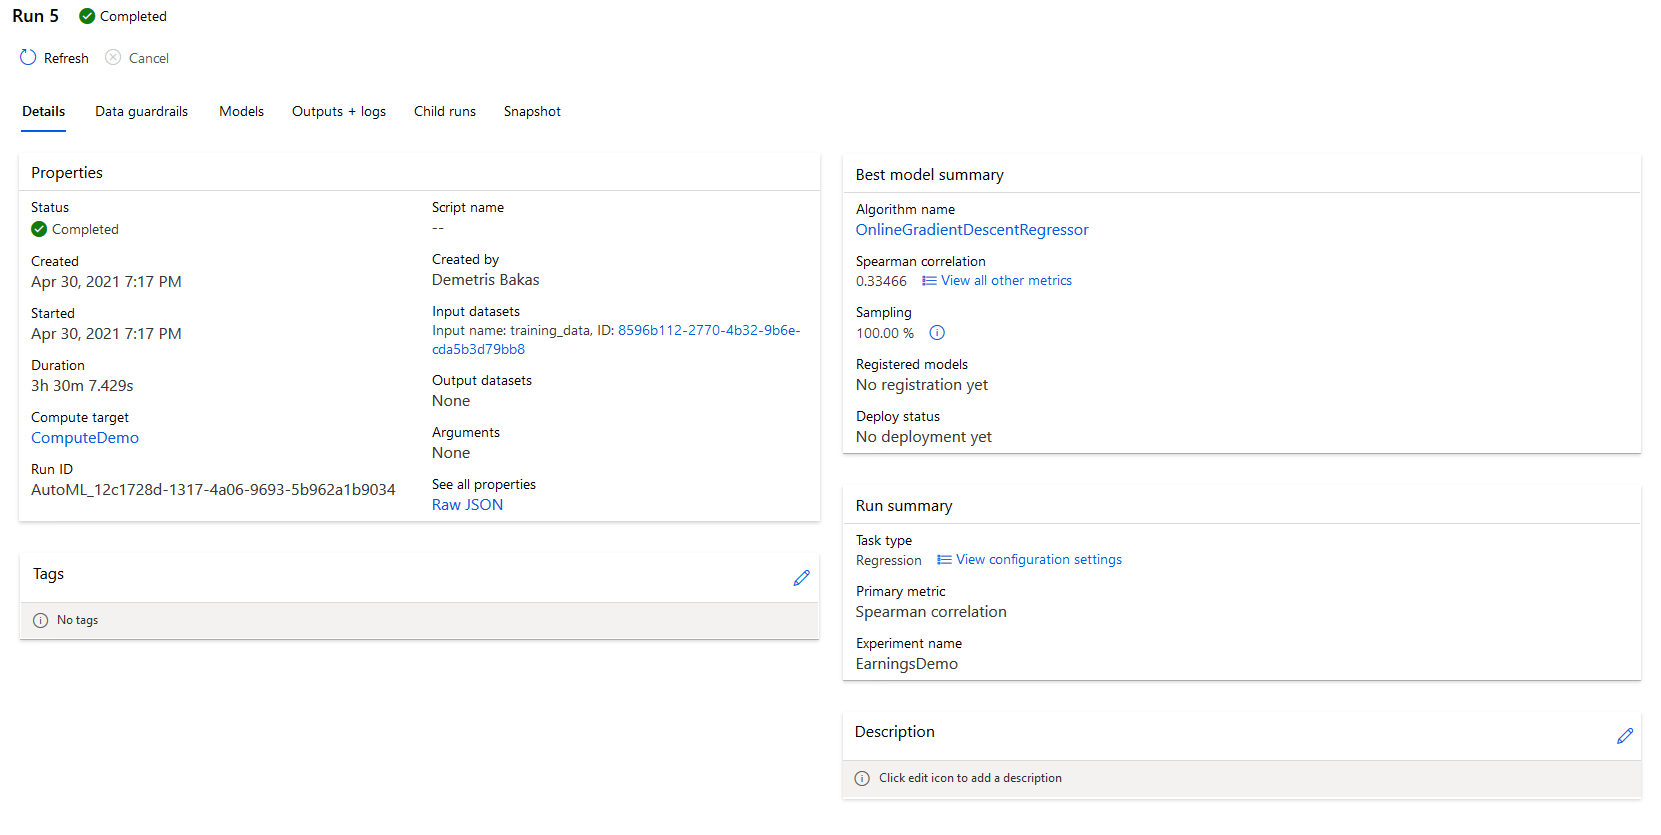
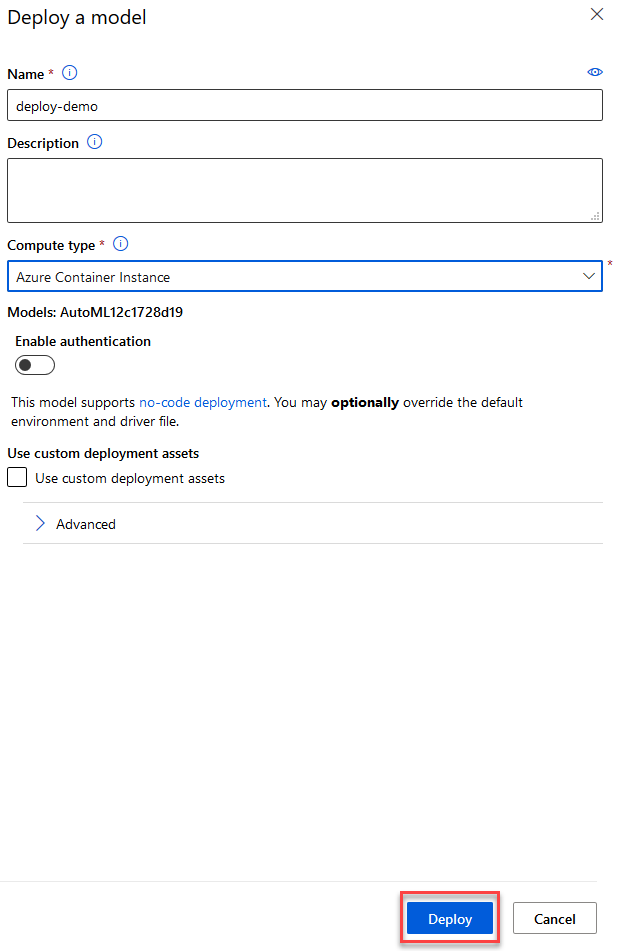
You can deploy your model by going into the Models tab, selecting your model and clicking Deploy.

Give a Name and a Compute Type for your deployment. The Compute Type is the container that your deployment will be running inside.
After that click Deploy.
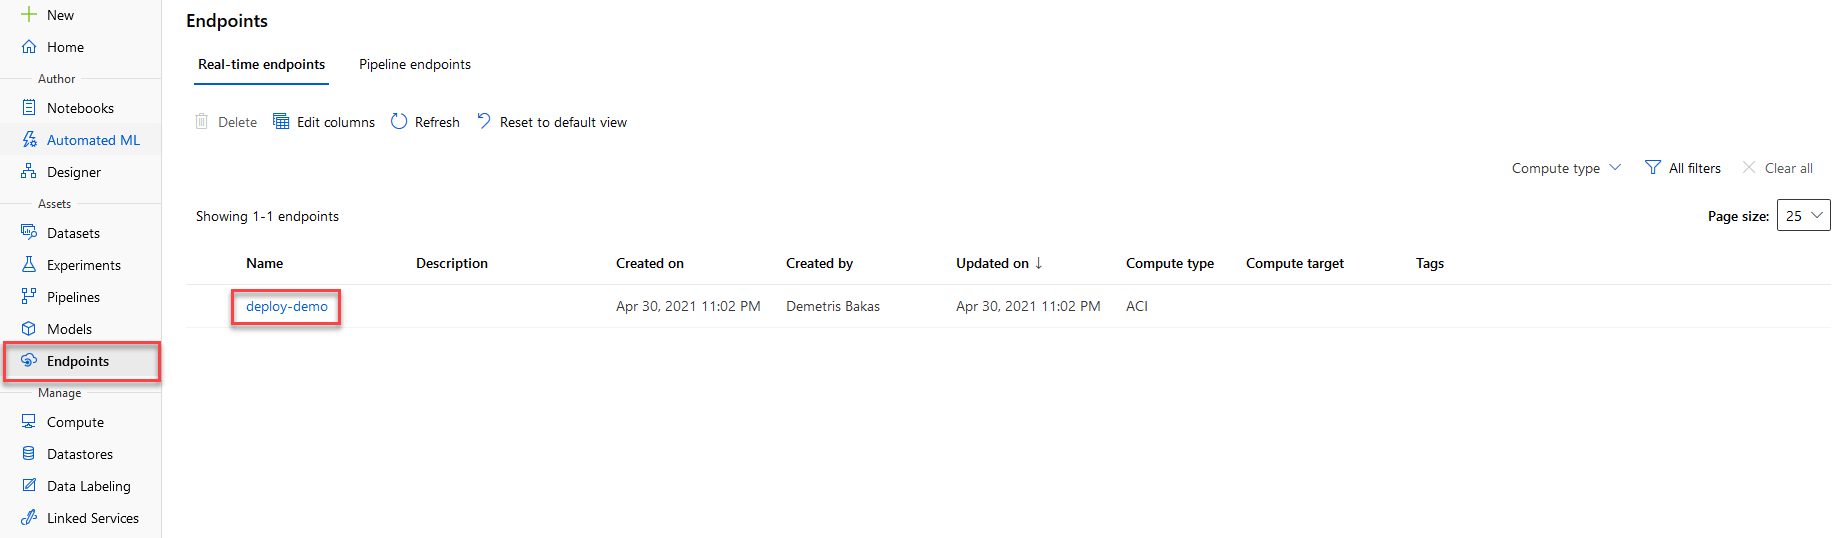
After deploying it, go to the Endpoints tab and you can find the endpoint that you just created there. You can click on it to do a fast test.
Go to the Test tab, input the details you want to test, and click on the Test button.
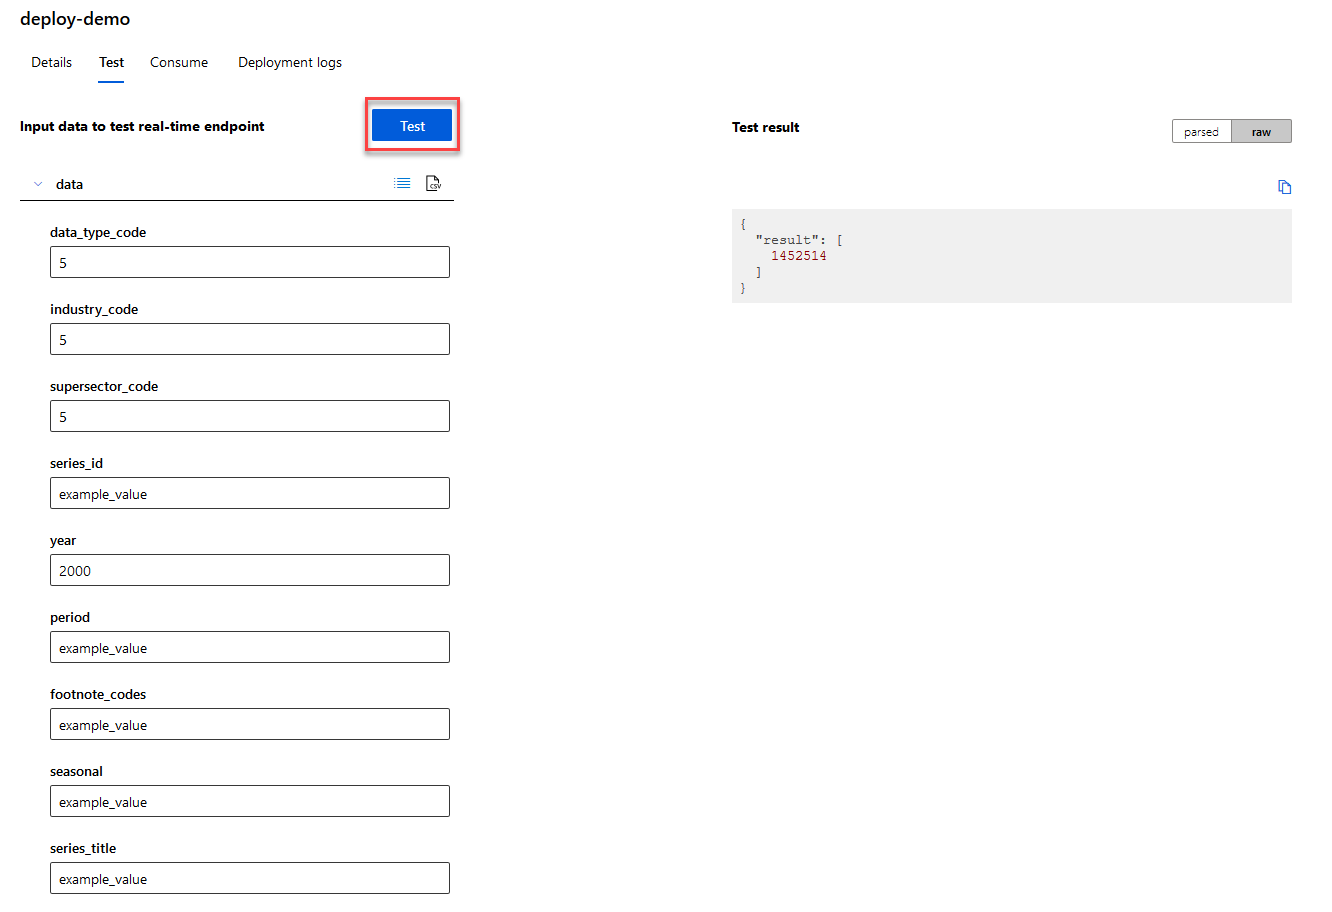
And thats how you train your own model with your data in Azure Machine Learning!
Proactive Messages in ASP.NETCore 3.1.1
 April 19, 2021
Proactive messaging provides your bot the ability to notify the user with messages that can be written and modified by the developer.
Preface
This post serves as an update to an older post I made for proactive messages. It has come to my attention that my older post does not work for newer versions of .NETCore, thus an update is in order.
Create
Let’s get to it!
In this demo we will be using a basic bot created in Azure using Azure Bot Service. To create one you can visit this post.
Open your Visual Studio project and create a new class named NotifyController.cs. This is the controller that handles the proactive messages. In line 42 you can change the message that is presented to the user by the bot. In line 35 you can find the page that gets loaded when you hit the endpoint.
using System.Collections.Concurrent;
using System.Net;
using System.Threading;
using System.Threading.Tasks;
using Microsoft.AspNetCore.Mvc;
using Microsoft.Bot.Builder;
using Microsoft.Bot.Builder.Integration.AspNet.Core;
using Microsoft.Bot.Schema;

namespace Microsoft.BotBuilderSamples.Dialogs
{
    [Route("api/notify")]
    [ApiController]
    public class NotifyController : ControllerBase
    {
        private IBotFrameworkHttpAdapter _externAdapter;
        private ConcurrentDictionary<string, ConversationReference> _userReference;
        public NotifyController(IBotFrameworkHttpAdapter adapter, ConcurrentDictionary<string, ConversationReference> conReferences)
        {
            _externAdapter = adapter;
            _userReference = conReferences;
        }

        public async Task<IActionResult> Get()
        {
            foreach (var conversationReference in _userReference.Values)
            {
                await ((BotAdapter)_externAdapter).ContinueConversationAsync(string.Empty, conversationReference,
                    ExternalCallback, default(CancellationToken));
            }

            var result = new ContentResult();
            result.StatusCode = (int)HttpStatusCode.OK;
            result.ContentType = "text/html";
            result.Content = "<html>Proactive messages have been sent.</html>";

            return result;
        }

        private async Task ExternalCallback(ITurnContext turnContext, CancellationToken cancellationToken)
        {
            await turnContext.SendActivityAsync(MessageFactory.Text("This is a proactive message!"), cancellationToken);
        }
    }
}
Implement
Open the Startup.cs class and add the following using statements.
      using System.Collections.Concurrent;
      using Microsoft.Bot.Schema;
In the ConfigureServices function add the following service.
services.AddSingleton<ConcurrentDictionary<string, ConversationReference>>();
Open the DialogBot.cs and add the following using statement.
using System.Collections.Concurrent;
Add the ConcurrentDictionary
private ConcurrentDictionary<string, ConversationReference> _userConversationReferences;
Change the constructor by adding the ConcurrentDictionary in line 1 and line 7.
public DialogBot(ConversationState conversationState, UserState userState, T dialog, ILogger<DialogBot<T>> logger, ConcurrentDictionary<string, ConversationReference> userConversationReferences)
{
    ConversationState = conversationState;
    UserState = userState;
    Dialog = dialog;
    Logger = logger;
    _userConversationReferences = userConversationReferences;
}
Add this function at the end of the class.
protected override Task OnConversationUpdateActivityAsync(ITurnContext<IConversationUpdateActivity> turnContext, CancellationToken cancellationToken)
{
    if (turnContext.Activity is Activity activity)
    {
        var conReference = activity.GetConversationReference();

        _userConversationReferences.AddOrUpdate(conReference.User.Id, conReference,
            (key, newValue) => conReference);
    }

    return base.OnConversationUpdateActivityAsync(turnContext, cancellationToken);
}
Lastly, open the DialogAndWelcomeBot.cs class and add the following using statement.
using System.Collections.Concurrent;
And add the ConcurrentDictionary constructor method in lines 1-2.
public DialogAndWelcomeBot(ConversationState conversationState, UserState userState, T dialog, ILogger<DialogBot<T>> logger, ConcurrentDictionary<string, ConversationReference> userConversationReferences)
    : base(conversationState, userState, dialog, logger, userConversationReferences)
{
}
Test
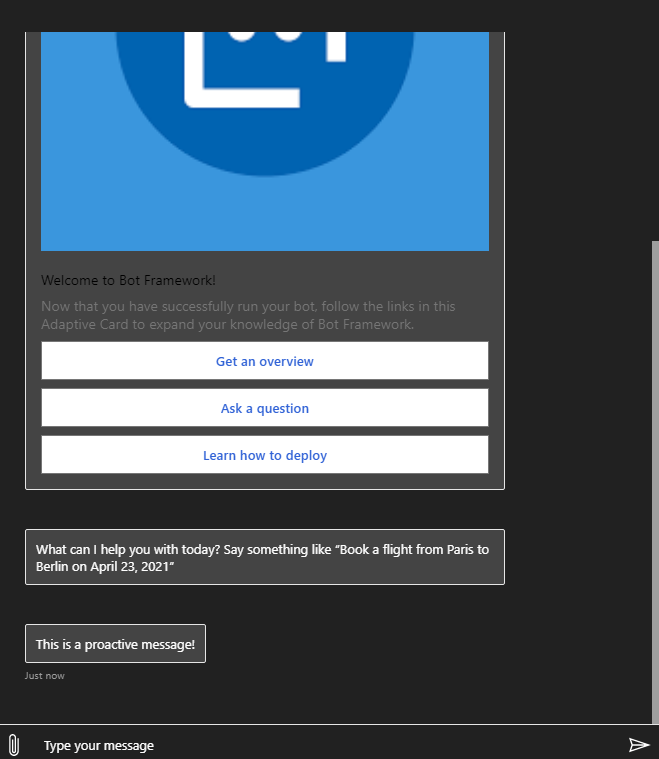
To test, simply run your bot and load up the emulator like normally, you should get the following messages.
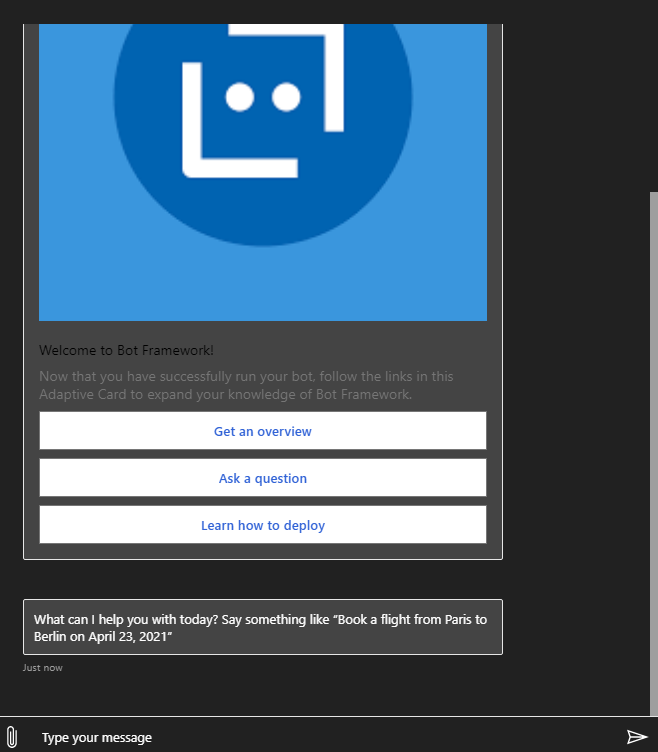
Now to trigger the proactive message click the following link: http://localhost:3978/api/notify
You should see this page in your browser informing you that the Proactive messages have been sent.

Now you should see the new message in your emulator!
This is how you implement proactive messages to your bot to notify the user in ASP.NETCore 3.1.1!
Get familiar with Azure Machine Learning Studio (classic)
 April 09, 2021
Azure Machine Learning Studio (classic) is a drag & drop tool that you can use to build, test, and deploy machine learning models. It publishes models as web services, which can easily be consumed by custom apps or BI tools such as Excel. ML Studio (classic) is a standalone service that only offers a visual experience. It does not interoperate with Azure Machine Learning.
Azure Machine Learning is a separate, and modernized, service that delivers a complete data science platform. It supports both code-first and low-code experiences. It is not covered in this post, but it will be covered in the future.
Create
Ths scope of this post is to create a sample experiment in order to get familiar with the environment of Azure Machine Learning Studio (classic) and how it functions.
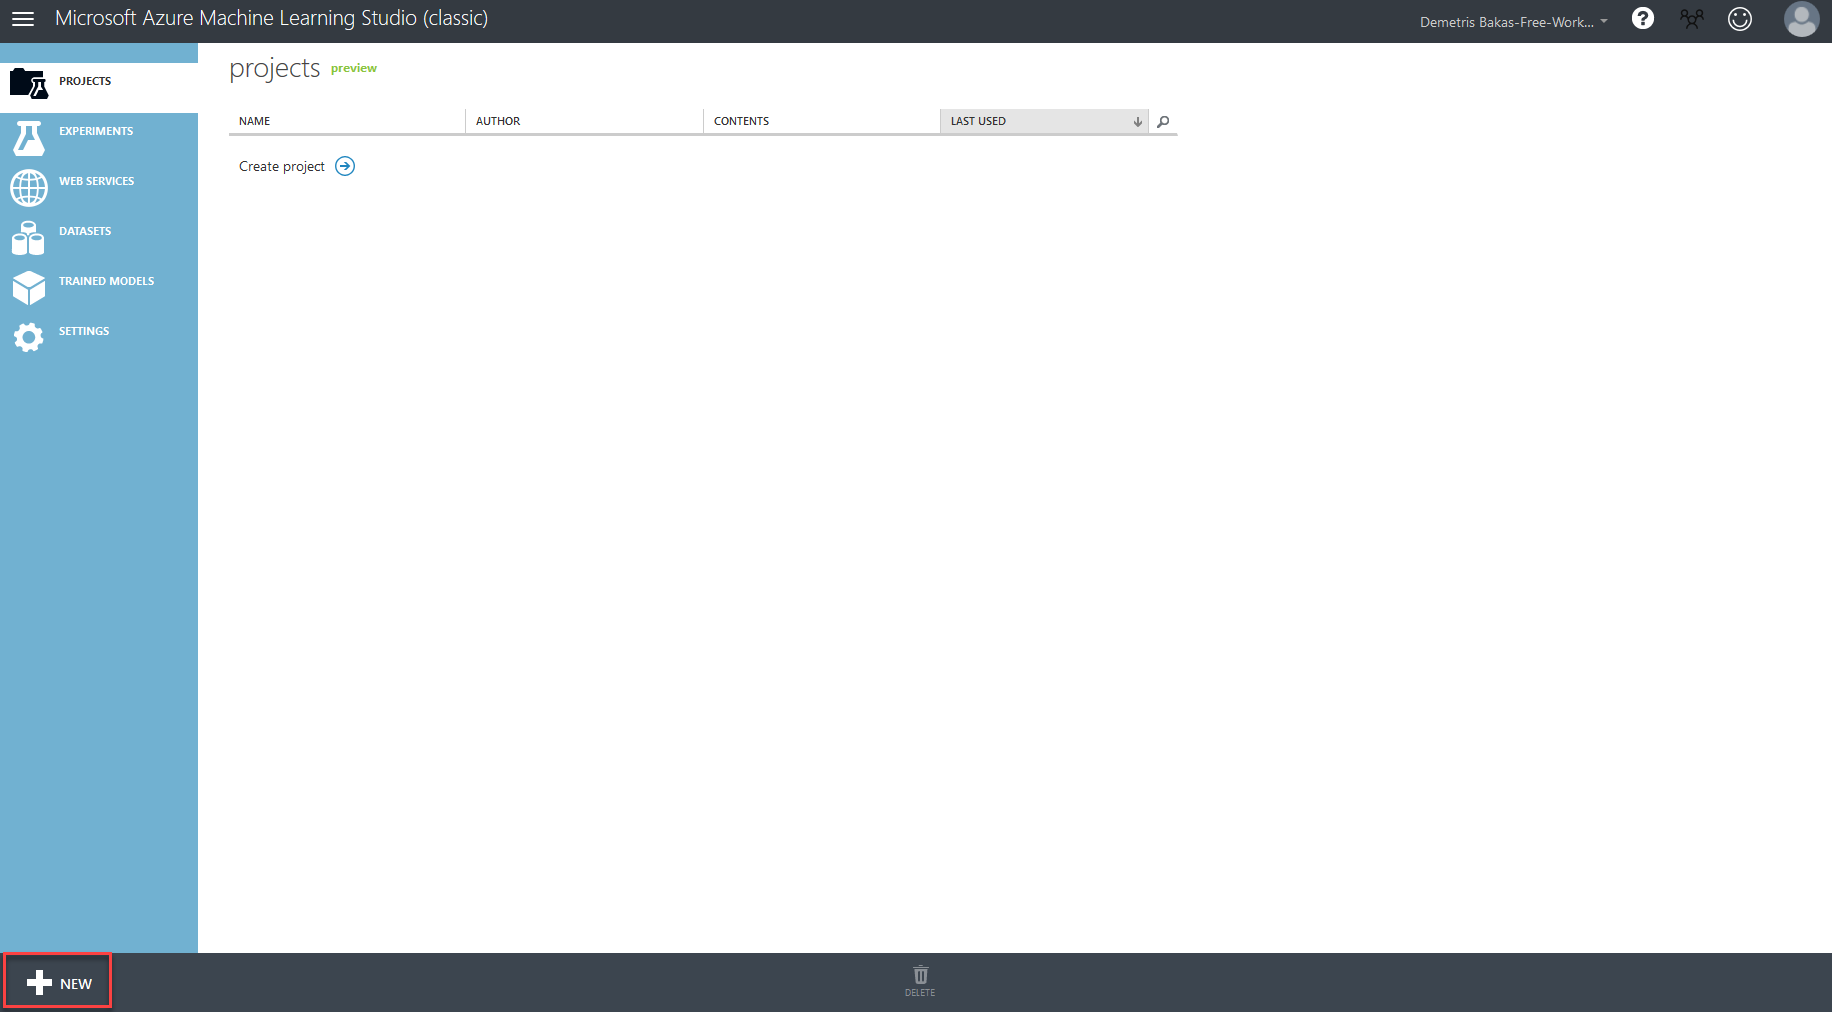
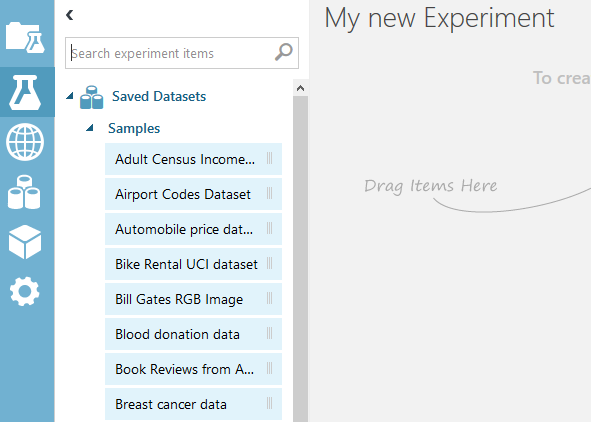
To begin, visit https://studio.azureml.net/ and log in, or create a free account. Then click NEW at the bottom left of your screen.
Navigate to the EXPERIMENT tab and click Blank Experiment. You can also try out the Experiment Tutorial which will show you the steps as well.
Input Dataset
You can use a sample dataset from Saved Datasets -> Samples from the sidebar. We will be using the Adult Census Income Binary for this example. You can also change the name of your experiment if you like.
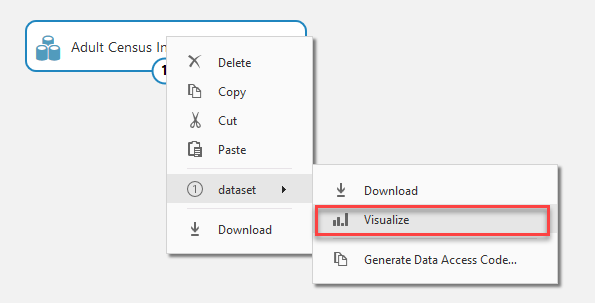
If you want to take a better look at your dataset you can right click on it and go to dataset -> Visualize.
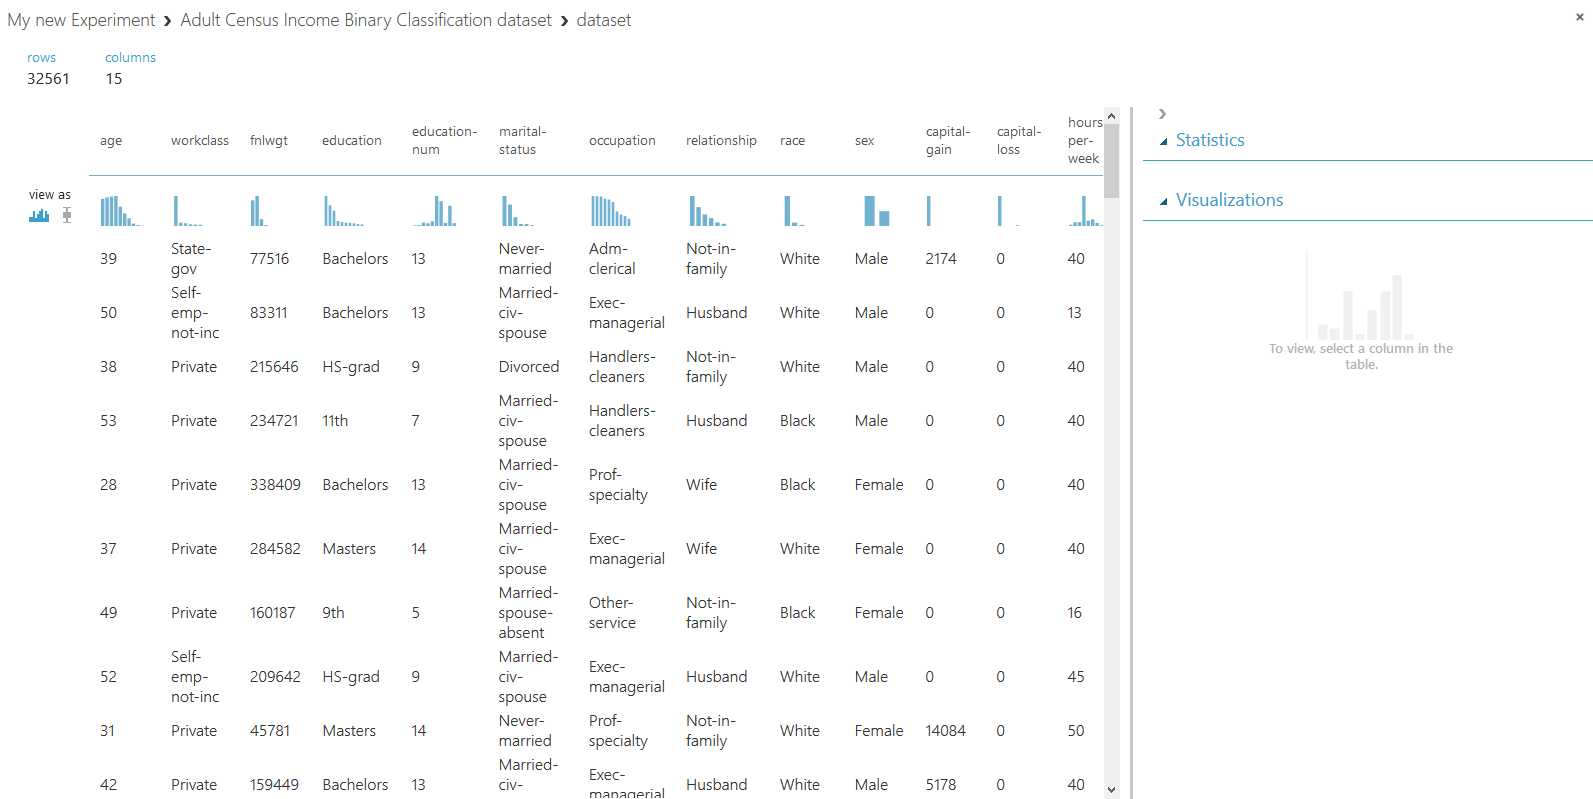
Here you can see a visualization of our current dataset.
Implement Model
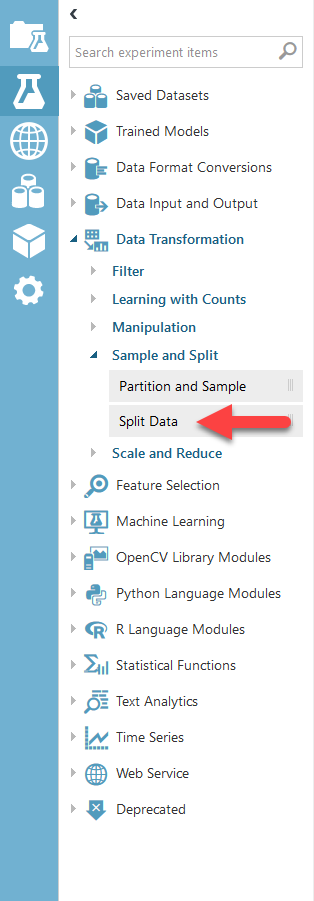
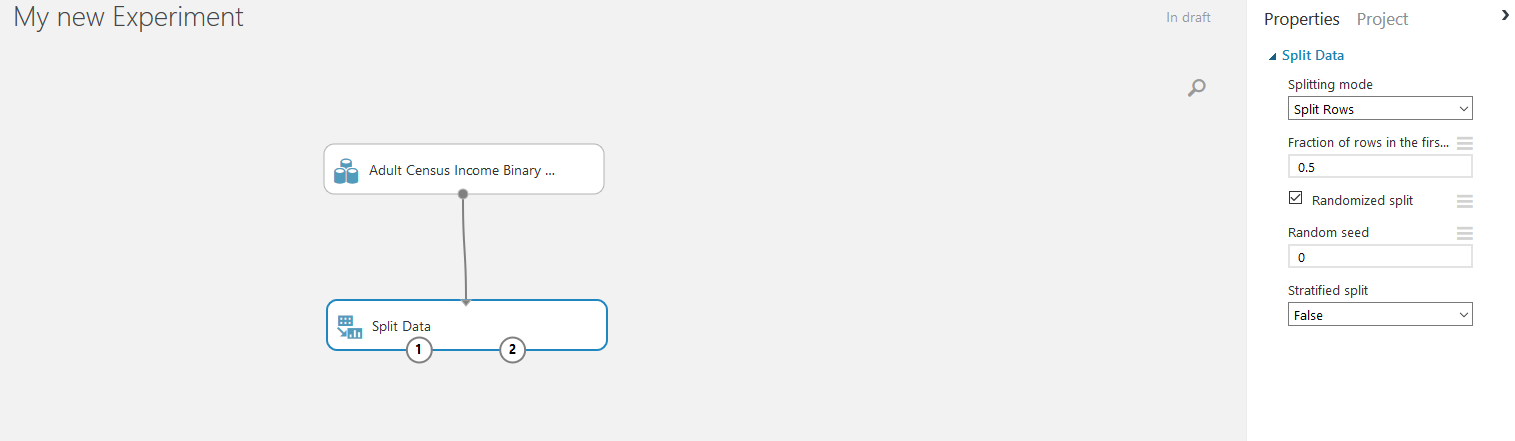
Go to Data Transformation -> Sample and Split at the sidebar and darg & drop the Split Data module to your experiment.
Connect the Split Data module with your dataset like in the picture below. You can click on the Split Data module inside your experiment to view the properties of the split at the right sidebar. There you can change the properties as you please, but we are using the default values for now.
Here you can choose a model. We are choosing Two-Class Averaged Perception but you can change that to whatever best fits the task you want to achieve. Once you made your choice drag & drop your model in your experiment area.

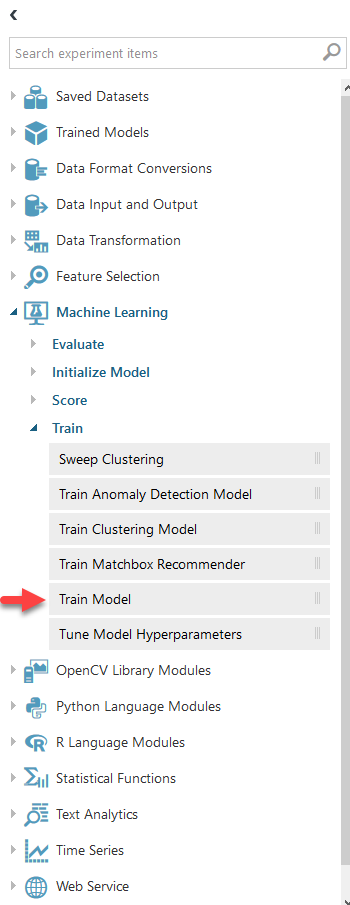
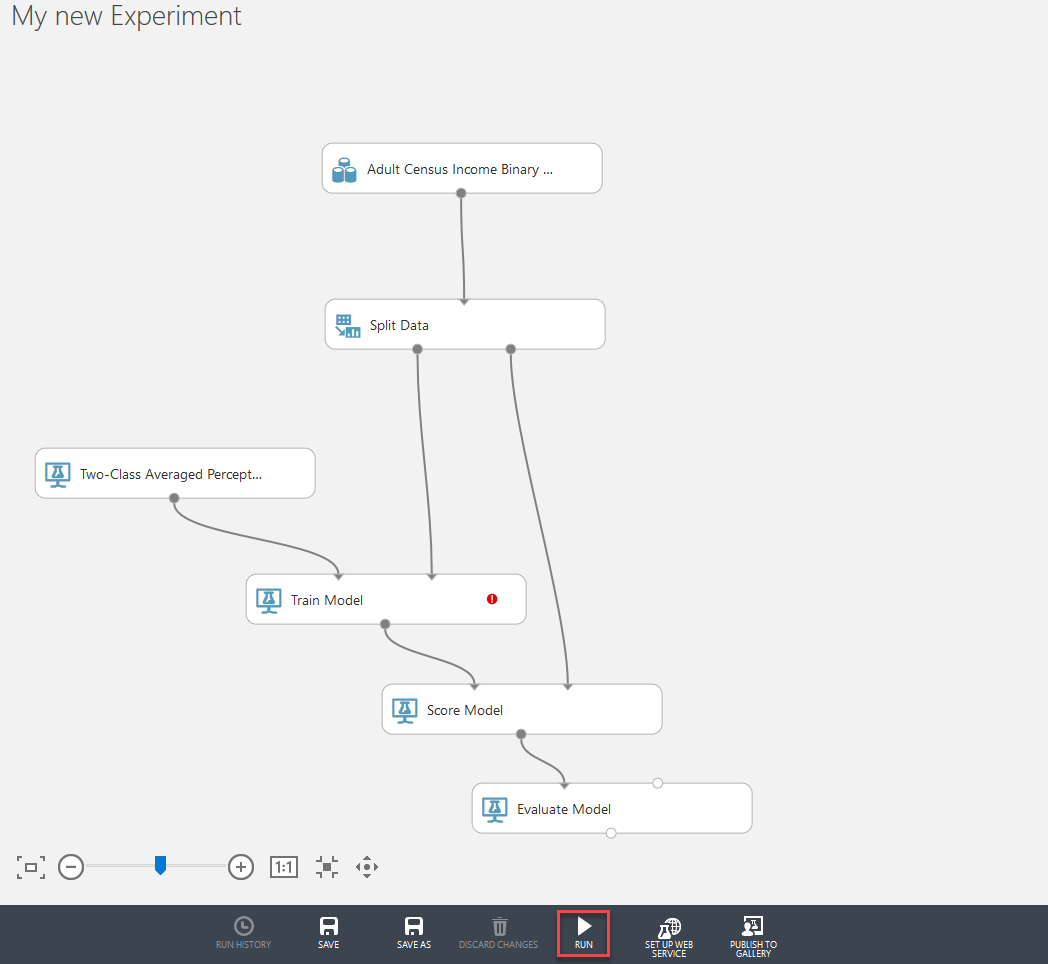
Next, drag & drop the Train Model module to your experiment from Machine Learning -> Train.
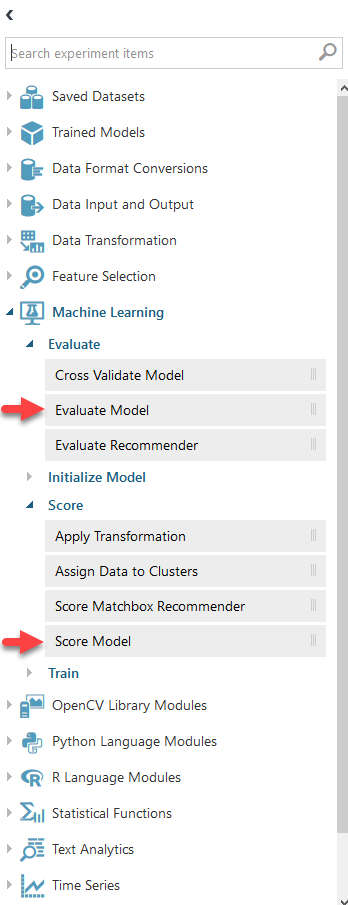
You will also need the Evaluate Model and Score Model modules.
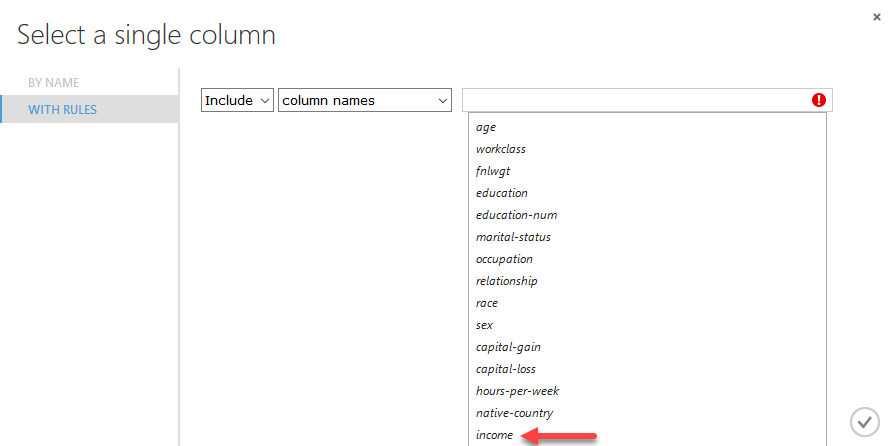
Connect the modules as shown below. Then click on the Train Model module and select Launch column selector form the sidebar at you right.
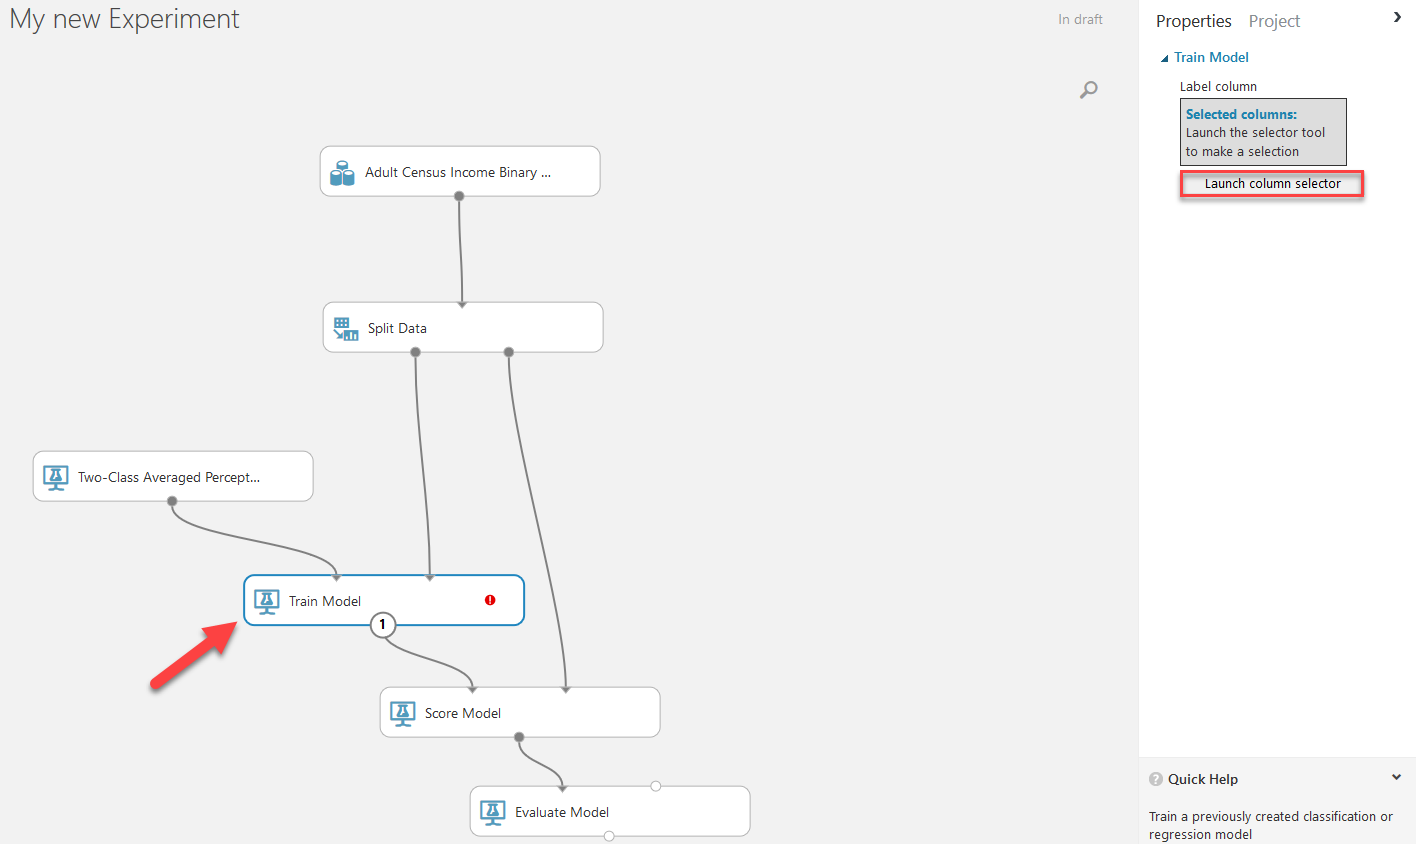
Here you can select the columns you need to include. We are only selecting the income column for now.
When everithing is ready hit RUN and wait for your model to process the dataset.
Visualize Results
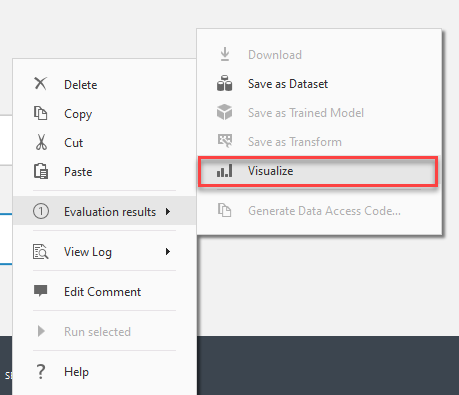
When the processing is finished you can right click on the Evaluate Model module and go Evaluation results -> Visualize to visualize your results.
Here are the results for our current example.
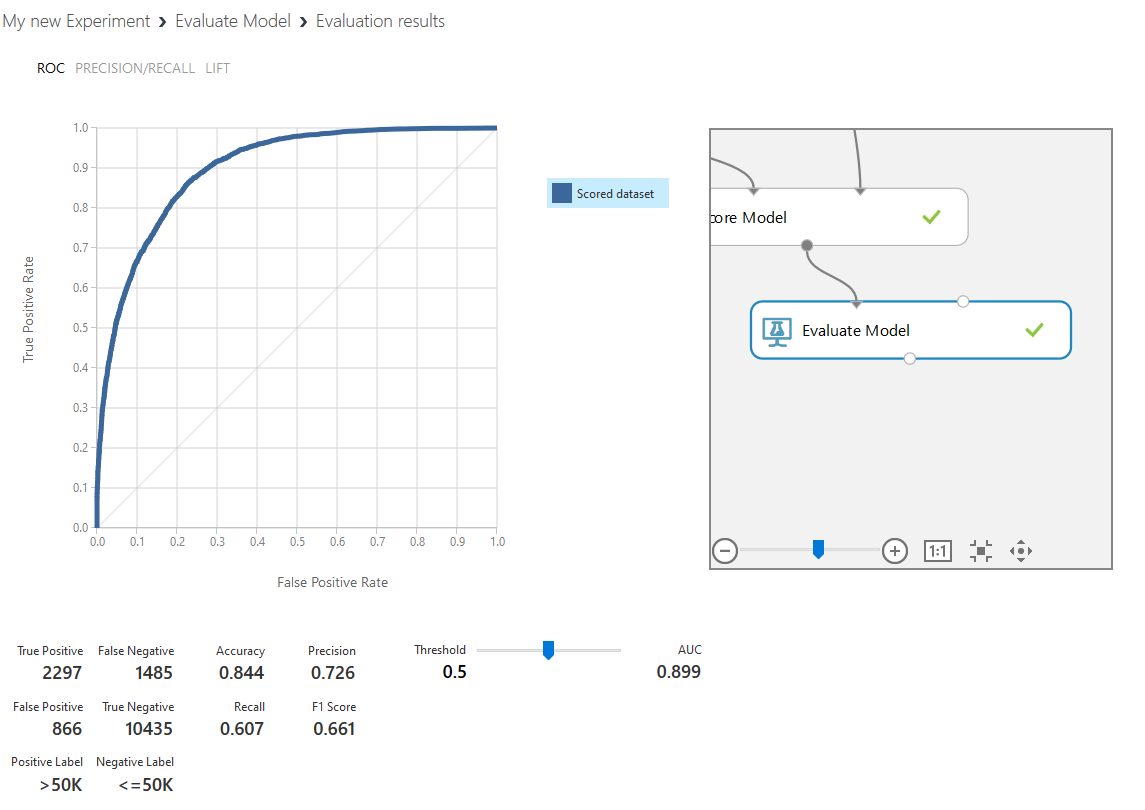
And that is how you navigate around Azure Machine Learning Studio (classic) to create your own experiment, now you are prepared to crunch some numbers!
Give voice to your project using Azure Speech
 March 29, 2021
Speech is an Azure service part of the Cognitive Services that converts text to lifelike speech.
Create
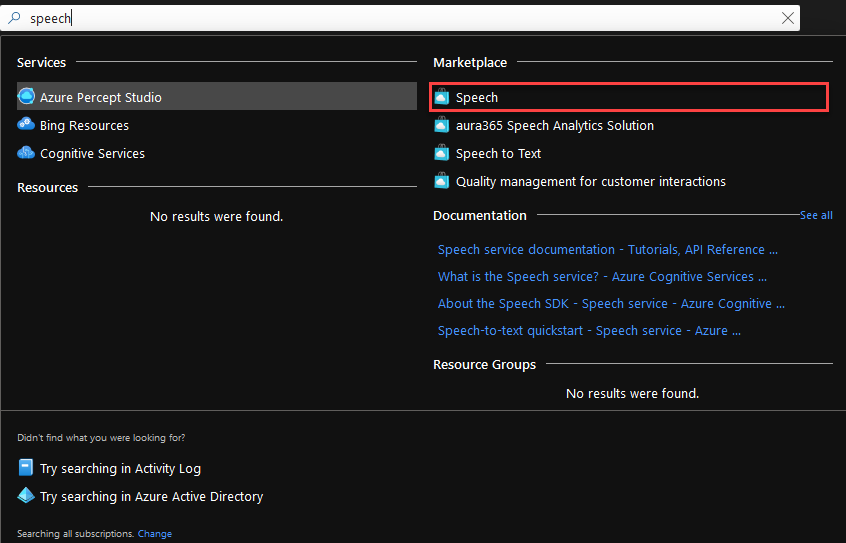
Go to Azure Portal and search for Speech. Select Speech from the Marketplace.
Fill the form. The fields with the ‘*’ are mandatory.
- Name is the name of your new Speech resource.
- Subscription should already be filled in with your default subscription.
- You can leave Region with the pre-selected region.
- Any Pricing tier will do for this demo.
- For Resource Group, you can use an existing one, or create a new one.

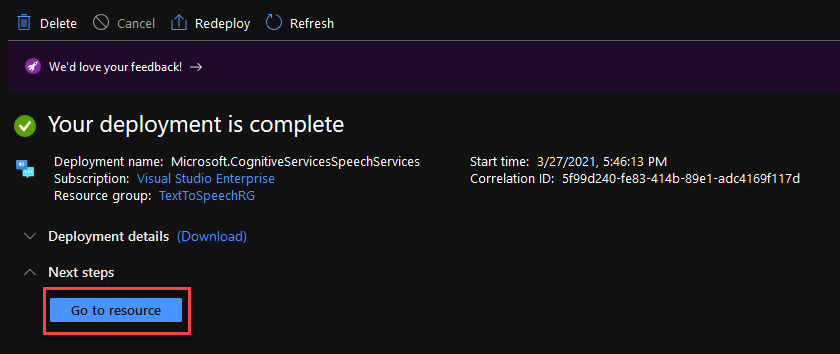
Click Create to deploy your resource. This might take a few minutes. After the deployment is done click Go to resource.
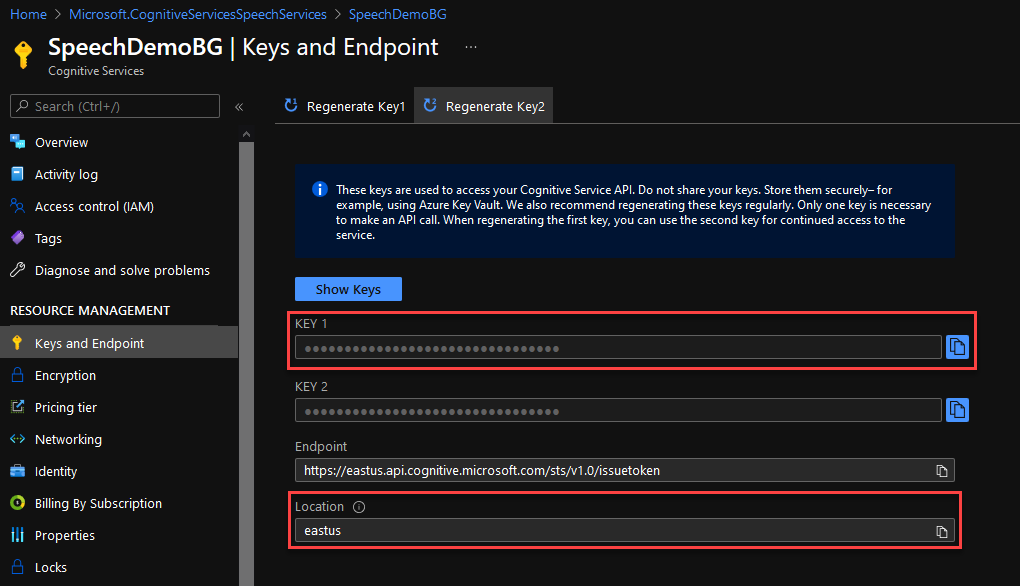
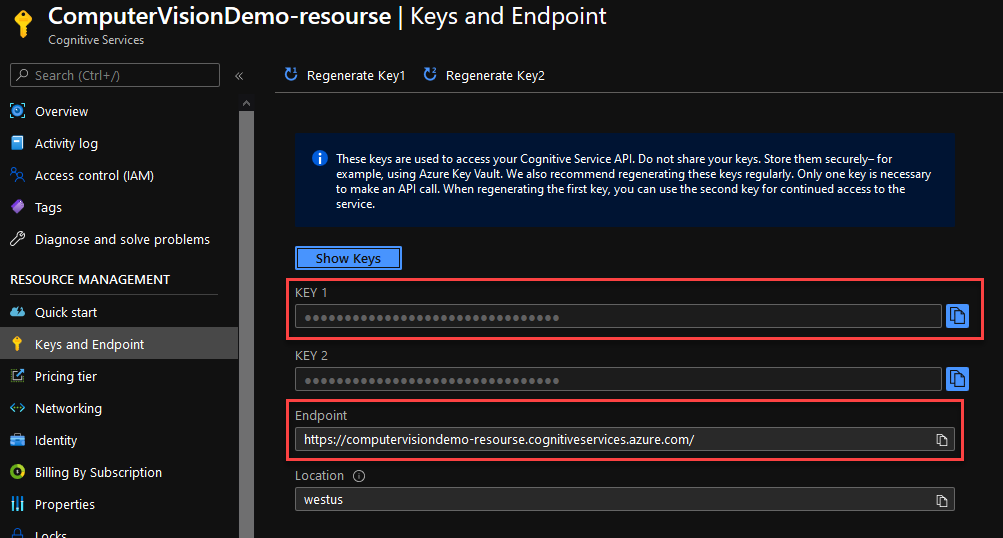
Navigate to the Keys and Endpoint tab at the left of your window. From here you can grab a Key and your Location. You will need theese later.
Implement
Open your existing project in Visual Studio. If you are not working on an existing project, simply create a C# (.NET Core) Console app.
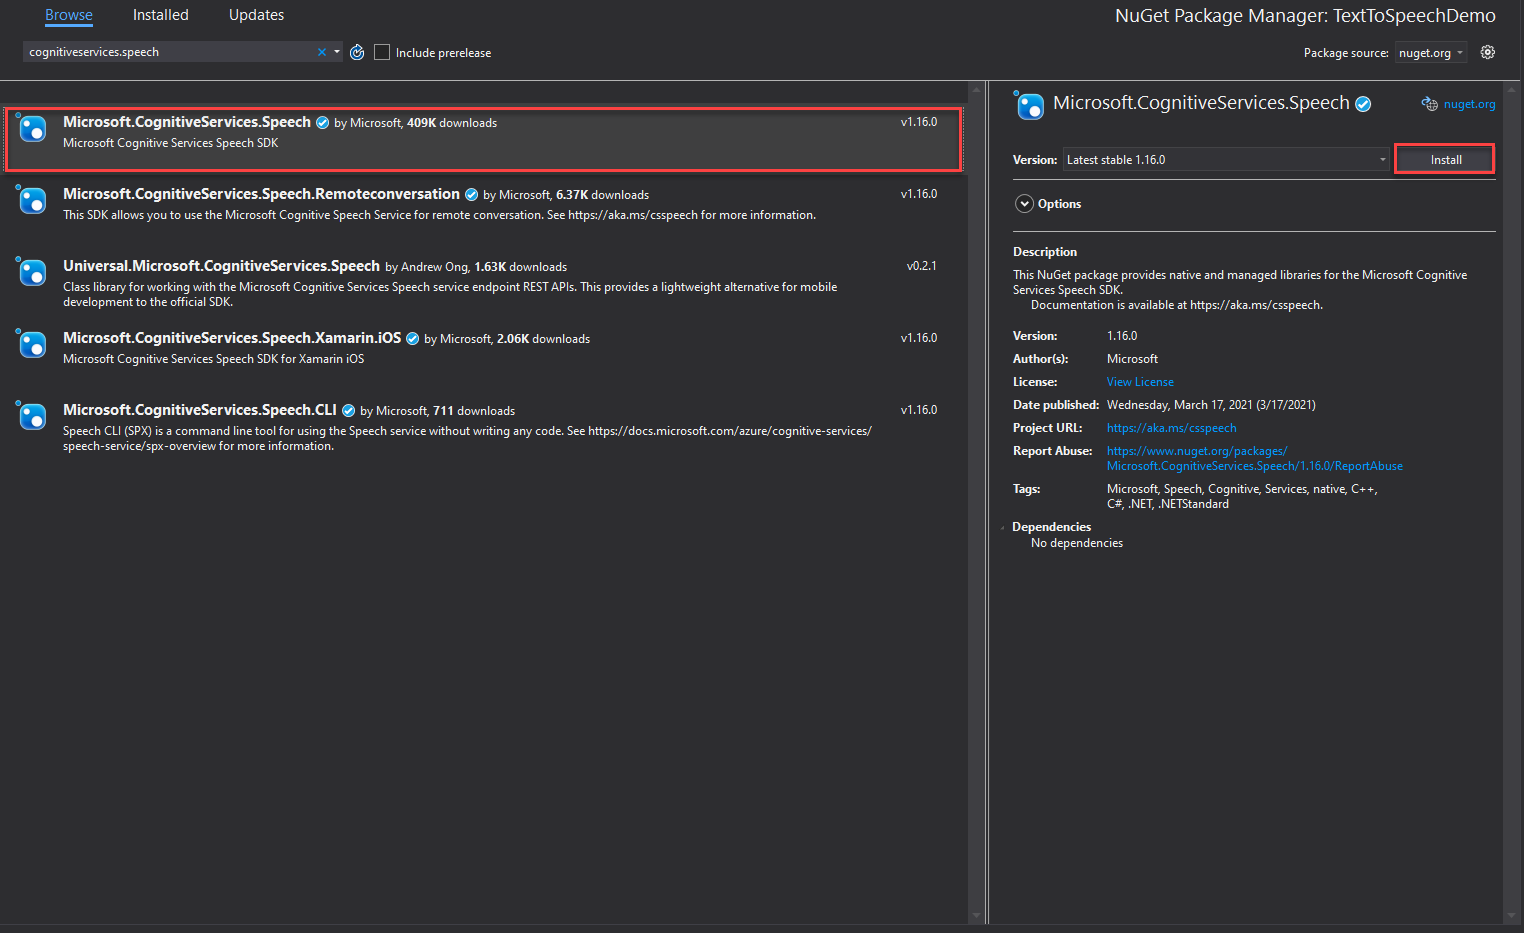
Navigate to Project -> Manage NuGet Packages, find and install the Microsoft.CognitiveServices.Speech package.
Open the class that you need to implement the speech synthesizer in. For a new project you can use the Program.cs.
Add the using statements you see below at the top of the file.
      using System.Threading.Tasks;
      using Microsoft.CognitiveServices.Speech;
Replace your Main with the code below. Do not worry about the SynthesizeAudioAsync function, we will implement it in the next step. The input argument of the function is the text that is going to get synthesized, you can change this to anythin you like.
static async Task Main()
{
    await SynthesizeAudioAsync("Sample text to get synthesized.");
}
This is the function that connects to the Azure resource and synthesizes the text. Implement it under your Main function. The first argument of the FromSubscription is your key and the second your location.
static async Task SynthesizeAudioAsync(string textToSpeech)
{
    var config = SpeechConfig.FromSubscription("7be282a06KEY_HEREb37d0c8f4a34", "eastus");
    using var synthesizer = new SpeechSynthesizer(config);
    await synthesizer.SpeakTextAsync(textToSpeech);
}
If you would like to try out more examples, or even output your spoken text to a file follow this link.
Test
Here is a sample of the output from the code above.
This is how you can rapidly intergrade a speech synthesizer to your project!
Change Choice Prompt appearance in Azure Bot Services
 March 19, 2021
One of the most important reasons we use chat-bots to convey information to the user, is that we are aiming to provide the best possible interface, convincing the user to experience our application because is easier and more fun to use. With this in mind we come to the realization that interface is key to what the user perceives as a good application and would like to spend any time using it.
Helping us on this task are Choice Prompts, which provide a set of pre-determined answers to the user to choose from. This not only makes the job of the developer easier but the user’s as well. Developers does not need to think about every possible answer, only the ones given to the user beforehand and users can have answers suggested by the interface itself, so they do not need to think about what to say. (If you would like to create your own Choice Prompts you can find how to do it here.)
However what might look as an incredably helpful tool, is as helpful as the interface displaying it. The appearance of the prompt, makes a big difference on weather the user will enjoy it or not. This is where ListStyle comes in handy. This option provides you the ability to customize the appearance of your choice prompts and choose the one best suited to the application you have in mind.
Let’s have a look on all the options available:
- auto: Automatically select the appropriate style for the current channel.
- heroCard: Add choices to prompt as a HeroCard with buttons.
- inline: Add choices to prompt as an inline list.
- list: Add choices to prompt as a numbered list.
- none: Don’t include any choices for prompt.
- suggestedAction: Add choices to prompt as suggested actions.
With this provided information I decided to try all the options on common used channels. The channels I selected are the Web Chat and Microsoft Teams. I will also have available the appearance inside the Emulator to help you out.
No Style
return await stepContext.PromptAsync(nameof(ChoicePrompt), new PromptOptions { Prompt = MessageFactory.Text("No Style"), Choices = choiceList }, cancellationToken);
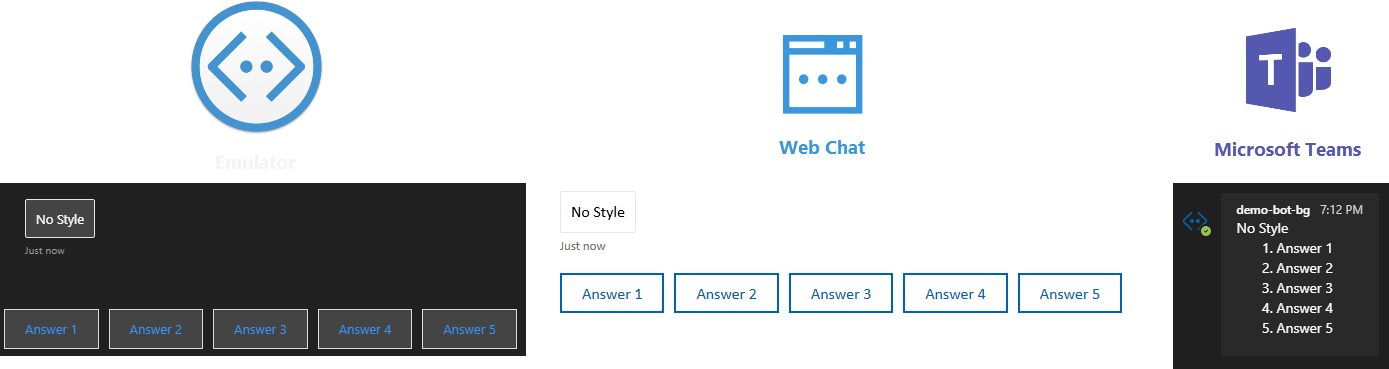
This is how your choice prompt will look without any ListStyle option selected. As you can see, despite having all the options as buttons in the emulator and web chat, Microsoft Teams displays only a list and the user is expected to write the number corresponding to his/her choice. Have in mind that the appearance might change depending of the amount of answers you need to display.
Auto
return await stepContext.PromptAsync(nameof(ChoicePrompt), new PromptOptions { Prompt = MessageFactory.Text("Auto"), Choices = choiceList, Style = ListStyle.Auto }, cancellationToken);
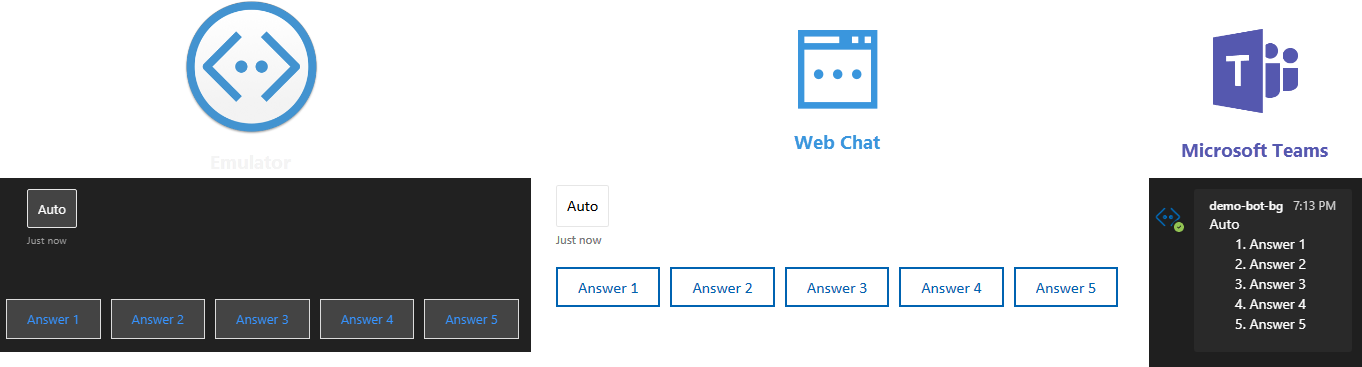
Auto seems to work exactly like not choosing any style option, as you can see above.
Hero Card
return await stepContext.PromptAsync(nameof(ChoicePrompt), new PromptOptions { Prompt = MessageFactory.Text("Hero Card"), Choices = choiceList, Style = ListStyle.HeroCard }, cancellationToken);
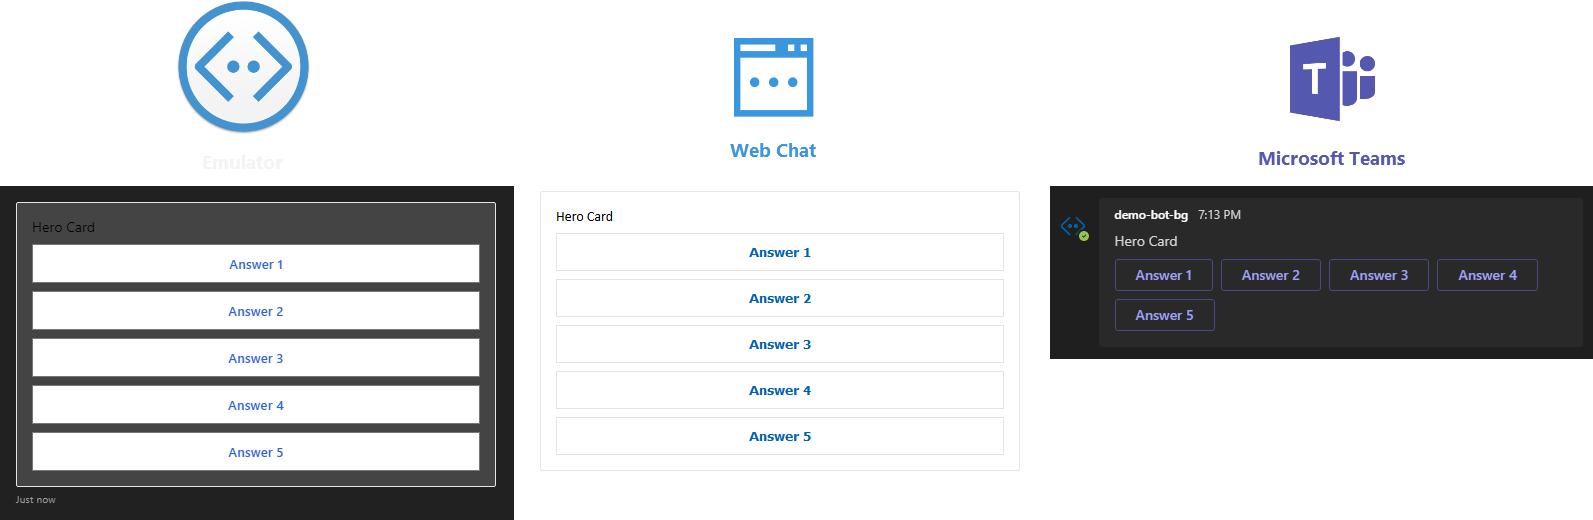
Although Hero Card might look a bit bulky ine emulator and web chat, in Microsoft Teams it looks exactly like the rest of the channels in the previous examples. Which in my opinion looks really intuitive for the user.
Inline
return await stepContext.PromptAsync(nameof(ChoicePrompt), new PromptOptions { Prompt = MessageFactory.Text("Inline"), Choices = choiceList, Style = ListStyle.Inline }, cancellationToken);

Inline has the same appearance throughout the different channels. However, in my opinion, it should only be used in cases where the available space that the bot interface is displayed on is limited.
List
return await stepContext.PromptAsync(nameof(ChoicePrompt), new PromptOptions { Prompt = MessageFactory.Text("List"), Choices = choiceList, Style = ListStyle.List }, cancellationToken);
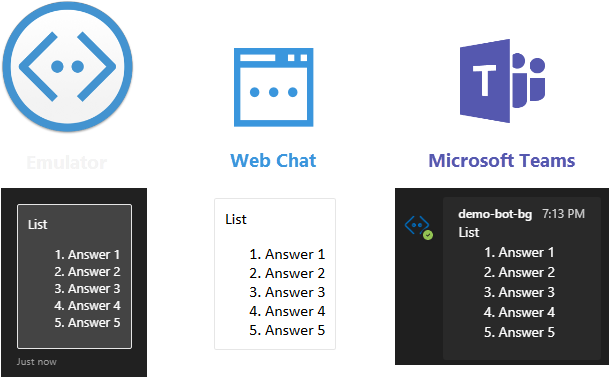
List is also consistent throughout hte channels and it provides a numbered list, expected from the user to write the number corresponding to his/her choice. In my opinion this is not ideal, but it can be useful when there are too many options available.
None
return await stepContext.PromptAsync(nameof(ChoicePrompt), new PromptOptions { Prompt = MessageFactory.Text("None"), Choices = choiceList, Style = ListStyle.None }, cancellationToken);
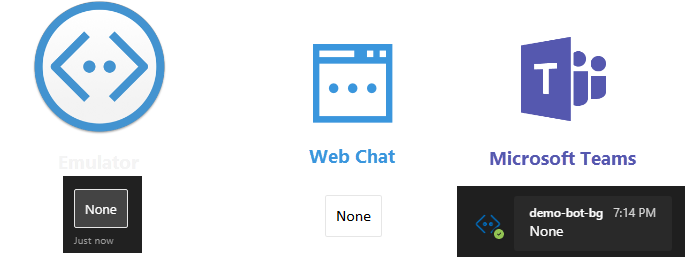
None is not helpful in our case because it does not provide any answers to the user.
Suggested Action
return await stepContext.PromptAsync(nameof(ChoicePrompt), new PromptOptions { Prompt = MessageFactory.Text("Suggested Action"), Choices = choiceList, Style = ListStyle.SuggestedAction }, cancellationToken);
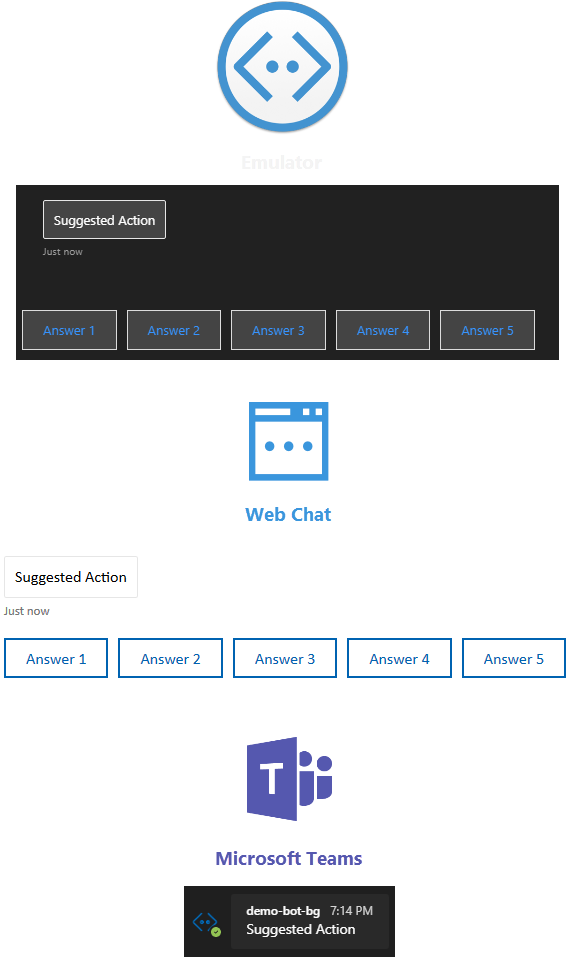
Lastly, although Suggested Action looks good in emulator and web chat, in Microsoft Teams no answers are provided rendering it much less desired than the rest of the options.
I hope this helps you decide which ListStyle is better suited to your use case to help you achieve the best interface possible!
Translate Text form Pictures using Azure
Computer Vision is an AI Service part of the Azure Cognitive Services that analyzes content in images and video.
Translator in Azure is an AI service, part of Azure Cognitive Services, used for real-time text translation and detection. It is fast and easy to implement, to bring intelligence to your text processing projects.
Create
In this post we will build upon two older posts: the post about Computer Vision and the post about Azure Translator. Follow the Create steps of both of theese posts to create your Azure resources.
Implement
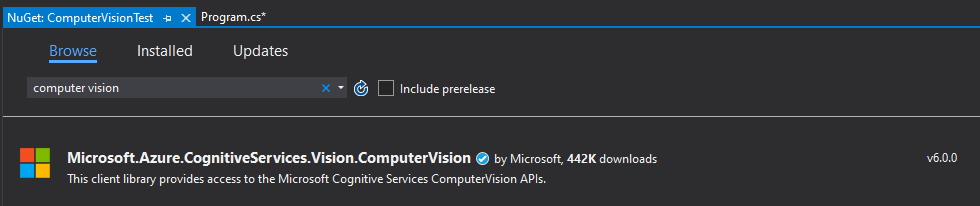
Create a new C# console project in Visual Studio or open an existing one. Follow the previous posts to install the Microsoft.Azure.CognitiveServices.Vision.ComputerVision and Newtonsoft.Json NuGet packages.
Open the class that you need to implement the image analyser and translator in. For a new project you can use the Program.cs.
Add the using statements you see below at the top of the file.
      using Microsoft.Azure.CognitiveServices.Vision.ComputerVision;
      using Microsoft.Azure.CognitiveServices.Vision.ComputerVision.Models;
      using System.Collections.Generic;
      using System.Threading.Tasks;
      using System.Threading;
      using System.Linq;
      using System.Net.Http;
      using System.Text;
      using Newtonsoft.Json;
Input your Subscription Keys, Endpoints and Location (Location is only for the Translator resource). You can see where to find them in the previous posts. The READ_TEXT_URL_IMAGE string at line 9 should contain the URL of the image you wish to analyse.
// Add your Computer Vision subscription key and endpoint
private static readonly string ComputerVisionsubScriptionKey = "1e6cd418eKEY_HERE450704d3e63c";
private static readonly string ComputerVisionEndpoint = "https://compvisiondemobinarygrounds.cognitiveservices.azure.com/";
private static readonly string TranslatorSubscriptionKey = "5b50844fKEY_HERE8be8f6f8f40f7";
private static readonly string TranslatorEndpoint = "https://api.cognitive.microsofttranslator.com/";
private static readonly string TranslatorLocation = "eastus2";

// URL image used for analyzing an image
private const string READ_TEXT_URL_IMAGE = "";
Replace your Main function with the following code. Your Main should be asynchronous because it needs to wait before all the asynchronous functions return their results before exiting. Do not worry about the missing functions, we will create them next.
You can change the translated language by changing the “&to=de” part of the string of route variable in line 9. You can find a list of the supported languages along with their codes here.
static async Task Main(string[] args)
{
    // Create a client
    ComputerVisionClient client = Authenticate(ComputerVisionEndpoint, ComputerVisionsubScriptionKey);

    var analisedText = await ReadFileUrl(client, READ_TEXT_URL_IMAGE);

    // Output languages are defined as parameters, input language detected.
    string route = "/translate?api-version=3.0&to=de";
    string textToTranslate = analisedText;
    object[] body = new object[] { new { Text = textToTranslate } };
    var requestBody = JsonConvert.SerializeObject(body);

    using (var client2 = new HttpClient())
    using (var request = new HttpRequestMessage())
    {
        // Build the request.
        request.Method = HttpMethod.Post;
        request.RequestUri = new Uri(TranslatorEndpoint + route);
        request.Content = new StringContent(requestBody, Encoding.UTF8, "application/json");
        request.Headers.Add("Ocp-Apim-Subscription-Key", TranslatorSubscriptionKey);
        request.Headers.Add("Ocp-Apim-Subscription-Region", TranslatorLocation);


        // Send the request and get response.
        HttpResponseMessage response = await client2.SendAsync(request).ConfigureAwait(false);
        // Read response as a string.
        string resultJson = await response.Content.ReadAsStringAsync();

        try
        {
            List<Rootobject> output = JsonConvert.DeserializeObject<List<Rootobject>>(resultJson);
            Console.WriteLine($"Input Text: {textToTranslate}\nPredicted Language: {output.FirstOrDefault().detectedLanguage.language}\nPredicted Score: {output.FirstOrDefault().detectedLanguage.score}\n\n");
            foreach (Translation obj in output.FirstOrDefault().translations)
                Console.WriteLine($"Translated Language: {obj.to}\nResult: {obj.text}\n\n");
        }
        catch (Exception e)
        {
            Console.WriteLine(e);
        }
    }
}
Create the Authenticate function below your Main.
public static ComputerVisionClient Authenticate(string endpoint, string key)
{
    ComputerVisionClient client =
        new ComputerVisionClient(new ApiKeyServiceClientCredentials(key))
        { Endpoint = endpoint };
    return client;
}
The following function extracts the text from the given picture. Place it under the Authenticate function.
public static async Task<string> ReadFileUrl(ComputerVisionClient client, string urlFile)
{
    Console.WriteLine("Extracted Text:");
    Console.WriteLine();

    // Read text from URL
    var textHeaders = await client.ReadAsync(urlFile, language: "en");
    // After the request, get the operation location (operation ID)
    string operationLocation = textHeaders.OperationLocation;
    Thread.Sleep(2000);
    // Retrieve the URI where the extracted text will be stored from the Operation-Location header.
    // We only need the ID and not the full URL
    const int numberOfCharsInOperationId = 36;
    string operationId = operationLocation.Substring(operationLocation.Length - numberOfCharsInOperationId);

    // Extract the text
    ReadOperationResult results;
    do
    {
        results = await client.GetReadResultAsync(Guid.Parse(operationId));
    }
    while ((results.Status == OperationStatusCodes.Running ||
        results.Status == OperationStatusCodes.NotStarted));
    // Display the found text.
    Console.WriteLine();
    var textUrlFileResults = results.AnalyzeResult.ReadResults;
    string output = "";
    foreach (ReadResult page in textUrlFileResults)
    {
        foreach (Line line in page.Lines)
        {
            Console.WriteLine(line.Text);
            output += " " + line.Text;
        }
    }
    Console.WriteLine();
    return output;
}
Add theese classes to deserialize your JSON. You can place them in separate files, or in the same file under the class you are working on.
public class Rootobject
{
    public Detectedlanguage detectedLanguage { get; set; }
    public List<Translation> translations { get; set; }
}

public class Detectedlanguage
{
    public string language { get; set; }
    public float score { get; set; }
}

public class Translation
{
    public string text { get; set; }
    public string to { get; set; }
}
Now everithing should be working as intended, let’s try testing our new project!
Test
Place the URL of this picture as an input.

This is the result for German translation.
And thats how you can translate text from a picture to any supported language you wish!
Get familiar with Azure Translator
Translator in Azure is an AI service, part of cognitive services, used for real-time text translation and detection. It is fast and easy to implement, to bring intelligence to your text processing projects.
Create
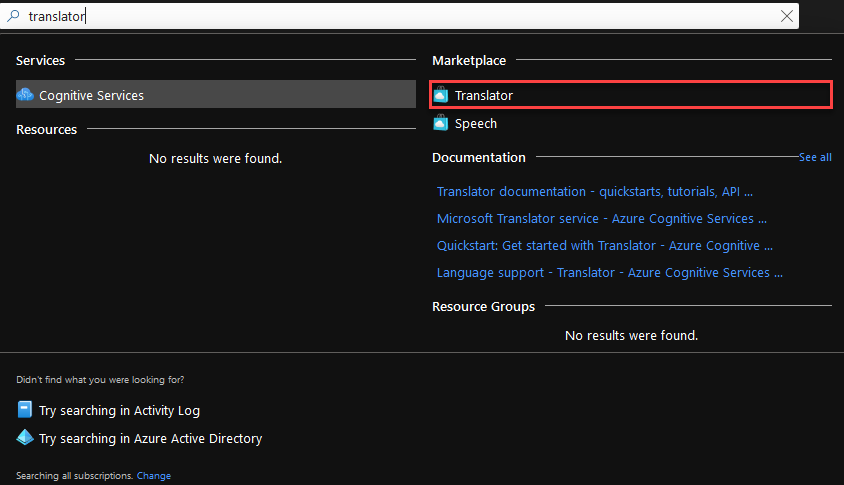
To create a translator resource go to Azure Portal and search for translator. Select Translator from the Marketplace.
Fill the form. The fields with the ‘*’ are mandatory.
- Subscription should already be filled in with your default subscription.
- For Resource Group, you can use an existing one, or create a new one.
- Choose Region your preferred region.
- Name is the name of your new Translator resource.
- Any Pricing tier will do for this demo.
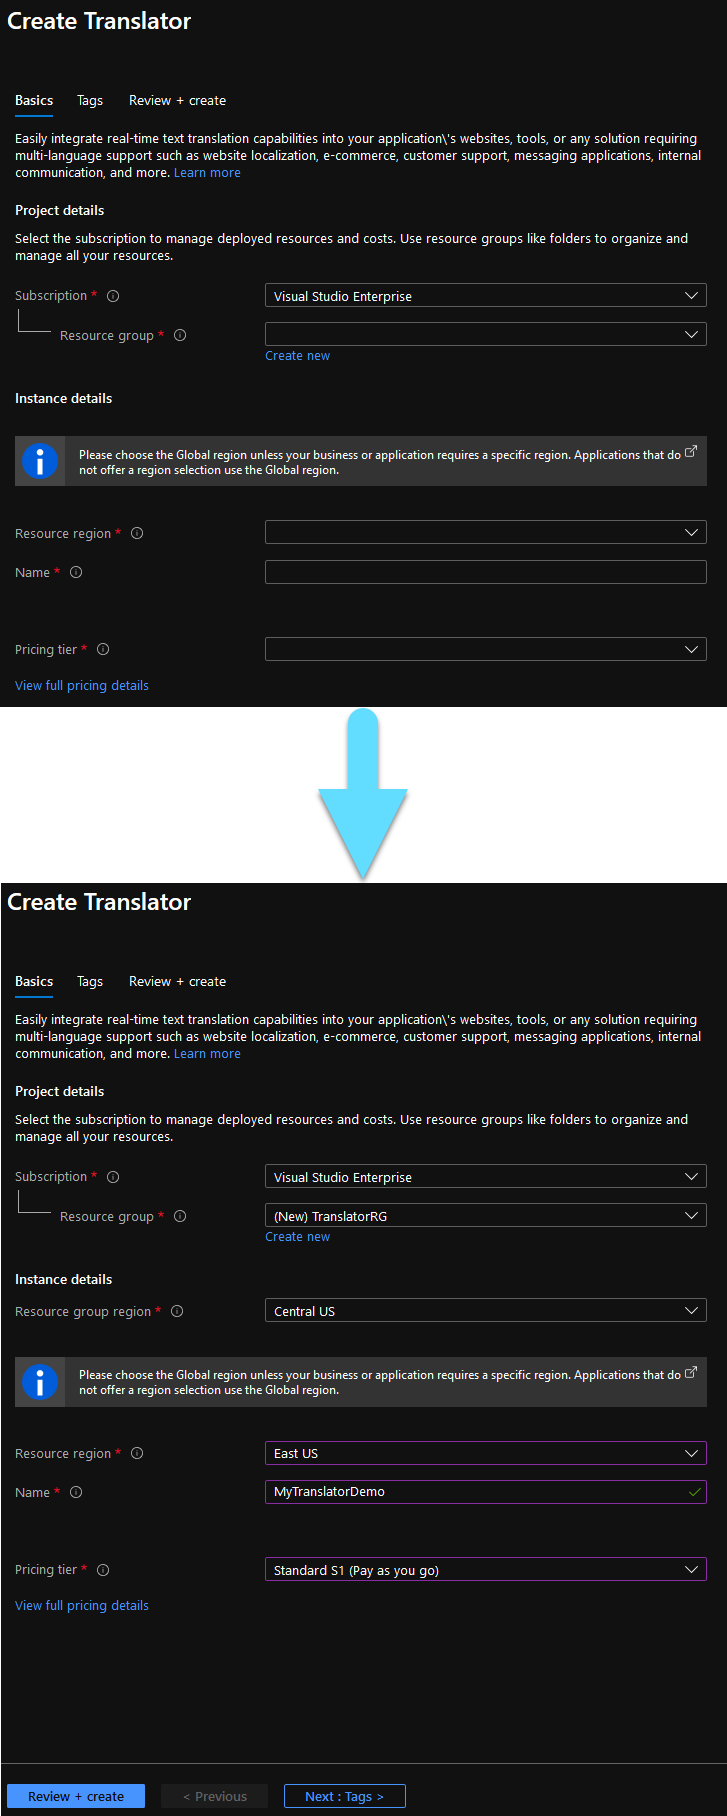
Click Review + Create at the bottom of the page and wait for your resource to deploy.
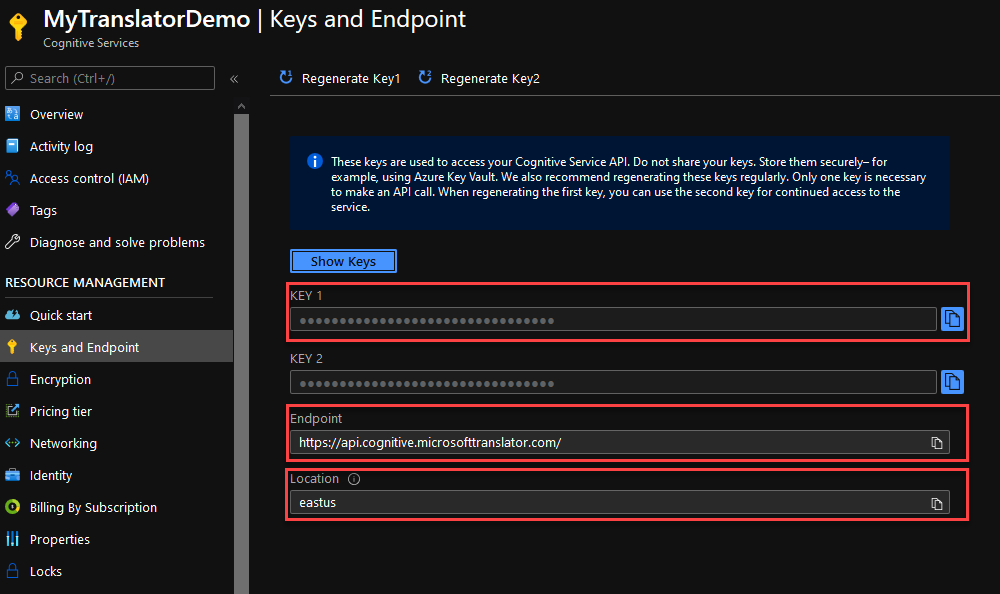
Go to your resource and navigate to the Keys and Endpoint tab at the left of your window. From here you can grab a Key, your Endpoint and your Location. You will need theese later.
Implement
Open your existing project in Visual Studio. If you are not working on an existing project, simply create a C# (.NET Core) Console app.
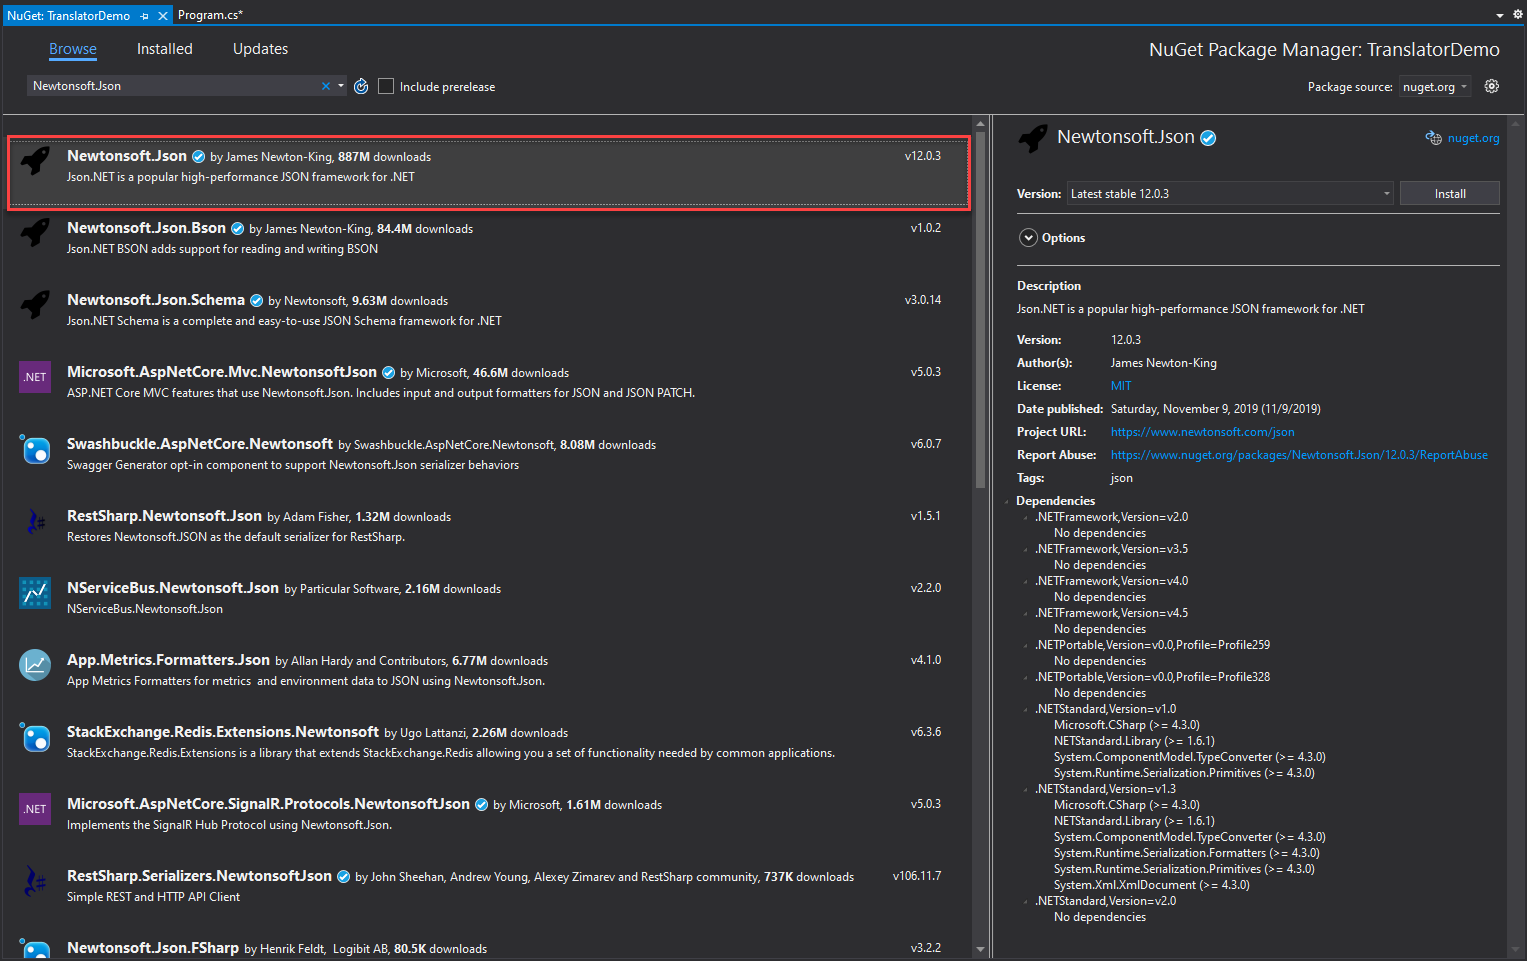
Navigate to Project -> Manage NuGet Packages, find and install the Newtonsoft.Json package.
Open the class that you need to implement the translator in. For a new project you can use the Program.cs.
Add the using statements you see below at the top of the file.
      using System.Collections.Generic;
      using System.Linq;
      using System.Net.Http;
      using System.Text;
      using System.Threading.Tasks;
      using Newtonsoft.Json;
Add your resource data at the top of your class. For the string in subscriptionKey you can use one of the keys you got before, the endpoint for the string in endpoint and the location for your location at line 3.
private static readonly string subscriptionKey = "73e0c30084KEY_HEREd94ae362b47";
private static readonly string endpoint = "https://api.cognitive.microsofttranslator.com/";
private static readonly string location = "eastus";
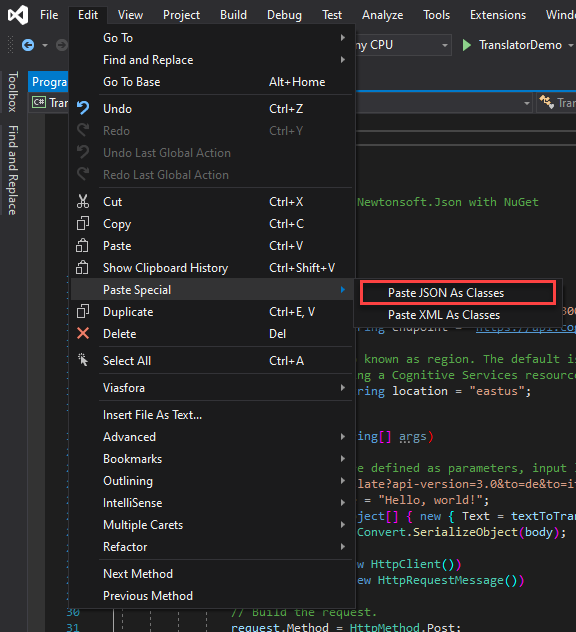
Now we need to create the classes that will contain our deserialized json. You can do that in Visual Studio by pasting the following json As JSON Classes. Go to Edit->Paste Special->Paste JSON As Classes. However, following this you might need to do some modifications in order to work, so I attached the resulting classes below to import directly in your project!
Here is the json you could copy.
[
    {
        "detectedLanguage": {
            "language": "en",
            "score": 1.0
        },
        "translations": [
            {
                "text": "Hallo Welt!",
                "to": "de"
            },
            {
                "text": "Salve, mondo!",
                "to": "it"
            }
        ]
    }
]
And that is how you paste it.
If you skipped the last step, copy the following classes in your project. You can put them either in a separate file, or in Program.cs directly below Main.
public class Rootobject
{
    public Detectedlanguage detectedLanguage { get; set; }
    public List<Translation> translations { get; set; }
}

public class Detectedlanguage
{
    public string language { get; set; }
    public float score { get; set; }
}

public class Translation
{
    public string text { get; set; }
    public string to { get; set; }
}
Here is the code that does all the magic! Inside your Main paste the following code. In string route at line 2 you can put all the languages you wish to translate your text to. Simply write &to= and then attach the Language code. You can find all available language codes here. For now, we will translate the text to German and Italian.
The textToTranslate string at line 3 is the text you wish to translate. The service will automatically detect which language is written at before translating it. So you can try inputing text in languages other than English if you so desire.
From lines 22 - 32 is where we deserialize the json, we also use a try statement to catch any errors that might appear.
// Output languages are defined as parameters, input language detected.
string route = "/translate?api-version=3.0&to=de&to=it";
string textToTranslate = "Hello, world!";
object[] body = new object[] { new { Text = textToTranslate } };
var requestBody = JsonConvert.SerializeObject(body);

using (var client = new HttpClient())
using (var request = new HttpRequestMessage())
{
    // Build the request.
    request.Method = HttpMethod.Post;
    request.RequestUri = new Uri(endpoint + route);
    request.Content = new StringContent(requestBody, Encoding.UTF8, "application/json");
    request.Headers.Add("Ocp-Apim-Subscription-Key", subscriptionKey);
    request.Headers.Add("Ocp-Apim-Subscription-Region", location);

    // Send the request and get response.
    HttpResponseMessage response = await client.SendAsync(request).ConfigureAwait(false);
    // Read response as a string.
    string resultJson = await response.Content.ReadAsStringAsync();

    try
    {
        List<Rootobject> output = JsonConvert.DeserializeObject<List<Rootobject>>(resultJson);
        Console.WriteLine($"Input Text: {textToTranslate}\nPredicted Language: {output.FirstOrDefault().detectedLanguage.language}\nPredicted Score: {output.FirstOrDefault().detectedLanguage.score}\n\n");
        foreach (Translation obj in output.FirstOrDefault().translations)
            Console.WriteLine($"Translated Language: {obj.to}\nResult: {obj.text}\n\n");
    }
    catch(Exception e)
    {
        Console.WriteLine(e);
    }
}
If you want to experiment more with text translator try some of the code segments from here.
Test
Now simply run the program to see how well the translator works. You can try changing the input text to test it. Here is the output of the text we had above.
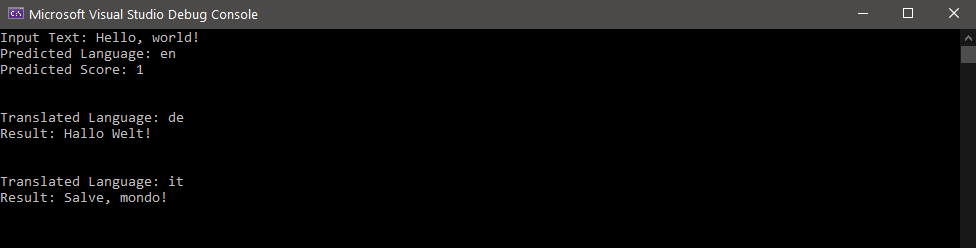
Now you have a ready to go translator for your next project!
Sentiment Analysis using Azure Text Analytics
 February 13, 2021
Text Analytics is an easy to learn and fast to implement AI service, part of the Azure Cognitive Services, that uncovers insights such as sentiment, entities, relations and key phrases in unstructured text.
Create
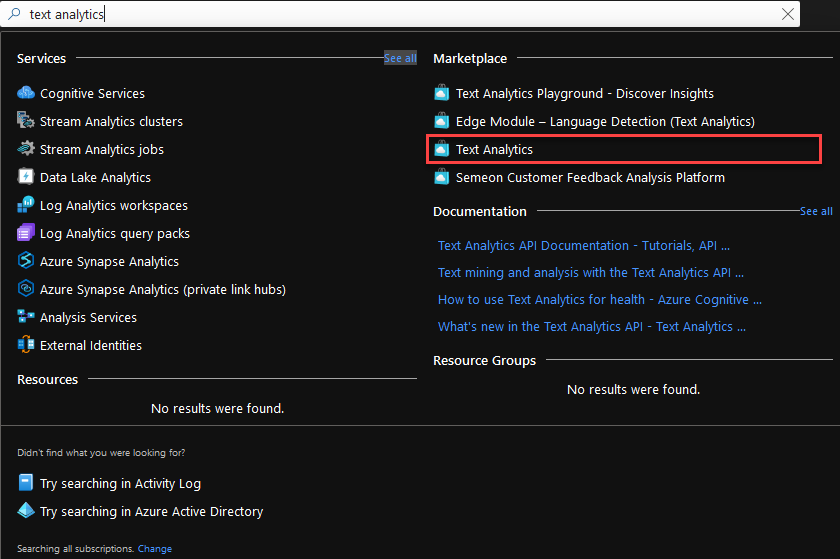
To create a text analytics resource go to Azure Portal and search for Text Analytics. Select Text Analytics from the Marketplace.
Fill the form. The fields with the ‘*’ are mandatory.
- Subscription should already be filled in with your default subscription.
- For Resource Group, you can use an existing one, or create a new one.
- You can leave Region with the pre-selected region.
- Name is the name of your new Text Analytics resource.
- Any Pricing tier will do for this demo.
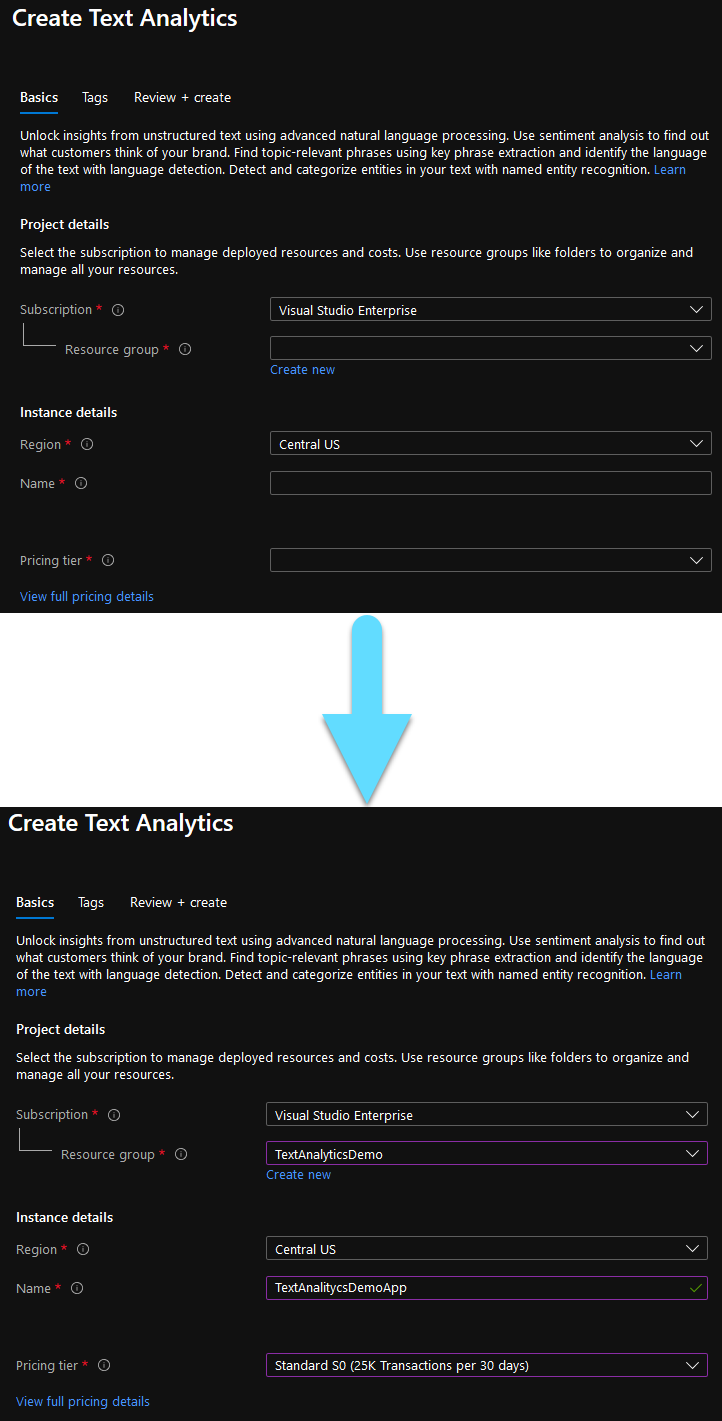
Continue to the last step and click Create.
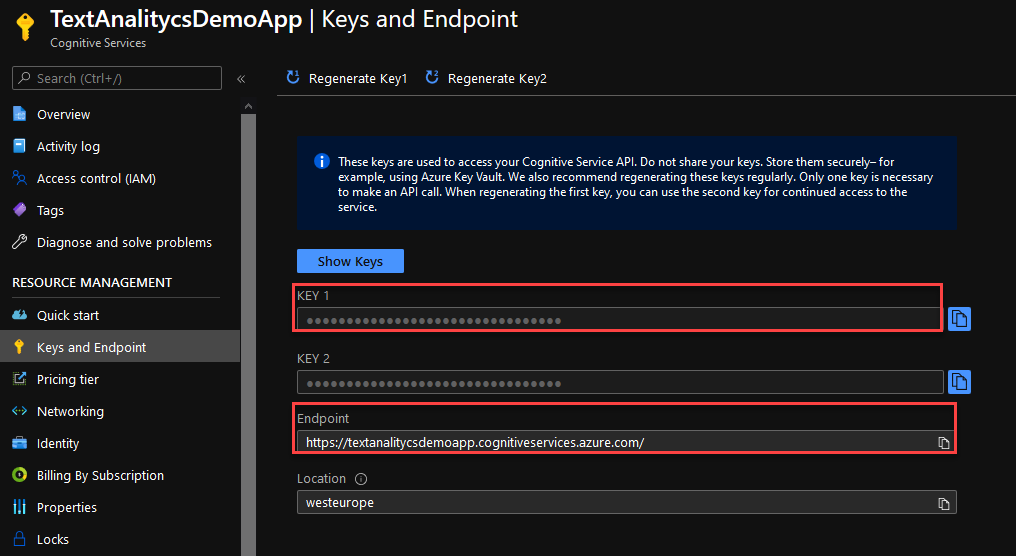
Go to your resource and navigate to the Keys and Endpoint tab at the left of your window. From here you can grab a Key and your Endpoint. You will need theese later.
Implement
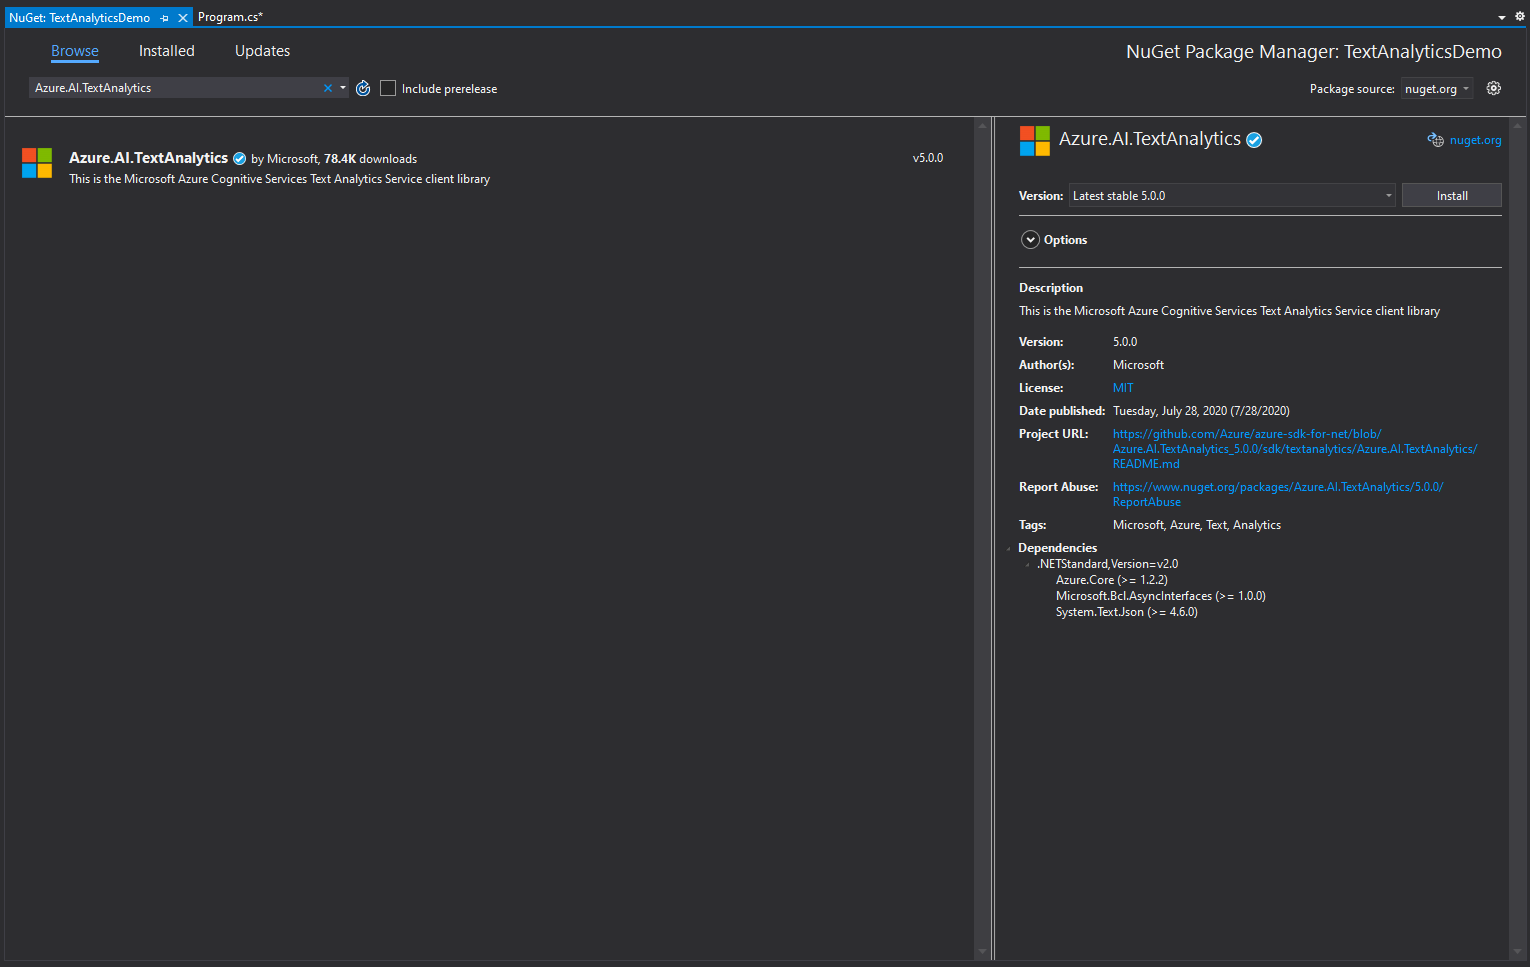
Open your existing project in Visual Studio. If you are not working on an existing project, simply create a C# (.NET Core) Console app.
Navigate to Project -> Manage NuGet Packages, find and install the Azure.AI.TextAnalytics package.
Open the class that you need to implement the sentiment analyser in. For a new project you can use the Program.cs.
Add the using statements you see below at the top of the file.
      using Azure;
      using Azure.AI.TextAnalytics;
Add your credentials and endpoint at the top of your class. For the string in credentials you can use one of the keys you got before and the endpoint for the string in endpoint.
      private static readonly AzureKeyCredential credentials = new AzureKeyCredential("30da76KEY_HERE5ef63b3993f03");
      private static readonly Uri endpoint = new Uri("https://textanalitycsdemoapp.cognitiveservices.azure.com/");
Inside your Main put the code that appears below. Do not worry about the missing function, we will create it in the next step.
static void Main(string[] args)
{
    var client = new TextAnalyticsClient(endpoint, credentials);

    SentimentAnalysisExample(client);
}
The SentimentAnalysisExample is the function that analyses the text and determins weather the intention was positive or negative. In the inputText string at line 3 you can put the document you want to analyse. Every sentense will be analysed separately and a overall result for the whole document will appear.
static void SentimentAnalysisExample(TextAnalyticsClient client)
{
    string inputText = "I am feeling happy. I am sick.";
    DocumentSentiment documentSentiment = client.AnalyzeSentiment(inputText);
    Console.WriteLine($"Document sentiment: {documentSentiment.Sentiment}\n");

    foreach (var sentence in documentSentiment.Sentences)
    {
        Console.WriteLine($"\tText: \"{sentence.Text}\"");
        Console.WriteLine($"\tSentence sentiment: {sentence.Sentiment}");
        Console.WriteLine($"\tPositive score: {sentence.ConfidenceScores.Positive:0.00}");
        Console.WriteLine($"\tNegative score: {sentence.ConfidenceScores.Negative:0.00}");
        Console.WriteLine($"\tNeutral score: {sentence.ConfidenceScores.Neutral:0.00}\n");
    }
}
If you wish to add extra functionality to your text analyser you can add functions from here and call them from Main. You can try Opinion mining, Language detection, Named Entity Recognition and many more.
Test
Now simply run the program to see how well the sentiment analysis works. You can try changing the text to test it. Here is the output of the text we had above.
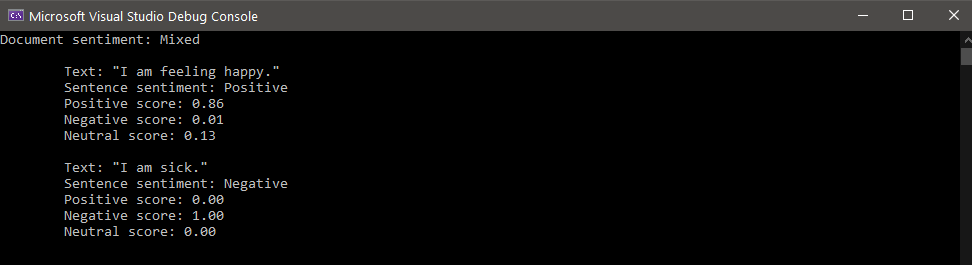
And thats how you implement sentiment analysis into your project in a few easy steps!
Introduction to Computer Vision using Azure
 February 02, 2021
Computer Vision is an AI Service part of the Azure Cognitive Services that analyzes content in images and video.
Create
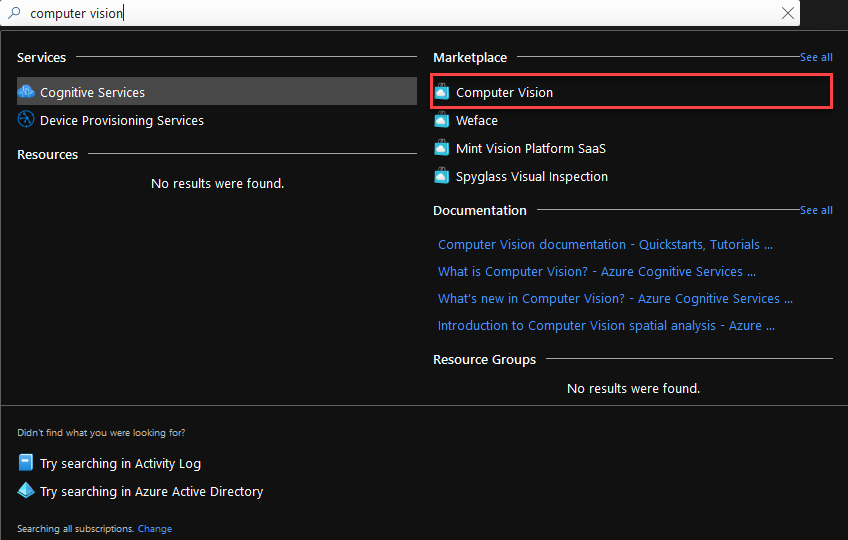
Go to Azure Portal and search for Computer Vision. Select Computer Vision from the Marketplace.
Fill the form. The fields with the ‘*’ are mandatory.
- Subscription should already be filled in with your default subscription.
- For Resource Group, you can use an existing one, or create a new one.
- You can leave Region with the pre-selected region.
- Name is the name of your new Computer Vision resource.
- Any Pricing tier will do for this demo.
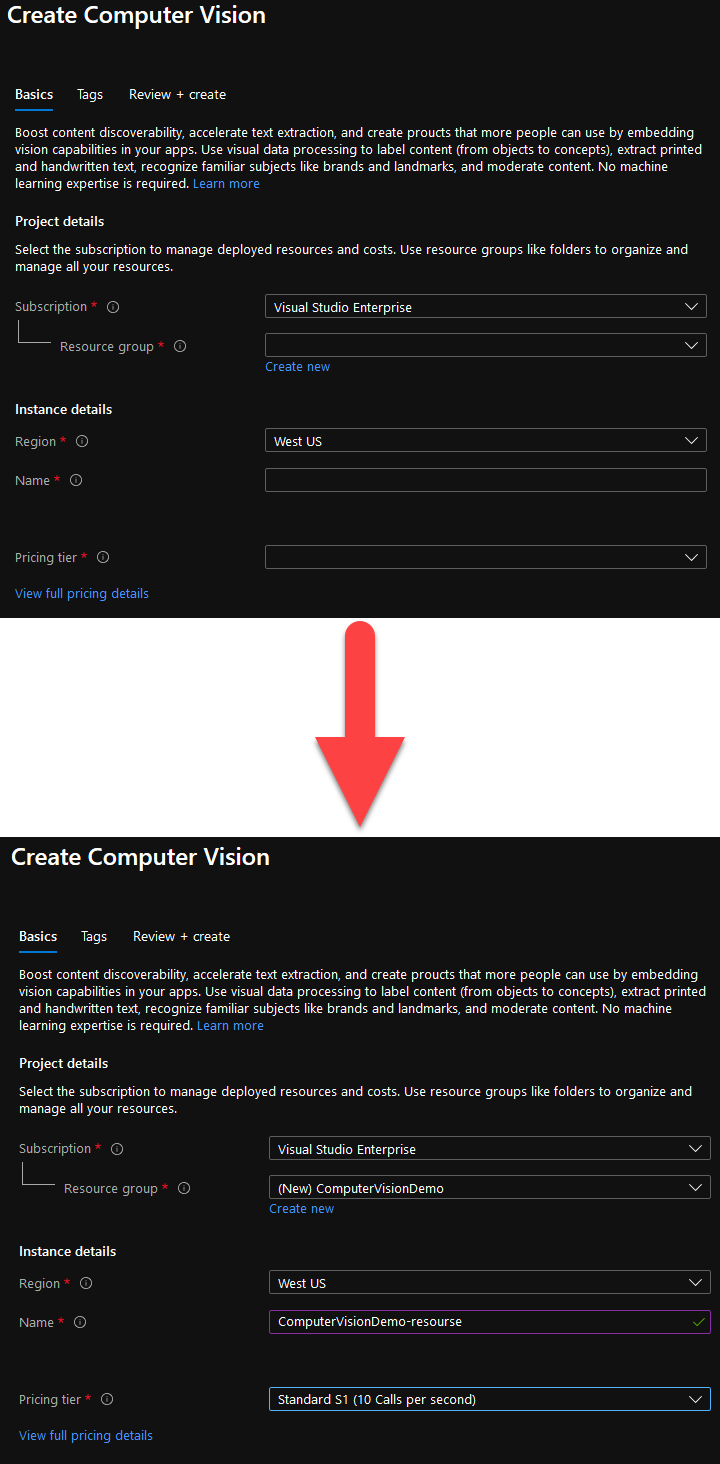
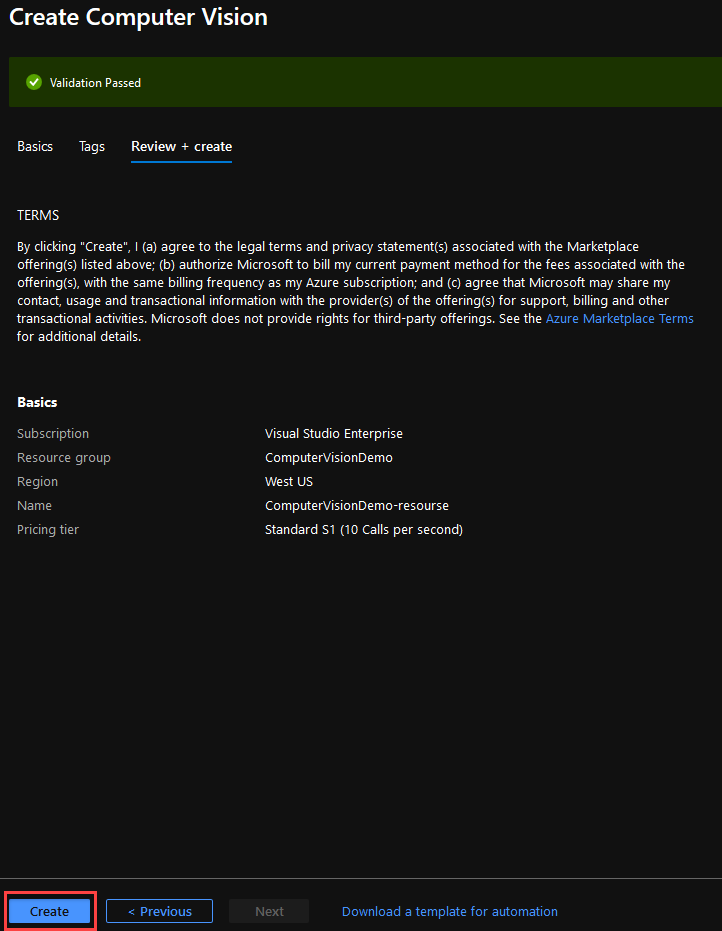
Continue to the last step and click Create.
Go to your resource and navigate to the Keys and Endpoint tab at the left of your window.
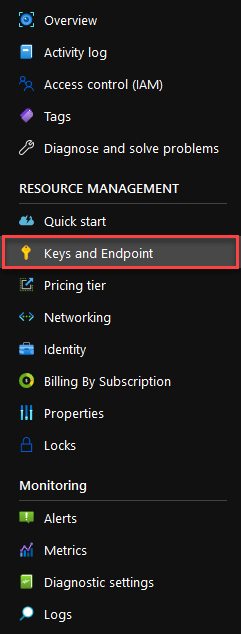
From here you can grab a Key and your Endpoint. You will need theese later.
Implement
Open your existing project in Visual Studio. If you are not working on an existing project, simply create a C# (.NET Core) Console app.
Navigate to Project -> Manage NuGet Packages, find and install the Microsoft.Azure.CognitiveServices.Vision.ComputerVision package.
Open the class that you need to implement the image analyser in. For a new project you can use the Program.cs.
Add the using statements you see below at the top of the file.
      using Microsoft.Azure.CognitiveServices.Vision.ComputerVision;
      using Microsoft.Azure.CognitiveServices.Vision.ComputerVision.Models;
      using System;
      using System.Collections.Generic;
      using System.Threading.Tasks;
Add these strings at the top of your class. The subscriptionKey should be the Key and endpoint is the Endpoint you found in the last step. At line 6 the ANALYZE_URL_IMAGE constant must be populated with the URL of the image you want to analyse. You can grab the URL of the images in the Test section of this post.
// Add your Computer Vision subscription key and endpoint
static string subscriptionKey = "b5c6KEY_HERE81400602c7";
static string endpoint = "https://computervisiondemo-resourse.cognitiveservices.azure.com/";

// URL image used for analyzing an image
private const string ANALYZE_URL_IMAGE = "";
Inside your Main put the code that appears below. Do not worry about the missing functions, we will create them in the next step.
// Create a client
ComputerVisionClient client = Authenticate(endpoint, subscriptionKey);

// Analyze an image to get features and other properties.
AnalyzeImageUrl(client, ANALYZE_URL_IMAGE).Wait();
Add the Authenticate function to create a connection between your project and your Copmuter Vision resource.
public static ComputerVisionClient Authenticate(string endpoint, string key)
{
    ComputerVisionClient client =
        new ComputerVisionClient(new ApiKeyServiceClientCredentials(key))
        { Endpoint = endpoint };
    return client;
}
The AnalyzeImageUrl is the function that analyses the image and outputs the results. In this example it will only output the summary of the image, however much more functionality is supported.
public static async Task AnalyzeImageUrl(ComputerVisionClient client, string imageUrl)
{
    // Creating a list that defines the features to be extracted from the image.
    List<VisualFeatureTypes?> features = new List<VisualFeatureTypes?>()
    {
        VisualFeatureTypes.Categories, VisualFeatureTypes.Description,
        VisualFeatureTypes.Faces, VisualFeatureTypes.ImageType,
        VisualFeatureTypes.Tags, VisualFeatureTypes.Adult,
        VisualFeatureTypes.Color, VisualFeatureTypes.Brands,
        VisualFeatureTypes.Objects
    };

    // Analyze the URL image
    ImageAnalysis results = await client.AnalyzeImageAsync(ANALYZE_URL_IMAGE, features);

    // Summarizes the image content.
    Console.WriteLine("Summary:");
    foreach (var caption in results.Description.Captions)
    {
        Console.WriteLine($"{caption.Text} with confidence {caption.Confidence}");
    }
    Console.WriteLine();
}
If you wish to add extra functionality to your image analyser you can add code segments into the AnalyzeImageUrl function from here. You can also take a look here to see more examples of what is supported with the Computer Vision service.
Test
To test, simply put the URL of one of the images below to the ANALYZE_URL_IMAGE constant and run the project.
Example 1


Example 2


As you can see it works pretty well! And this is how you can utilise the power of Computer Vision to make an image analyser! It is also extremely easy to give this functionality to a bot, let the user show photos to the bot and receive information about them.
Proactive Messages in Microsoft Bot Framework
 January 21, 2021
Proactive messaging provides your bot the ability to notify the user with messages that can be written and modified by the developer.
Create
In this demo we will be using a core bot created in Azure using Azure Bot Service. To create one you can visit this post.
Open the project in Visual Studio and create a new class named NotifyController.cs. Copy and paste the following code. Change the string in line 59 to the message you would like to appear in your bot.
using Microsoft.AspNetCore.Mvc;
using Microsoft.Bot.Builder;
using Microsoft.Bot.Builder.Integration.AspNet.Core;
using Microsoft.Bot.Schema;
using Microsoft.BotBuilderSamples.Dialogs;
using Microsoft.Extensions.Configuration;
using System;
using System.Collections.Concurrent;
using System.Net;
using System.Threading;
using System.Threading.Tasks;

namespace CoreBot.Controllers
{
    [Route("api/notify")]
    [ApiController]
    public class NotifyController : ControllerBase
    {
        private readonly IBotFrameworkHttpAdapter _adapter;
        private readonly string _appId;
        private readonly ConcurrentDictionary<string, ConversationReference> _conversationReferences;

        public NotifyController(IBotFrameworkHttpAdapter adapter, IConfiguration configuration, ConcurrentDictionary<string, ConversationReference> conversationReferences)
        {
            _adapter = adapter;
            _conversationReferences = conversationReferences;
            _appId = configuration["MicrosoftAppId"];

            // If the channel is the Emulator, and authentication is not in use,
            // the AppId will be null.  We generate a random AppId for this case only.
            // This is not required for production, since the AppId will have a value.
            if (string.IsNullOrEmpty(_appId))
            {
                _appId = Guid.NewGuid().ToString(); //if no AppId, use a random Guid
            }
        }

        public async Task<IActionResult> Get()
        {
            foreach (var conversationReference in _conversationReferences.Values)
            {
                await ((BotAdapter)_adapter).ContinueConversationAsync(_appId, conversationReference, BotCallback, default);
            }

            // Let the caller know proactive messages have been sent
            return new ContentResult()
            {
                Content = "<html><body><h1>Proactive messages have been sent.</h1></body></html>",
                ContentType = "text/html",
                StatusCode = (int)HttpStatusCode.OK,
            };
        }

        private async Task BotCallback(ITurnContext turnContext, CancellationToken cancellationToken)
        {
            // If you encounter permission-related errors when sending this message, see
            // https://aka.ms/BotTrustServiceUrl

            await turnContext.SendActivityAsync("This is a proactive message!");
        }
    }
}
Implement
Open the MainDialog.cs class and add the following using statement.
using System.Collections.Concurrent;
Create the ConcurrentDictionary at the top of the file.
private static ConcurrentDictionary<string, ConversationReference> _conversationReferences;
Change the constructor to include the ConcurrentDictionary<string, ConversationReference> conversationReferences) as an argument in line 1 and initialize the _conversationReferences in line 7.
public MainDialog(FlightBookingRecognizer luisRecognizer, BookingDialog bookingDialog, ILogger<MainDialog> logger, ConcurrentDictionary<string, ConversationReference> conversationReferences)
    : base(nameof(MainDialog))
{
    _luisRecognizer = luisRecognizer;
    Logger = logger;

    _conversationReferences = conversationReferences;

    AddDialog(new TextPrompt(nameof(TextPrompt)));
    AddDialog(bookingDialog);
    AddDialog(new WaterfallDialog(nameof(WaterfallDialog), new WaterfallStep[]
    {
        IntroStepAsync,
        ActStepAsync,
        FinalStepAsync,
    }));

    // The initial child Dialog to run.
    InitialDialogId = nameof(WaterfallDialog);
}
Add the AddConversationReference function later in the file.
public static void AddConversationReference(Activity activity)
{
    var conversationReference = activity.GetConversationReference();
    _conversationReferences.AddOrUpdate(conversationReference.User.Id, conversationReference, (key, newValue) => conversationReference);
}
Open the DialogBot.cs class and override the OnConversationUpdateActivityAsync by inserting the following code to the file.
protected override Task OnConversationUpdateActivityAsync(ITurnContext<IConversationUpdateActivity> turnContext, CancellationToken cancellationToken)
{
    MainDialog.AddConversationReference(turnContext.Activity as Activity);

    return base.OnConversationUpdateActivityAsync(turnContext, cancellationToken);
}
Lastly open the Startup.cs class and add the two following using statements.
      using Microsoft.Bot.Schema;
      using System.Collections.Concurrent;
Add the following line in the ConfigureServices function.
services.AddSingleton<ConcurrentDictionary<string, ConversationReference>>();
Test
To test, simply run your bot and load up the emulator like normally, you should get the following messages.
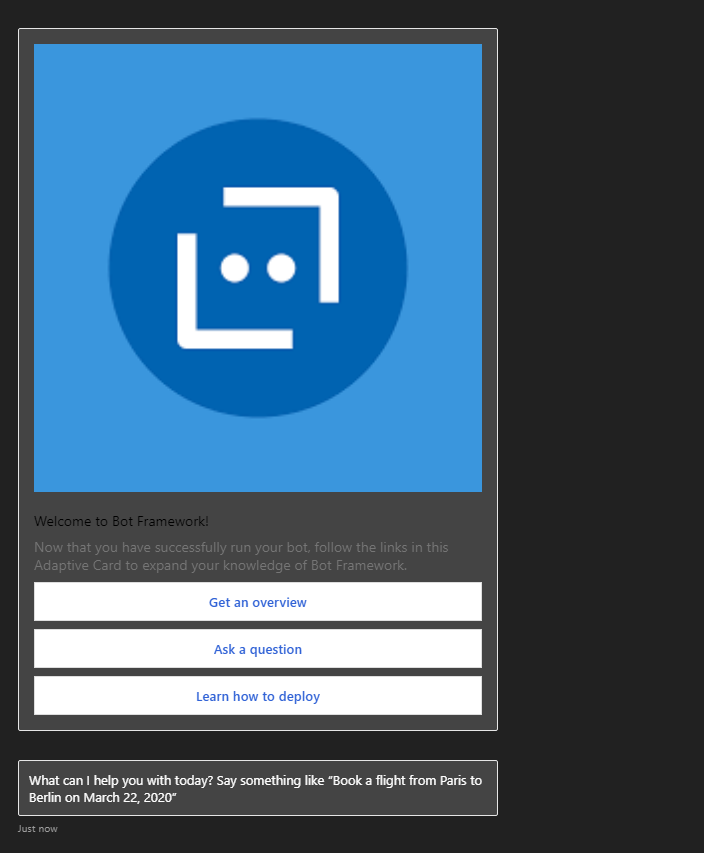
Now to trigger the proactive message click the following link: http://localhost:3978/api/notify
You should see this page in your browser informing you that the Proactive messages have been sent.
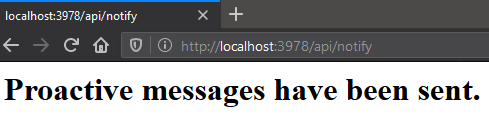
Finally, check your emulator, your bot has sent a new message. The text and type of the message is determined by NotifyController.cs so you can make any changes you need. At this point you can refresh the proactive messages page as many times as you like and each will sent a new message to the user.
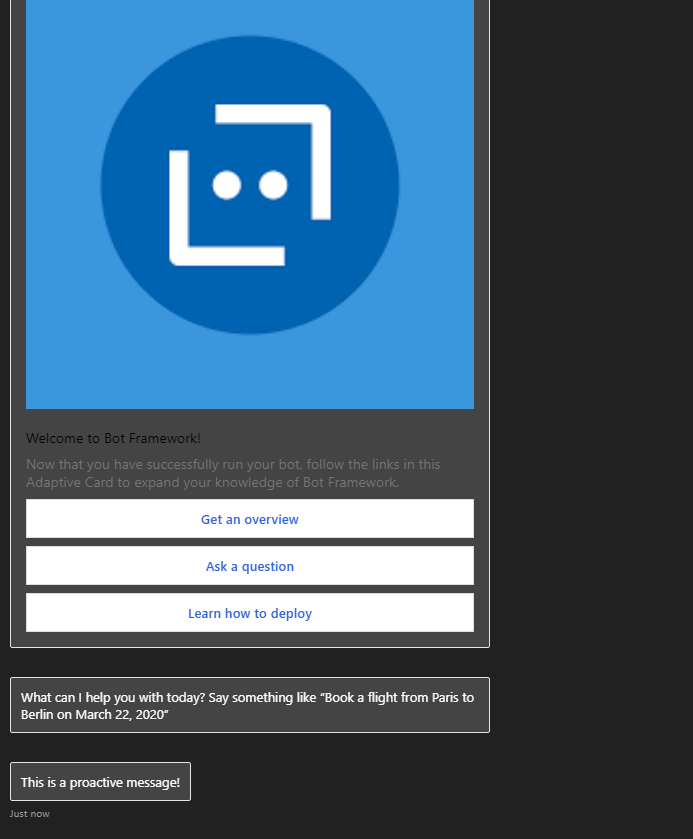
This is how you send a massage to the user without him opening a dialog. You can schedule your messages as you like to notify the user according to his needs.
LUIS Overview
 January 06, 2021
LUIS (Language Understanding) is a cloud-based conversational AI service that applies custom machine-learning intelligence to a user’s conversational, natural language text to predict overall meaning, and pull out relevant, detailed information. Learn more about it here.
A client application for LUIS is any conversational application that communicates with a user in natural language to complete a task. It becomes especially usefull when creating a chatbot to provide the ability to comunicate using human language. The communication between LUIS and Azure Bot Service is done using JSON.
Get Started
In order to follow through you need a luis app which is already connected with your bot. You can find out how to do it in this post. After your app is ready, Sign in to the LUIS portal at https://www.luis.ai/.
After you Sign in, select your Subscription from the list
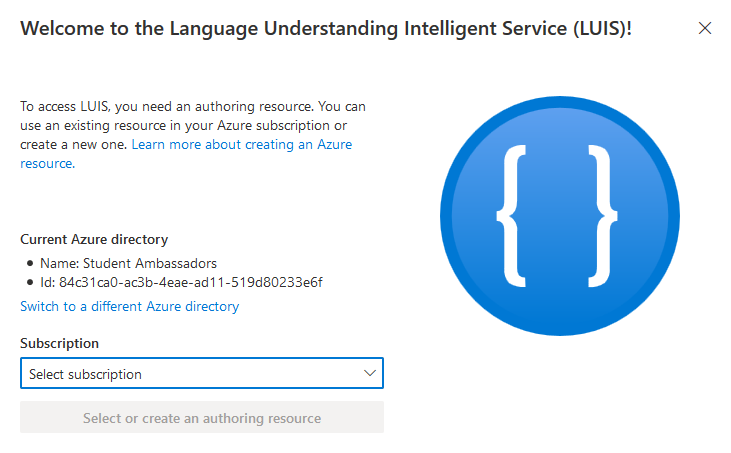
then select your authoring resource and click Done.
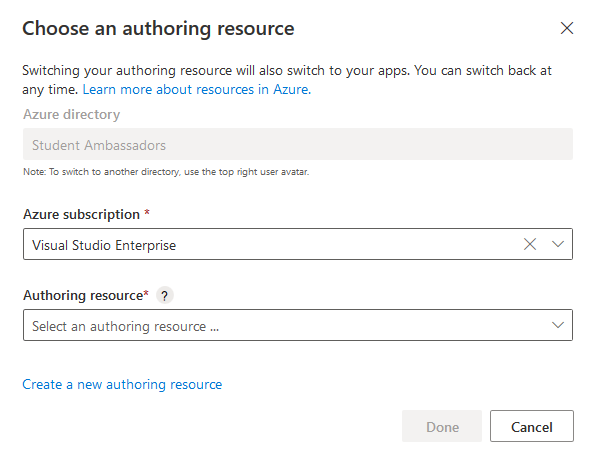
You now have in front of you all the available apps in that authoring resource. Pick the one you have connected to your bot.

Here you can manage how your bot understands human language.
Intents
Intents show the intentions of a user and are extracted from the messages that are sent to the bot. For example the sentence “flight to paris” shows an intention to book a flight. LUIS is able to understand the intention of the user and provides you with the correct answer. If the correct answer is not achieved, then you can correct the model and it will improve over time.
Here you can see all the available intents in your model.
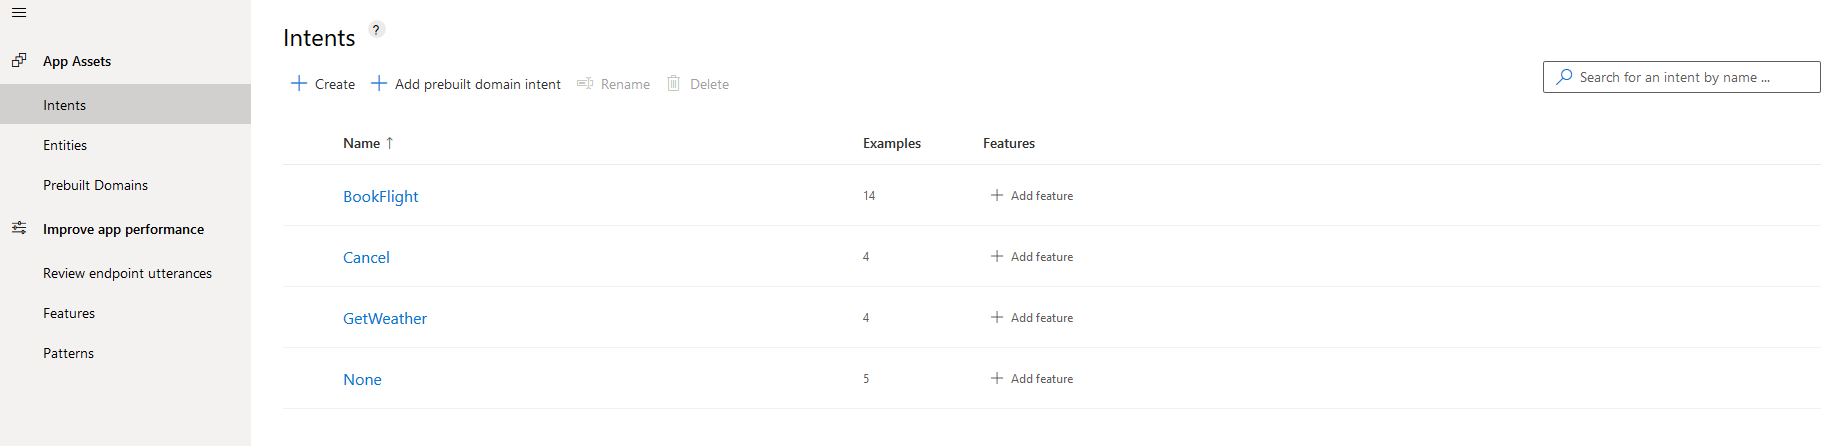
You can review an existing intent by clicking on it. Here you can add, edit or remove utterances (sentencess) that are associated with that intent.
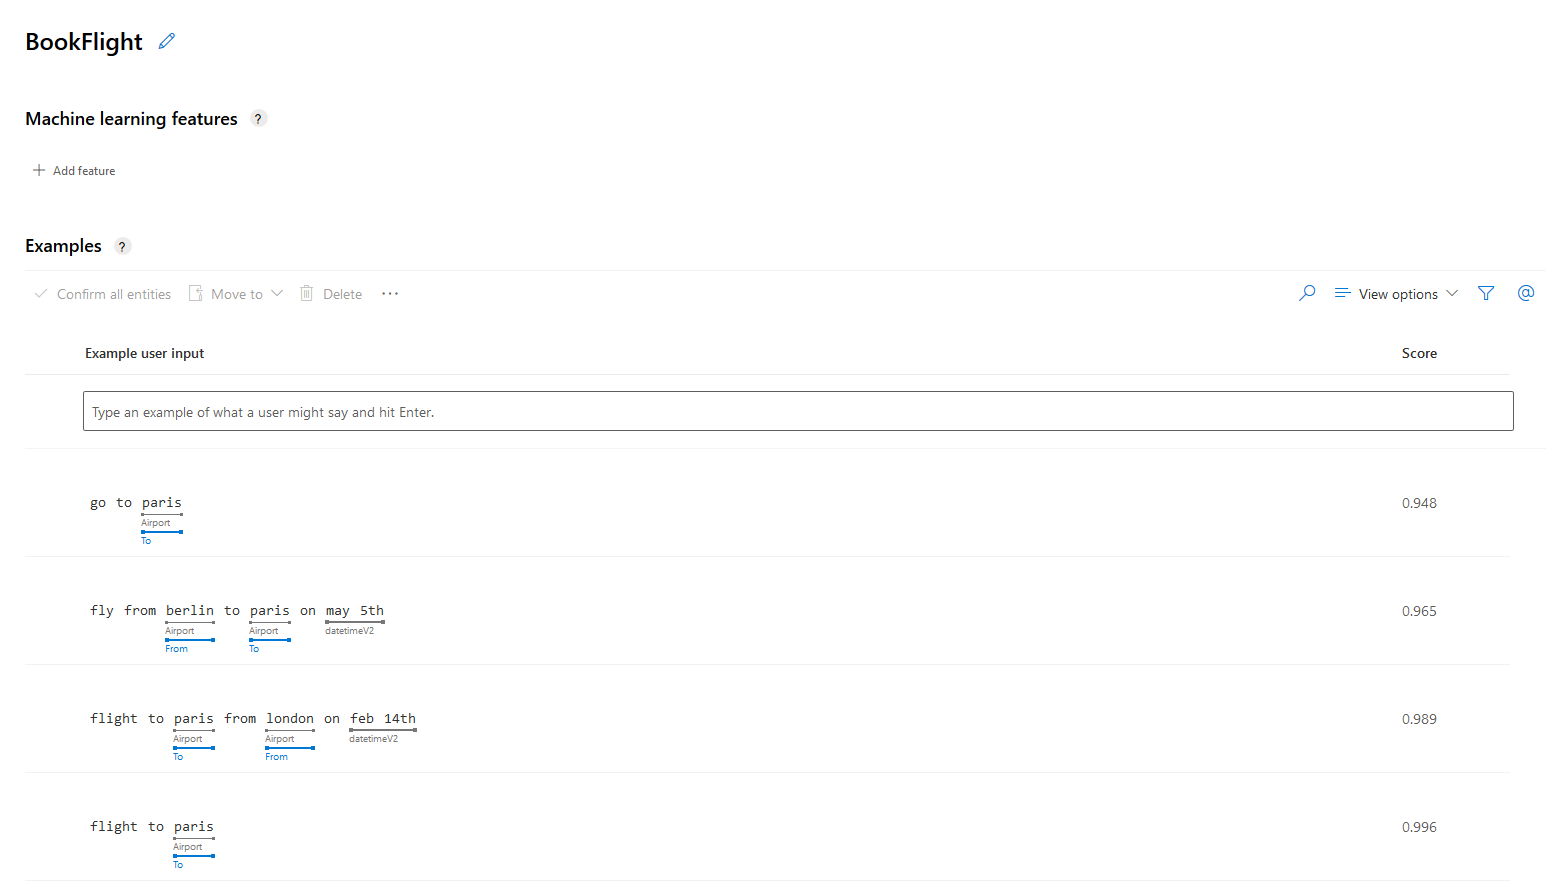
You can create a new intent buy clicking Create and the typing the name of your intent. For example “Greeting”.
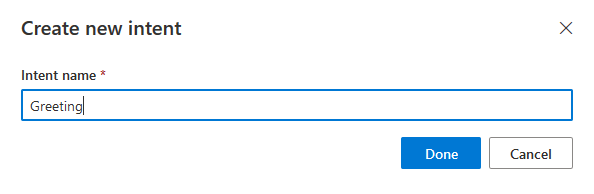
Here you can add the potential utterances that will get recognized as this intent. Because this model uses active machine learning, it will only get better over time as it learns more phrases and associates them with each intent. For now we will put “hello”, “hey” and “hi”.
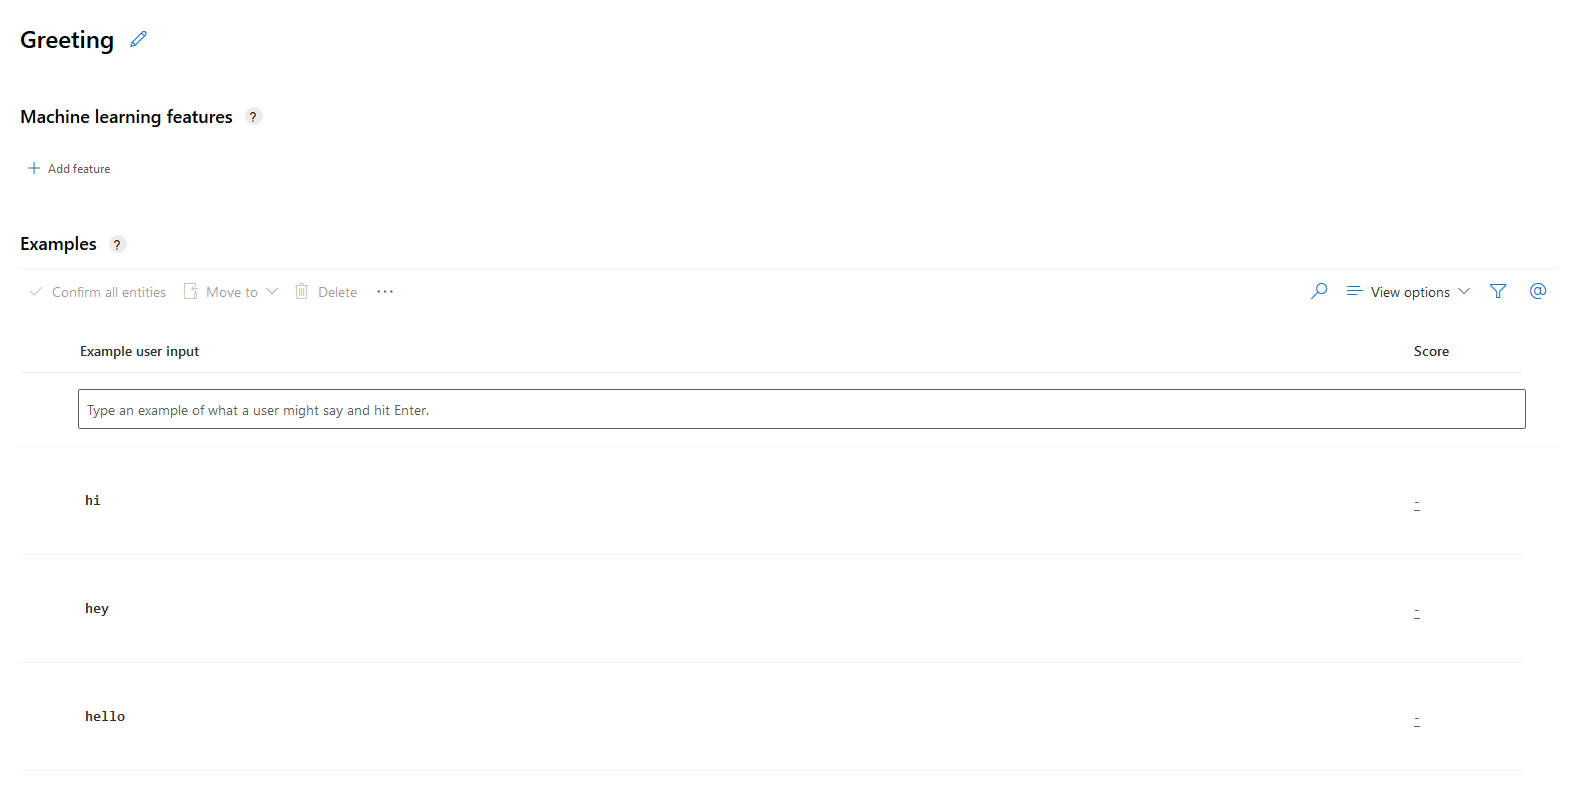
Entities
Entities are variables that can be extracted form an utterance. For example a certain time or a name. These are the entities that are already included in a new web app bot.
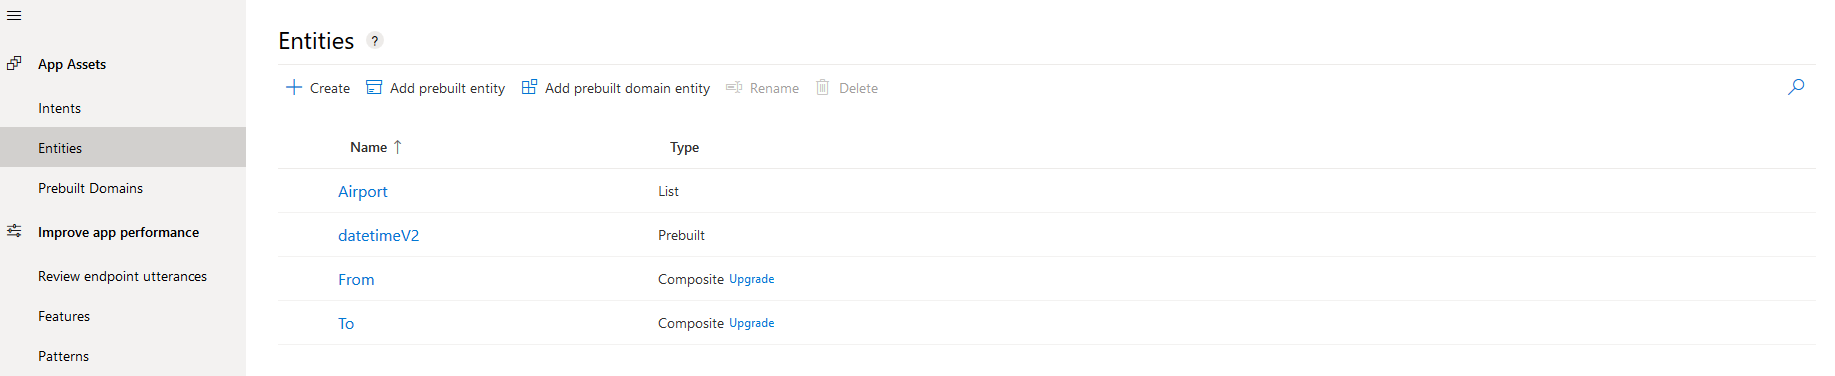
You can click Create to create your own entities, or Add prebuilt entity to add an entity that is already existent in LUIS and is more commonly used. For this example we will Add a prebuilt entity.
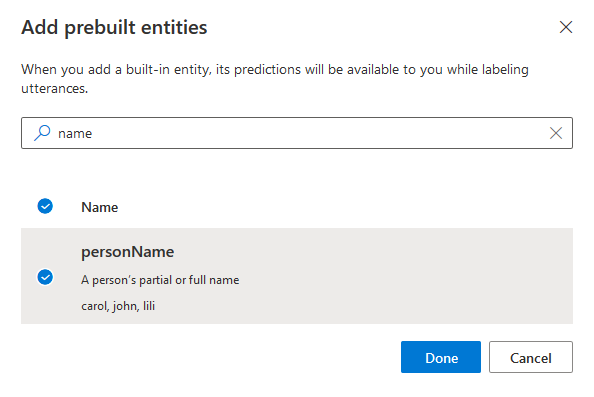
Search for the entity called personName, select it and click Done. This will give your model the ability to identify many common names in any intent.
Review and Publish
Click on the Review endpoint utteracnes tab to see all the utterances that are exposed to your model. This tab is empty when you first create the model, but they will quickly stack up as you use your bot, either durning development or after release. Here is an example.
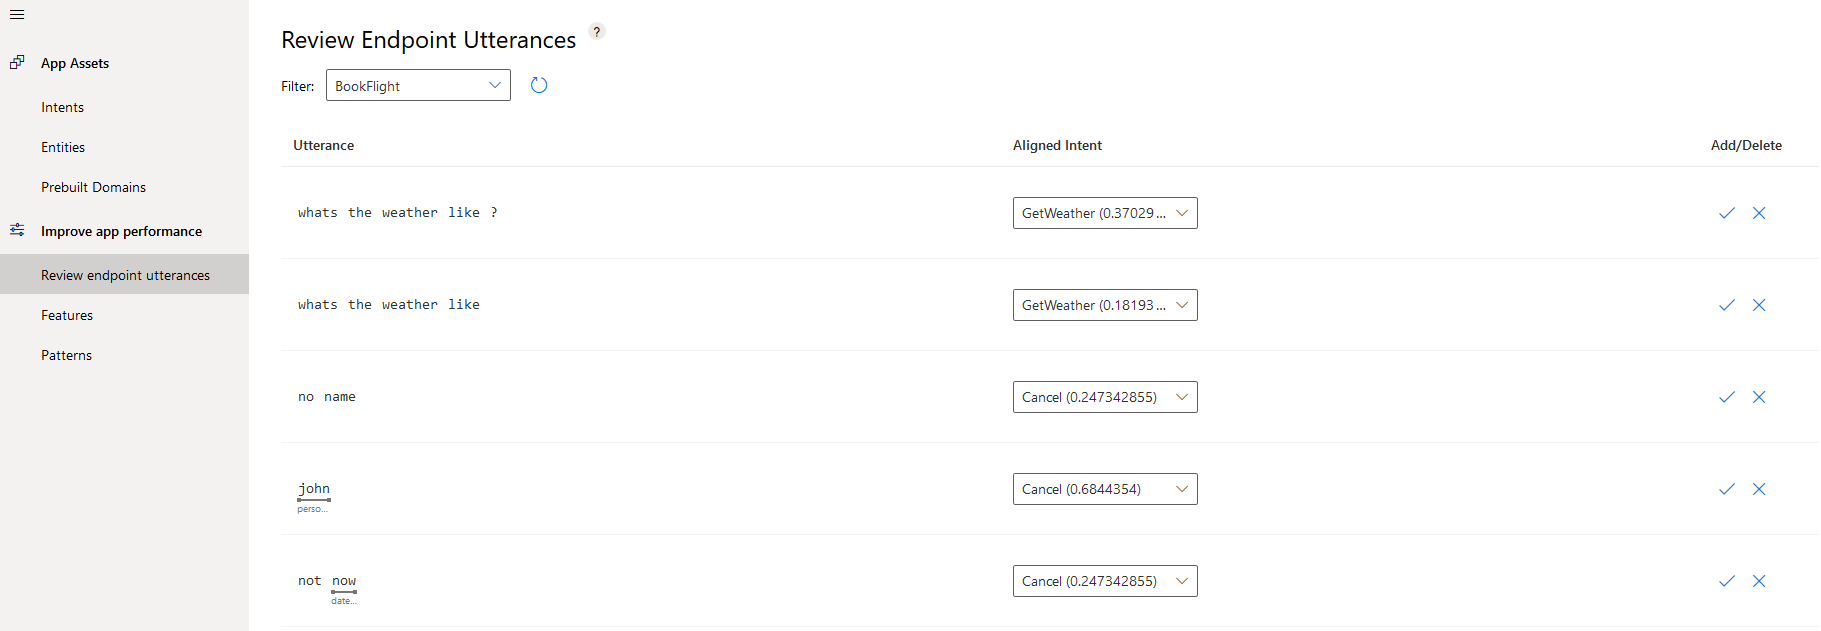
In the Utterance column you can view what the user sent to your bot. You can change the Aligned Intent to match the correct intent, if the model has not guessed it correctly. You can also view the entities in the Utterance column. For the utterance “john” the moddel correctly guessed that is a personName and for the utterance “not now” it guessed tha the word “now” my refer to a datetimeV2. You can add or delete any utterances as you please.
After you are done modifying your model click the Train button at the top right corner. If there are untrained changes available it’s icon will have a red color as a reminder.

After training your model click publish to make all the changes live.

Select Produtcion Slot and click Done.
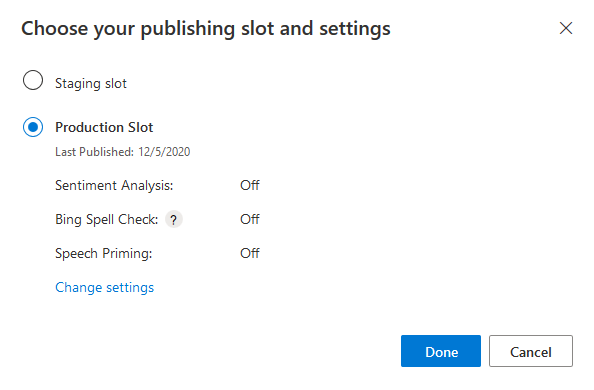
Now you can start testing your model inside the LUIS portal by clicking Test. Write your utterance and then click on Inspect to see the results.
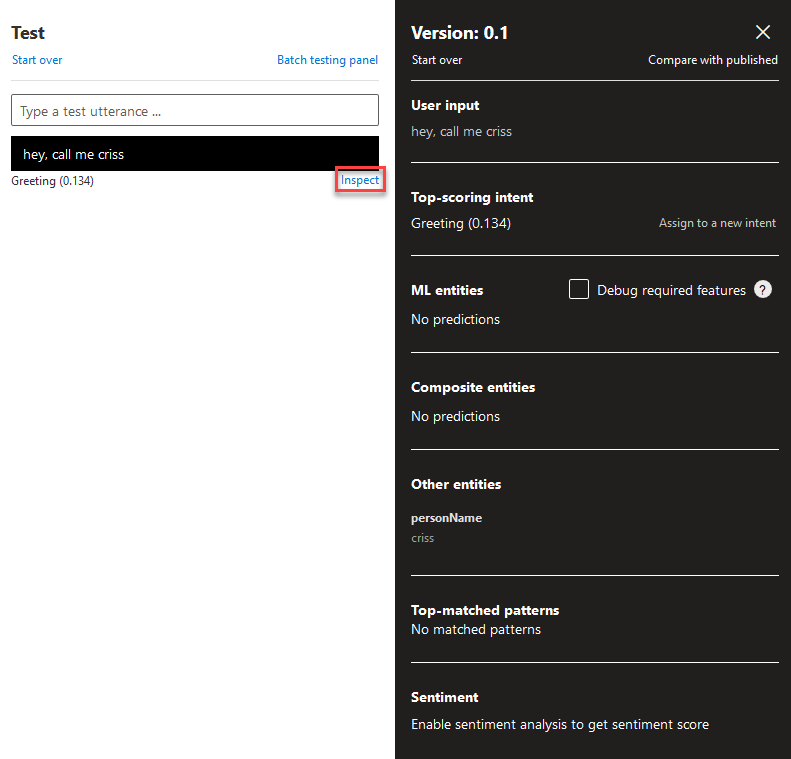
I used the utterance “hey, call me criss” as an example. The model correctly guessed the Top-scoring intent as Greeting and criss as a personName. Important note is that the testing utterances used here are not are not processed as new endpoint hits, therefore are not stacked with the rest of the Review endpoint utterances.
Intergrade to your bot
To implement theese changes to an Azure Bot Service core bot sample you need to add a few lines of code.
In the FlightBooking.cs file, add the lines 9 and 19. This adds the new intent and entity into your json class structure. The samples below shows only a small part of the files.
public partial class FlightBooking: IRecognizerConvert
    {
        public string Text;
        public string AlteredText;
        public enum Intent {
            BookFlight,
            Cancel,
            GetWeather,
            Greeting,
            None
        };
        public Dictionary<Intent, IntentScore> Intents;

        public class _Entities
        {

            // Built-in entities
            public DateTimeSpec[] datetime;
            public string[] personName;
In the FlightBooking.json file add the new intent (lines 11 - 13) in the intents section.
  "intents": [
    {
      "name": "BookFlight"
    },
    {
      "name": "Cancel"
    },
    {
      "name": "GetWeather"
    },
    {
      "name": "Greeting"
    },
    {
      "name": "None"
    }
  ],
Further down the file, in the prebuiltEntities section add the lines 6 - 9 to add the new prebuilt entity.
  "prebuiltEntities": [
    {
      "name": "datetimeV2",
      "roles": []
    },
    {
      "name": "personName",
      "roles": []
    }
  ],
You are now done! The new intent and entity are ready to use by the bot and you can access them like any other intent or entity.
Enhance the answers of your bot using Adaptive Cards
 December 20, 2020
Adaptive Cards are platform-agnostic snippets of UI, authored in JSON, that apps and services can openly exchange. When delivered to a specific app, the JSON is transformed into native UI that automatically adapts to its surroundings. It helps design and integrate light-weight UI for all major platforms and frameworks.
Intergrading them to an Azure Bot Service project provides the user a more aesthetically pleasing and intuitive user interface. Works seamlessly with every channel, making multiplatform support effortless.
- Portable - To any app, device, and UI framework
- Open - Libraries and schema are open source and shared
- Low cost - Easy to define, easy to consume
- Expressive - Targeted at the long tail of content that developers want to produce
- Purely declarative - No code is needed or allowed
- Automatically styled - To the Host application UX and brand guidelines
Learn more about Adaptive Cards here.
Setup
In this demo we will be using a fresh created Core Bot from Azure. You can find out how to make one in this post. In Visual Studio navigate to Project and select Manage NuGet Packages.
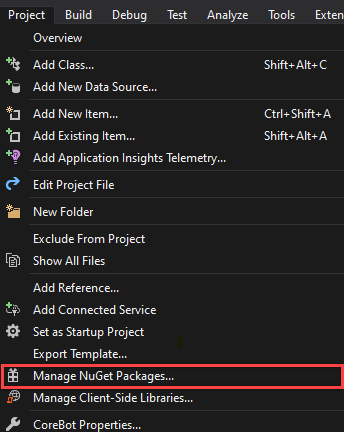
In Browse search for Adaptive Cards and find the AdaptiveCards package by Microsoft. Click on the install button an your right and click OK in the next prompt. If it fails to install try to updating all of your existing packages.
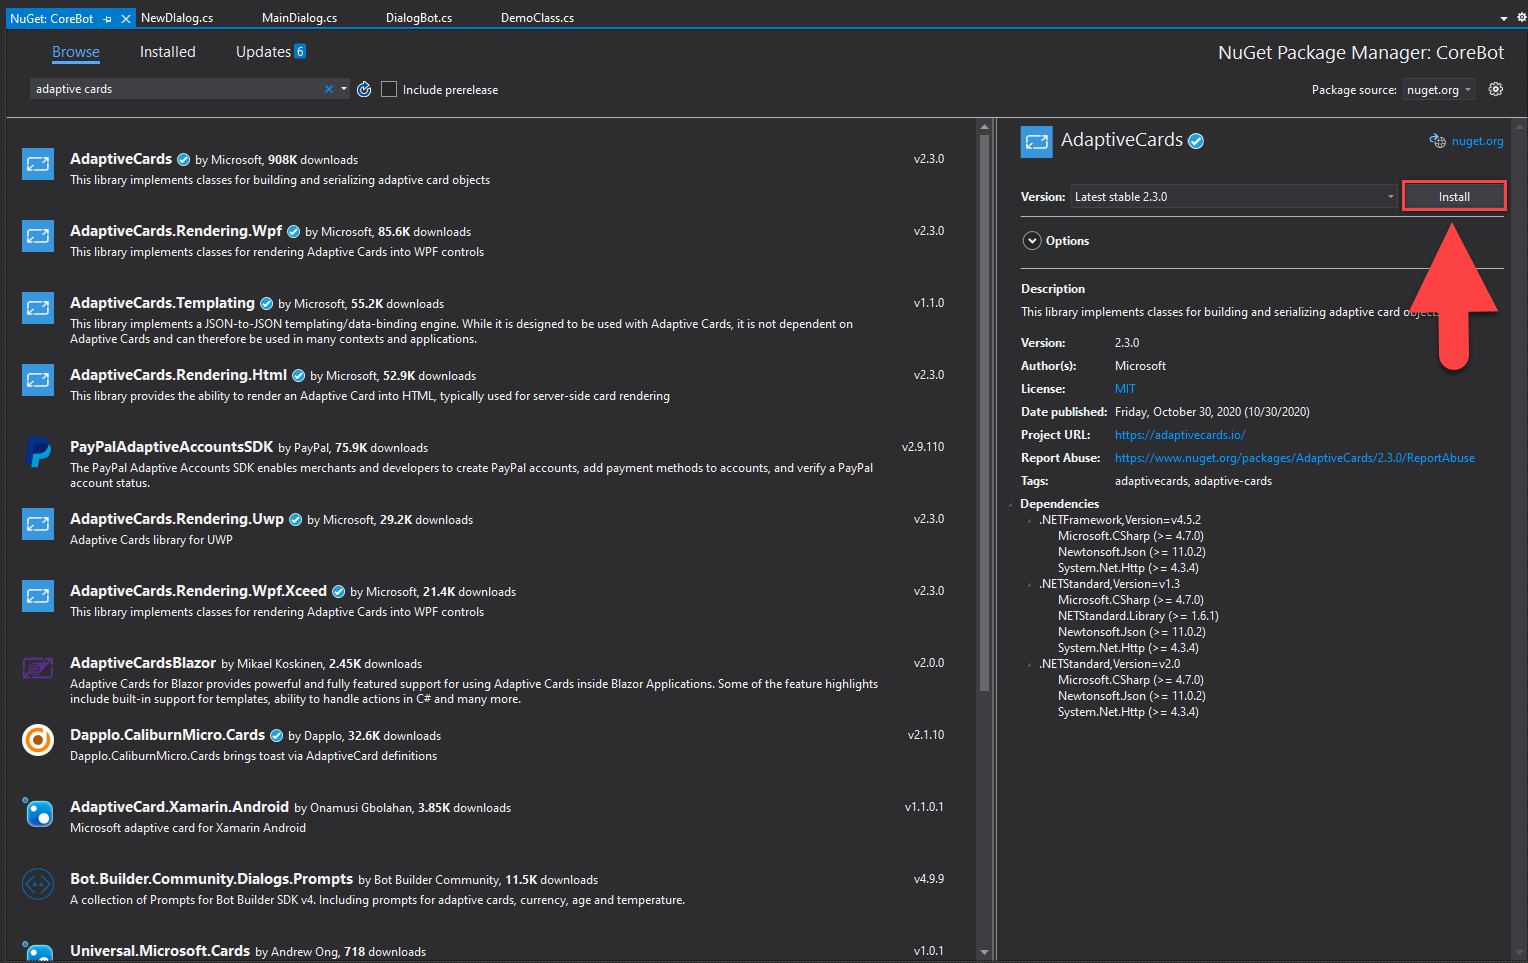
Code
In this segment we will be modifying the booking result message to appear as an Adaptive Card.
Put this line on top, with the rest of the using statements.
using AdaptiveCards;
The following code creates our card as an Attachment. We use a BookingDetails object as an argument because we will need our booking details information to be displayed in the card. If you are using the card in another project, you can completely ignore the arguments, or change them to the information that your card requires. The card.Speak section is especially important in our use case, as is what the bot will tell if it is connected to a personal assistant with speech capabilities. This is useful because a spoken channel might not have the ability to convey the card visually to the user as it might not be required to have a screen in order to use it. In the first AdaptiveTextBlock we are modifying the text to be Large and Bolder. In the second one the text is displayed regularly. Next we display an AdaptiveImage and we input the URL. You can remove or add more body segments if you wish.
public Attachment CreateAdaptiveCardAttachment(BookingDetails result)
{
    AdaptiveCard card = new AdaptiveCard("1.0");

    var timeProperty = new TimexProperty(result.TravelDate);
    var travelDateMsg = timeProperty.ToNaturalLanguage(DateTime.Now);

    card.Speak = $"I have you booked to {result.Destination} from {result.Origin} on {travelDateMsg}";

    card.Body.Add(new AdaptiveTextBlock()
    {
        Text = $"I have you booked\n\nTo {result.Destination}\n\nFrom {result.Origin}\n\nOn {result.TravelDate}",
        Size = AdaptiveTextSize.Large,
        Weight = AdaptiveTextWeight.Bolder
    });

    card.Body.Add(new AdaptiveTextBlock()
    {
        Text = $"Have a nice Flight!"
    });

    card.Body.Add(new AdaptiveImage()
    {
        Url = new Uri($"https://images.unsplash.com/photo-1587019158091-1a103c5dd17f?ixid=MXwxMjA3fDB8MHxwaG90by1wYWdlfHx8fGVufDB8fHw%3D&ixlib=rb-1.2.1&auto=format&fit=crop&w=1950&q=80")
    });

    Attachment attachment = new Attachment()
    {
        ContentType = AdaptiveCard.ContentType,
        Content = card
    };

    return attachment;
}
Next we replace the regular prompt message with our newly created card.
private async Task<DialogTurnResult> FinalStepAsync(WaterfallStepContext stepContext, CancellationToken cancellationToken)
{
    if (stepContext.Result is BookingDetails result)
    {
        var resultCard = CreateAdaptiveCardAttachment(result);
        var response = MessageFactory.Attachment(resultCard);
        await stepContext.Context.SendActivityAsync(response, cancellationToken);
    }

    // Restart the main dialog with a different message the second time around
    var promptMessage = "What else can I do for you?";
    return await stepContext.ReplaceDialogAsync(InitialDialogId, promptMessage, cancellationToken);
}
This is how the card looks like presented by the bot!
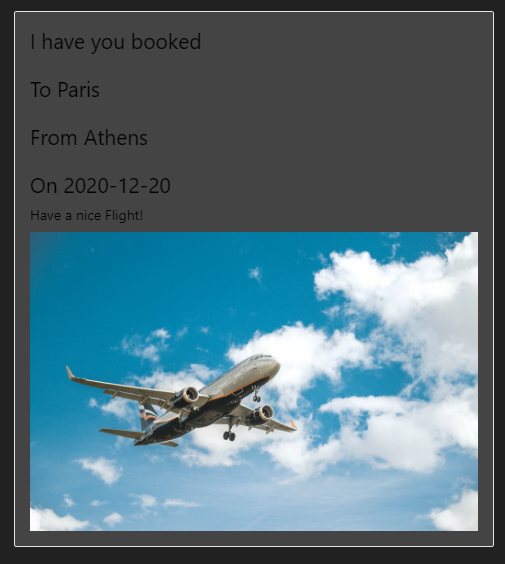
This way you can utilise Adaptive Cards with minimal changes to many different supporting frameworks, not only Bot Framework is supported.
Give your bot the ability to validate user's responce
 December 10, 2020
Validation in Bot Framework allows the developper to ensure that a compatible answer is given by the user before proceeding to the next prompt. Provided that the information gathered by the bot is validated, the accuracy of the attained information is increased.
How it works
A perfect example to see how validation works in a prompt can be seen using a choice prompt, because it provides validation functionality out of the box. When an input in the choice prompt is not in the given choices, the choice prompt repeats the question using a new message, until the question is answered correctly. However validation is not unique in the choice prompt. Below you will find a validation implementation in a text prompt.
Let’s get started!
Validate a Text prompt
We will now validatate a text prompt that asks for the user’s age. Create an new Task<bool> function that gets a PromptValidatorContext<string> as an argument. Inside we check if there is any number in the users text using a Regular Expression. If it does, we parse the number into a variable and return True as it passed the validation. If not, we return false to prompt the question again to the user.
private async Task<bool> TextPromptValidatorAsync(PromptValidatorContext<string> promptContext, CancellationToken cancellationToken)
{
    if (Regex.Match(promptContext.Context.Activity.Text, @"\d+").Value != "")
    {
        Age = Int32.Parse(Regex.Match(promptContext.Context.Activity.Text, @"\d+").Value);
        return await Task.FromResult(true);
    }
    else
        return await Task.FromResult(false);
}
Our validator is done. Now we just need to let the text prompt know that the validator exists. Find the line below
AddDialog(new TextPrompt(nameof(TextPrompt)));
and replace it with this line. Essentially we add the name of our validator function ine the text prompt’s declaration.
AddDialog(new TextPrompt(nameof(TextPrompt), TextPromptValidatorAsync));
Optionally we can change the message that gets repeated after the validation returns false. FInd the line below which calls the text prompt
return await stepContext.PromptAsync(nameof(TextPrompt), new PromptOptions { Prompt = promptMessage }, cancellationToken);
and add a RetryPrompt with your MessageFactory.
return await stepContext.PromptAsync(nameof(TextPrompt), new PromptOptions { Prompt = promptMessage, RetryPrompt = MessageFactory.Text("Your age must be a number") }, cancellationToken);
Intergrade LUIS in the validator
We are intergrading LUIS to a text prompt that asks for the user’s name. It works the same way as before, except you just send a request to LUIS and wait for it to respond. Thus the use of await is crucial. After that you save the LUIS response in the corresponding variable. If the variable is now null, it means that no name was identified from the user’s utterance, so we return False. If it is not null the name was captured correctly and we return True to let the user proceed.
private async Task<bool> TextPromptValidatorAsync(PromptValidatorContext<string> promptContext, CancellationToken cancellationToken)
{
    luisResult = await MainDialog.Get_luisRecognizer().RecognizeAsync<FlightBooking>(promptContext.Context, cancellationToken);
    Name = (luisResult.Entities.personName != null ? char.ToUpper(luisResult.Entities.personName[0][0]) + luisResult.Entities.personName[0].Substring(1) : null);

    if (Name == null)
        return await Task.FromResult(false);
    else
        return await Task.FromResult(true);
}
Multiple validators for the same prompt
If you have implemented both of those validators, you probably came to the realization that having more that one validator for the same type of prompt (in our case text prompt) is prohibited. To get around that we can create a switch statemend and pass a value that indicates which validation should be performed when the validator is called.
Firstly let’s create an enum that contains all the possible validations (Name and Age).
private enum Validator
{
    Name,
    Age
};
Next we implement the switch statement in the first function and cut-paste the functionality of the second one into the first, like below. Puting a null check in the switch is also helpful because some text prompts might not be utilizing any validation. For that reason we also set the default case to return true.
private async Task<bool> TextPromptValidatorAsync(PromptValidatorContext<string> promptContext, CancellationToken cancellationToken)
{
    switch (promptContext.Options.Validations != null ? (Validator)promptContext.Options.Validations : (Validator)(-1))
    {
        case Validator.Name:
            luisResult = await MainDialog.Get_luisRecognizer().RecognizeAsync<FlightBooking>(promptContext.Context, cancellationToken);
            Name = (luisResult.Entities.personName != null ? char.ToUpper(luisResult.Entities.personName[0][0]) + luisResult.Entities.personName[0].Substring(1) : null);

            if (Name == null)
                return await Task.FromResult(false);
            else
                return await Task.FromResult(true);

        case Validator.Age:
            if (Regex.Match(promptContext.Context.Activity.Text, @"\d+").Value != "")
            {
                Age = Int32.Parse(Regex.Match(promptContext.Context.Activity.Text, @"\d+").Value);
                return await Task.FromResult(true);
            }
            else
                return await Task.FromResult(false);

        default:
            return await Task.FromResult(true);
    }
}
Lastly we should include our validation type into the prompt’s options when the prompt is being called.
return await stepContext.PromptAsync(nameof(TextPrompt), new PromptOptions { Prompt = promptMessage, RetryPrompt = MessageFactory.Text("Can you please repeat your name?"), Validations = Validator.Name }, cancellationToken);
return await stepContext.PromptAsync(nameof(TextPrompt), new PromptOptions { Prompt = promptMessage, RetryPrompt = MessageFactory.Text("Your age must be a number"), Validations = Validator.Age }, cancellationToken);
Your finished result should look like this.
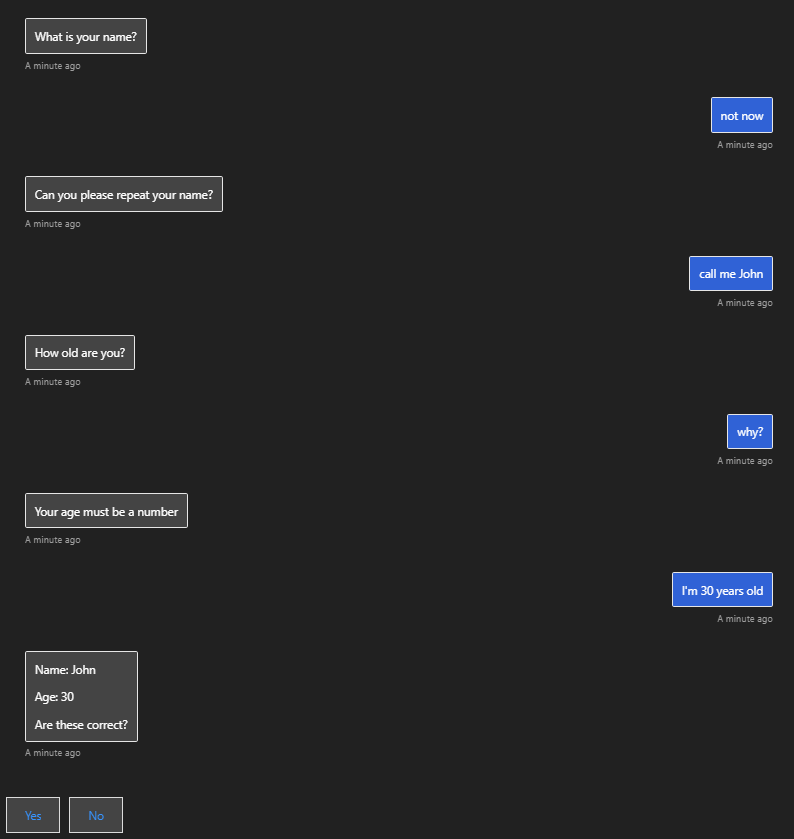
You can also work on the implementation of the validators to make it seem “smarter”. For example you can request LUIS for an age entity before trying the regular expression or if the user answers only with one word in the name field you can register it as a name, even if LUIS fails to identify it.
Overview of ML.NET
 November 30, 2020
ML.Net is an open source and cross-platform framework created by Microsoft that utilizes Machine Learning to give the user the ability to effortlessly manipulate data in their own volition. Using the available model creation, data can be transformed into a prediction in seconds. ML.NET runs on Windows, Linux, and macOS using .NET Core, or Windows using .NET Framework. 64 bit is supported on all platforms. 32 bit is supported on Windows, except for TensorFlow, LightGBM, and ONNX-related functionality. You can learn more here.
Get started
Download the latest version of Visual Studio here. Visual Studio Community edition is free. If you already have Visual Studio installed, you might need to update to the latest version.
Open the Visual Studio Installer. If you already have Visual Studio installed, navigate to the right of the installation, click More and then Modify.
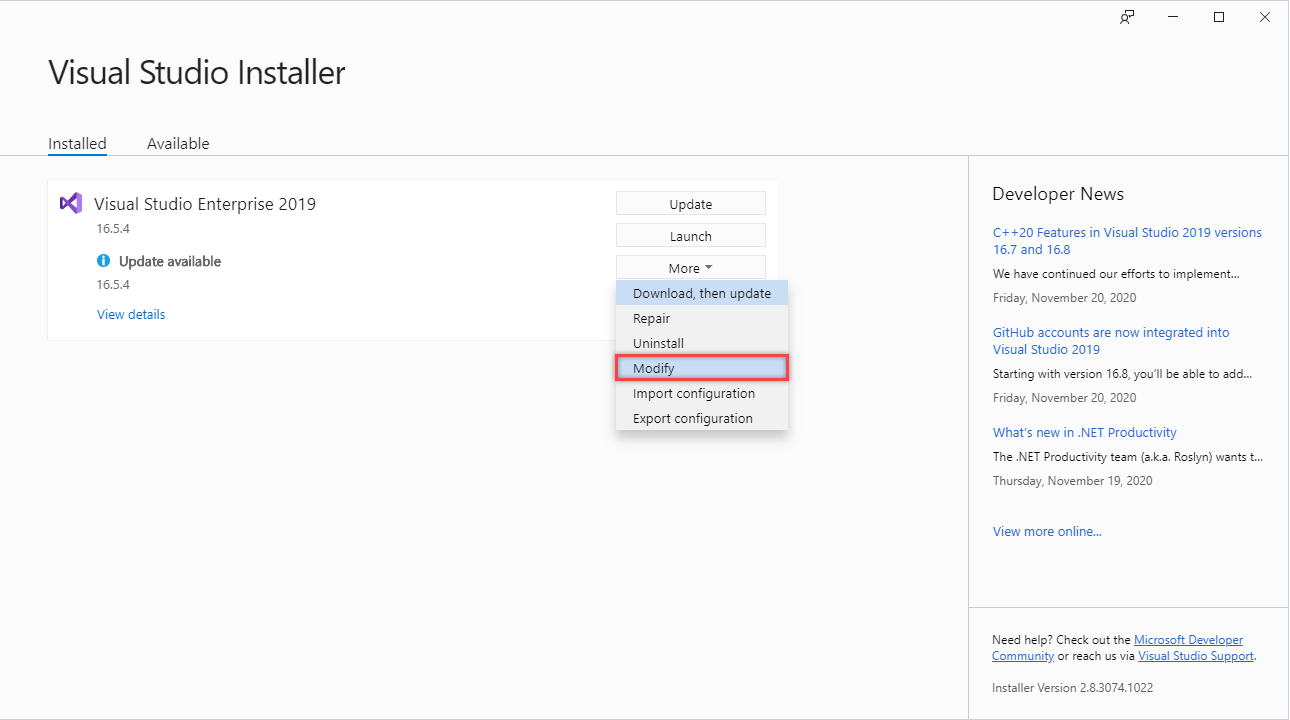
Now you have the installation window in front of you. At your right, click the Individual Components dropdown and check the ML.NET Model Builder (Preview) checkbox. If this is a fresh install of Visual Studio, now is the time to install every component you like.
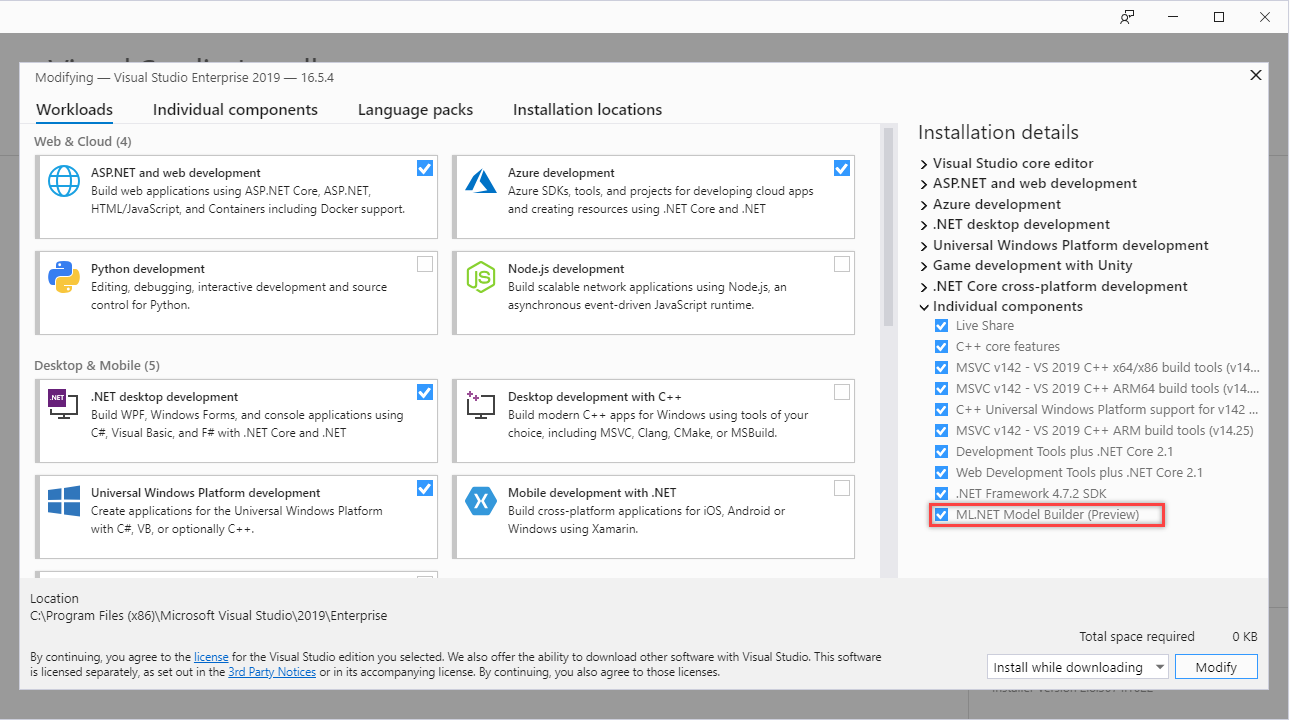
When you are done, click Modify or Install at the bottom right. Wait for everithing to install and open Visual Studio. Create a New Project and select Console App (.NET Framework).
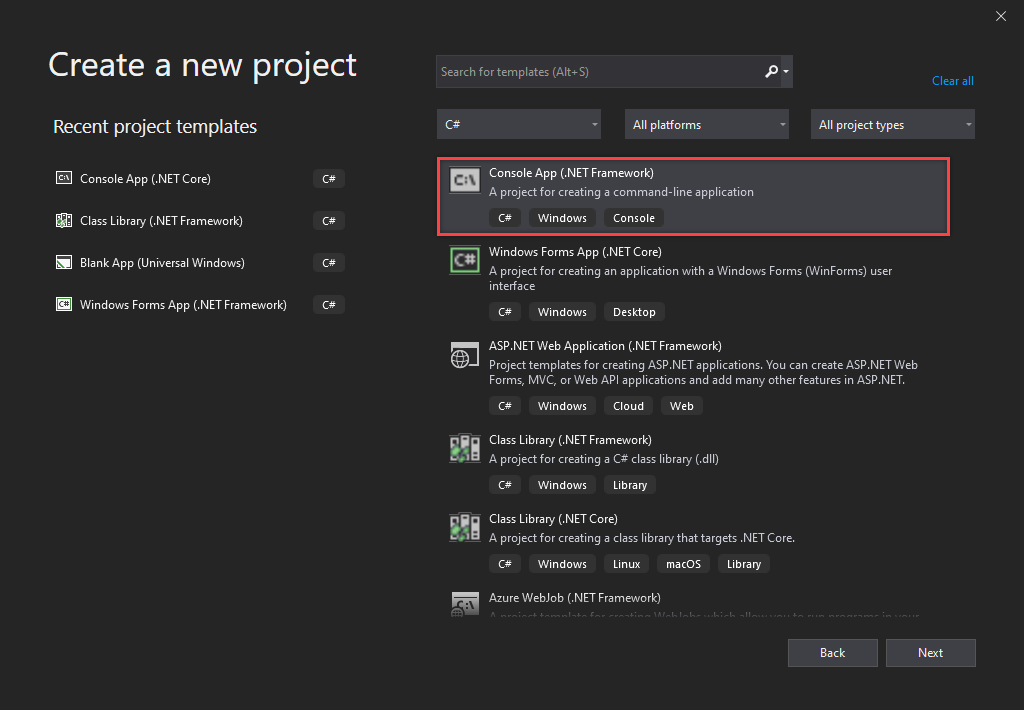
Create the new project and name it whatever you like. Navigate ti the Solution Explorer, right click on your project, Add and click Machine Learning.
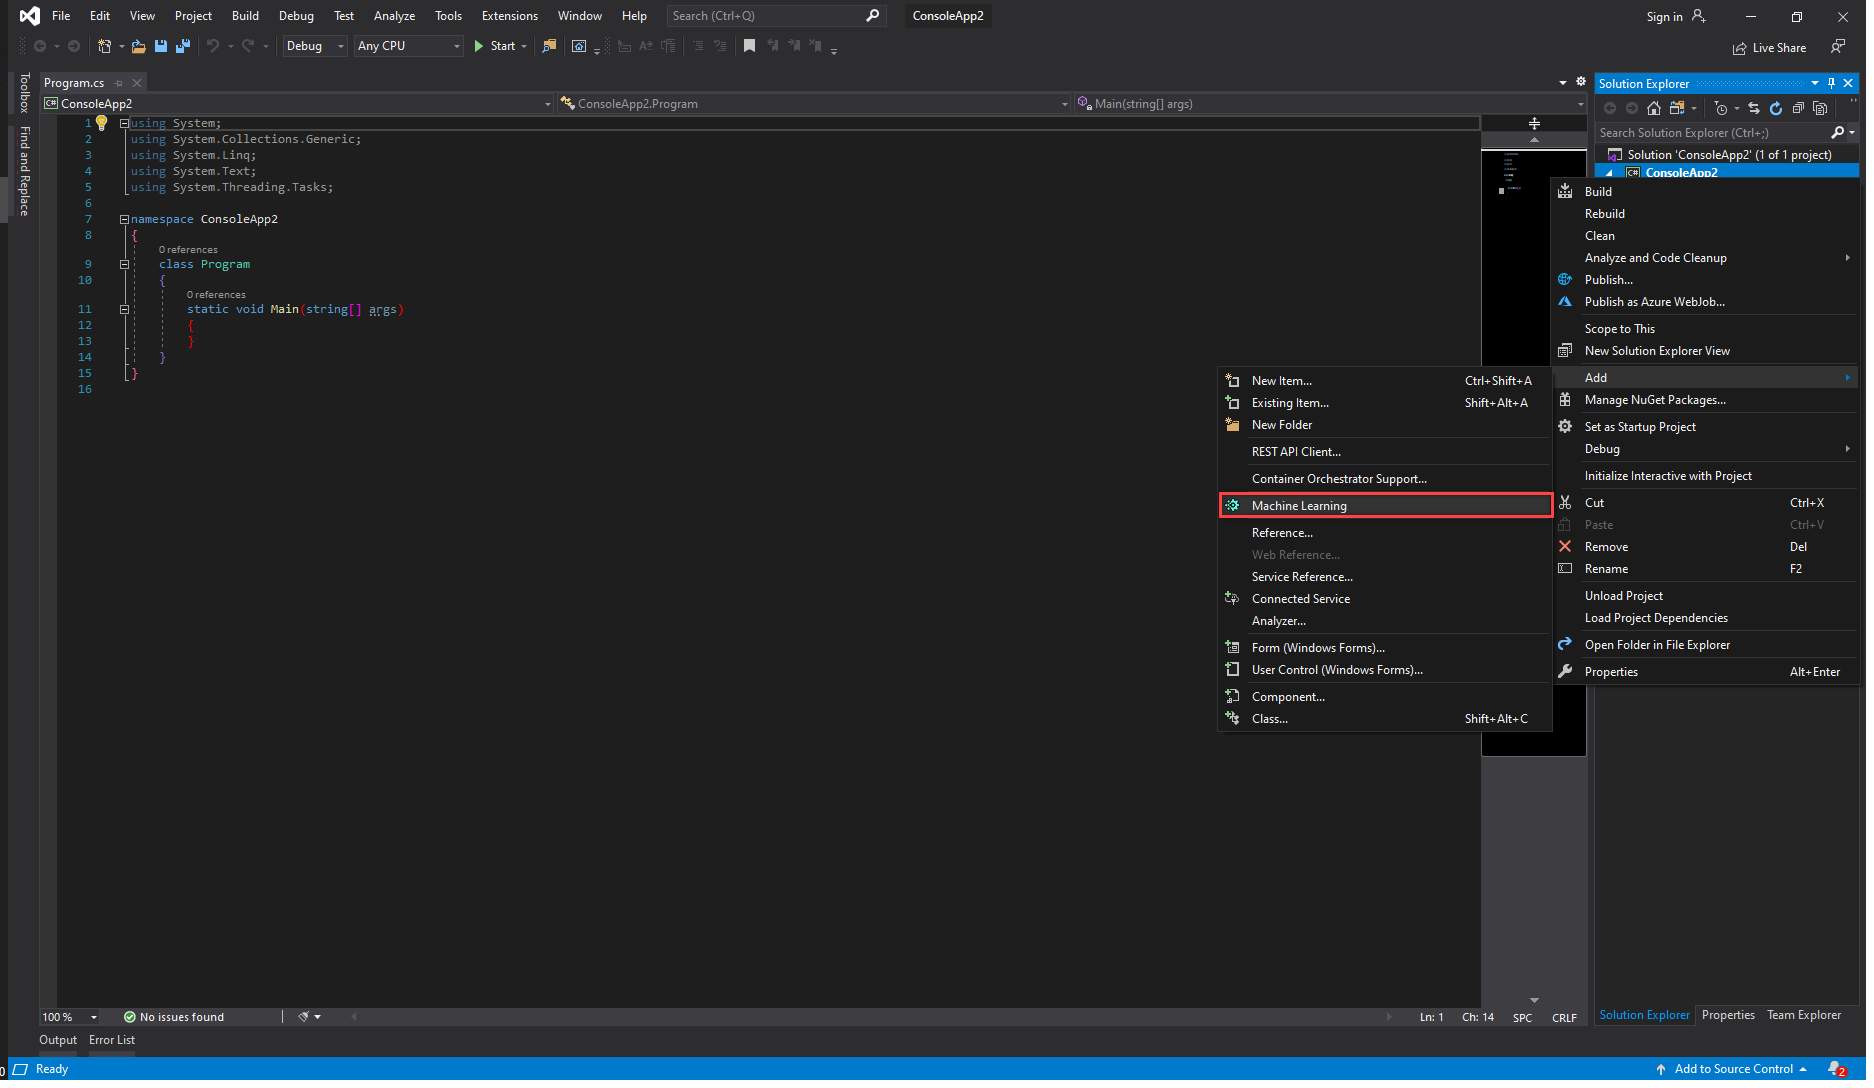
Now you are ready to start developing with Machine Learning on .NET framework.
Let’s do an example!
These are all the scenarios you can choose from. Learn more about the ML.NET Model Builder here.
Select the Text classification scenario.
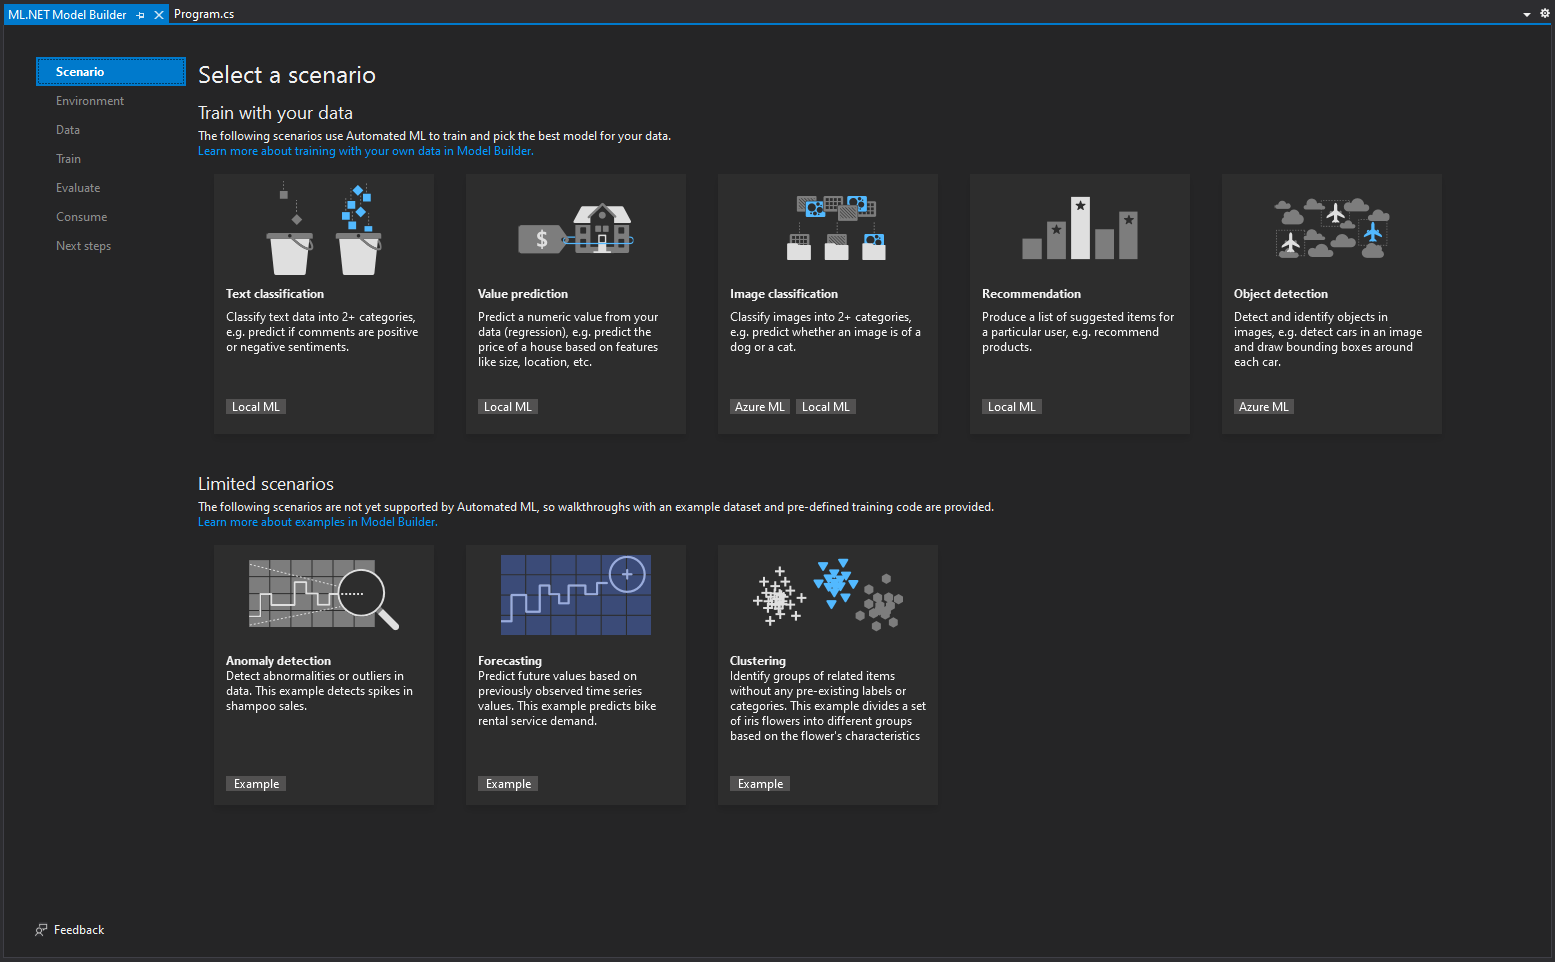
Select your Local CPU environment as your training environment. This means that all the training will happen locally on your computer.

Now it is time to input your data. There are many datasets you can use from these samples. For now we will use this one. Copy it to your computer and save is as .tsv. In the Input field select File and give the .tsv file you just created. For the Column to predict field select the Label column.
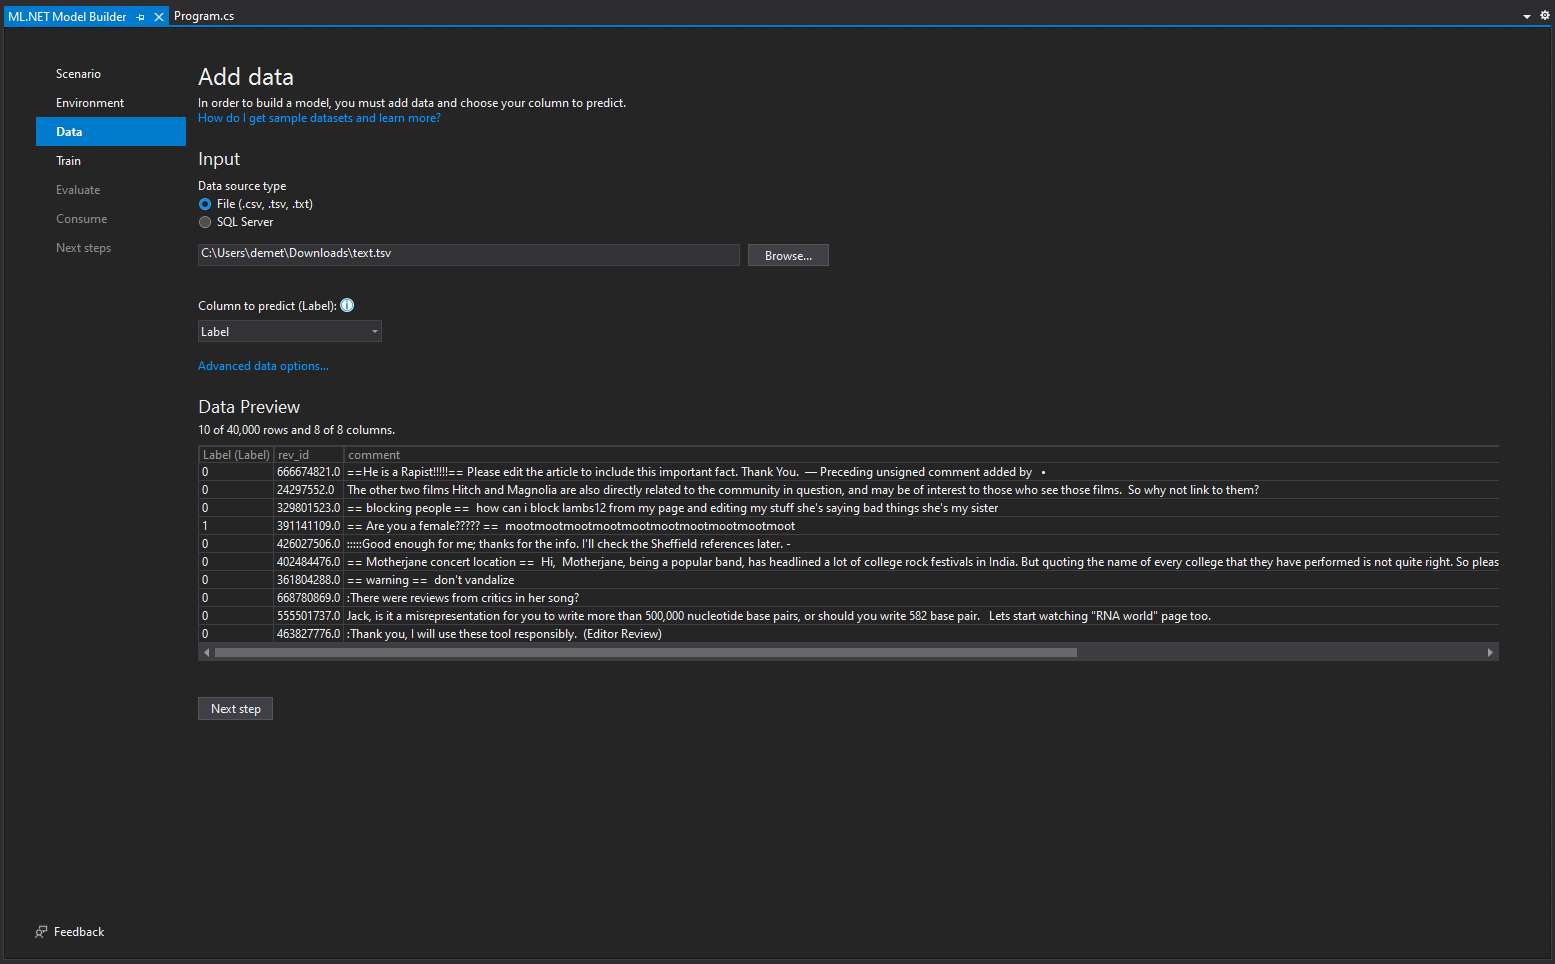
Now its time to start training. The longer you train your model, the better are the results. by default it trains for 600 seconds (10 minutes). You can change the training time if you like. When you are ready, click Start training and wait for training to finish.
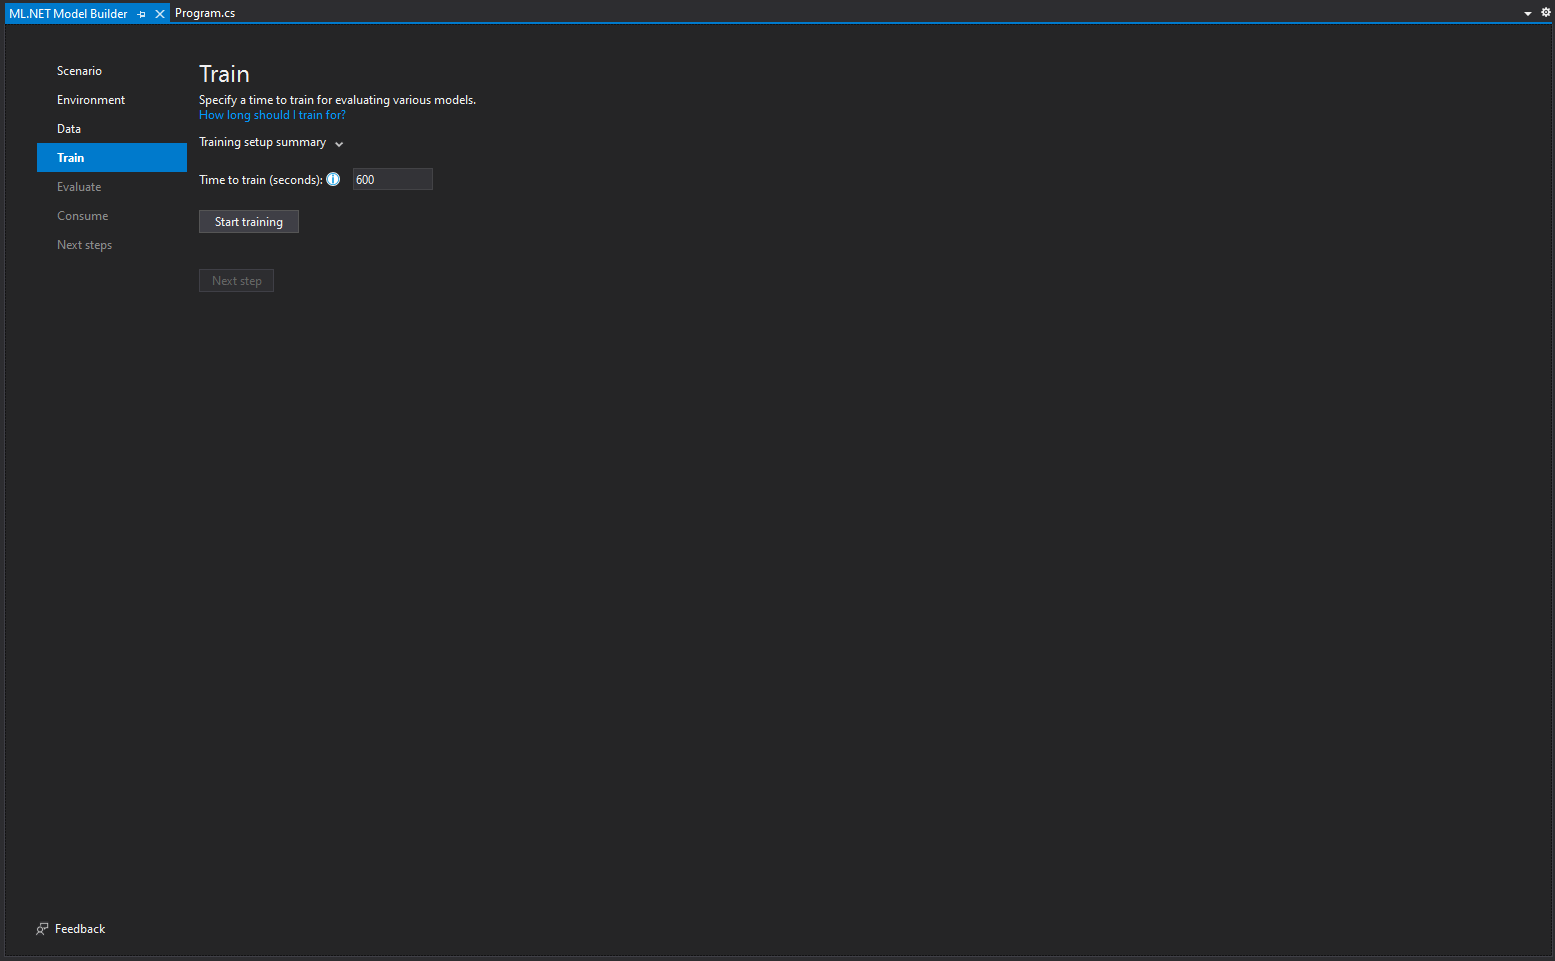
This is what you will see after the training is complete.
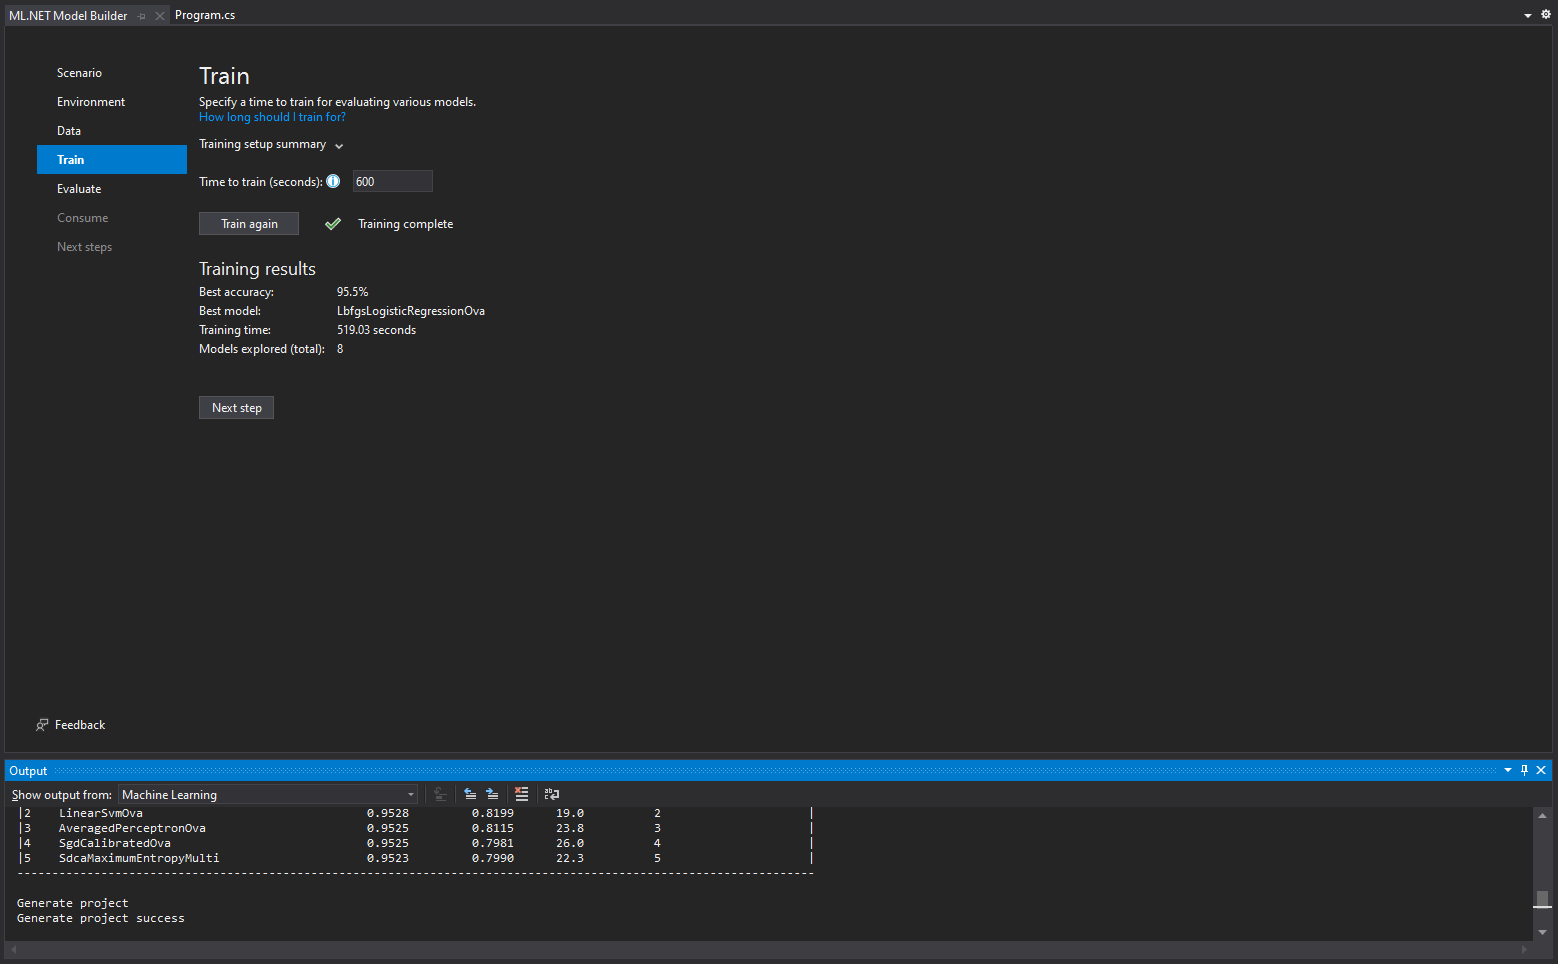
Here you can evaluate your model. It is populated by the first row as default. You can erase that and enter the comment you want evaluated in the comment field.
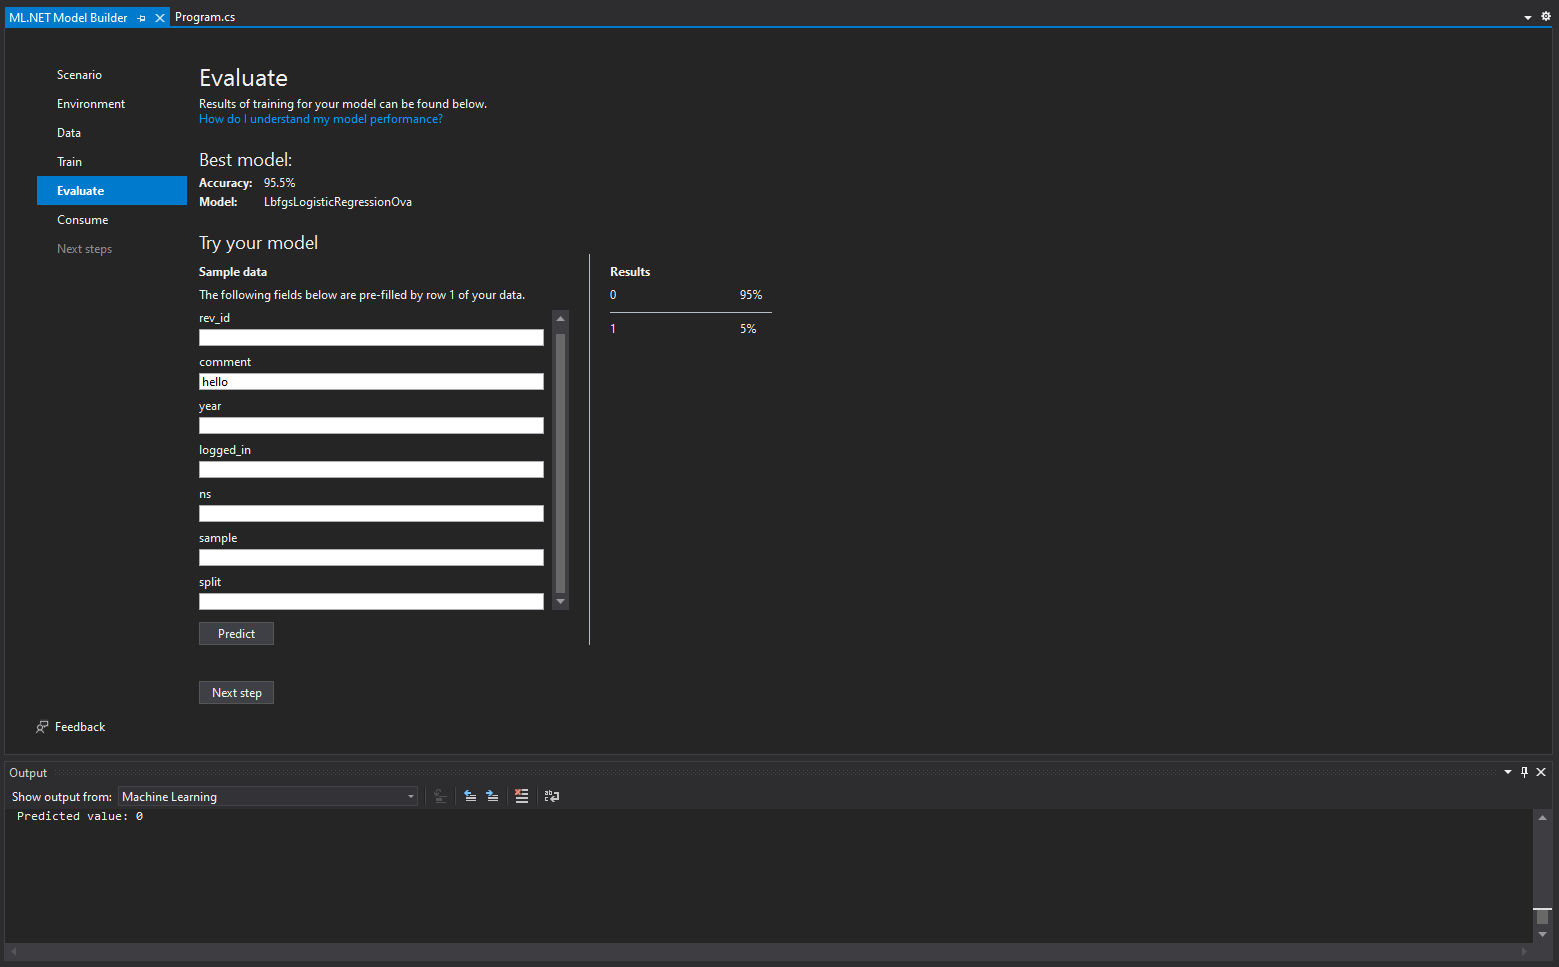
My comment was “hello” and the model predicted that is a non toxic comment with 95% accuracy, which is correct!
Next you need to Consume the model. This intergrades the model to your solution, so you can continue with your project.
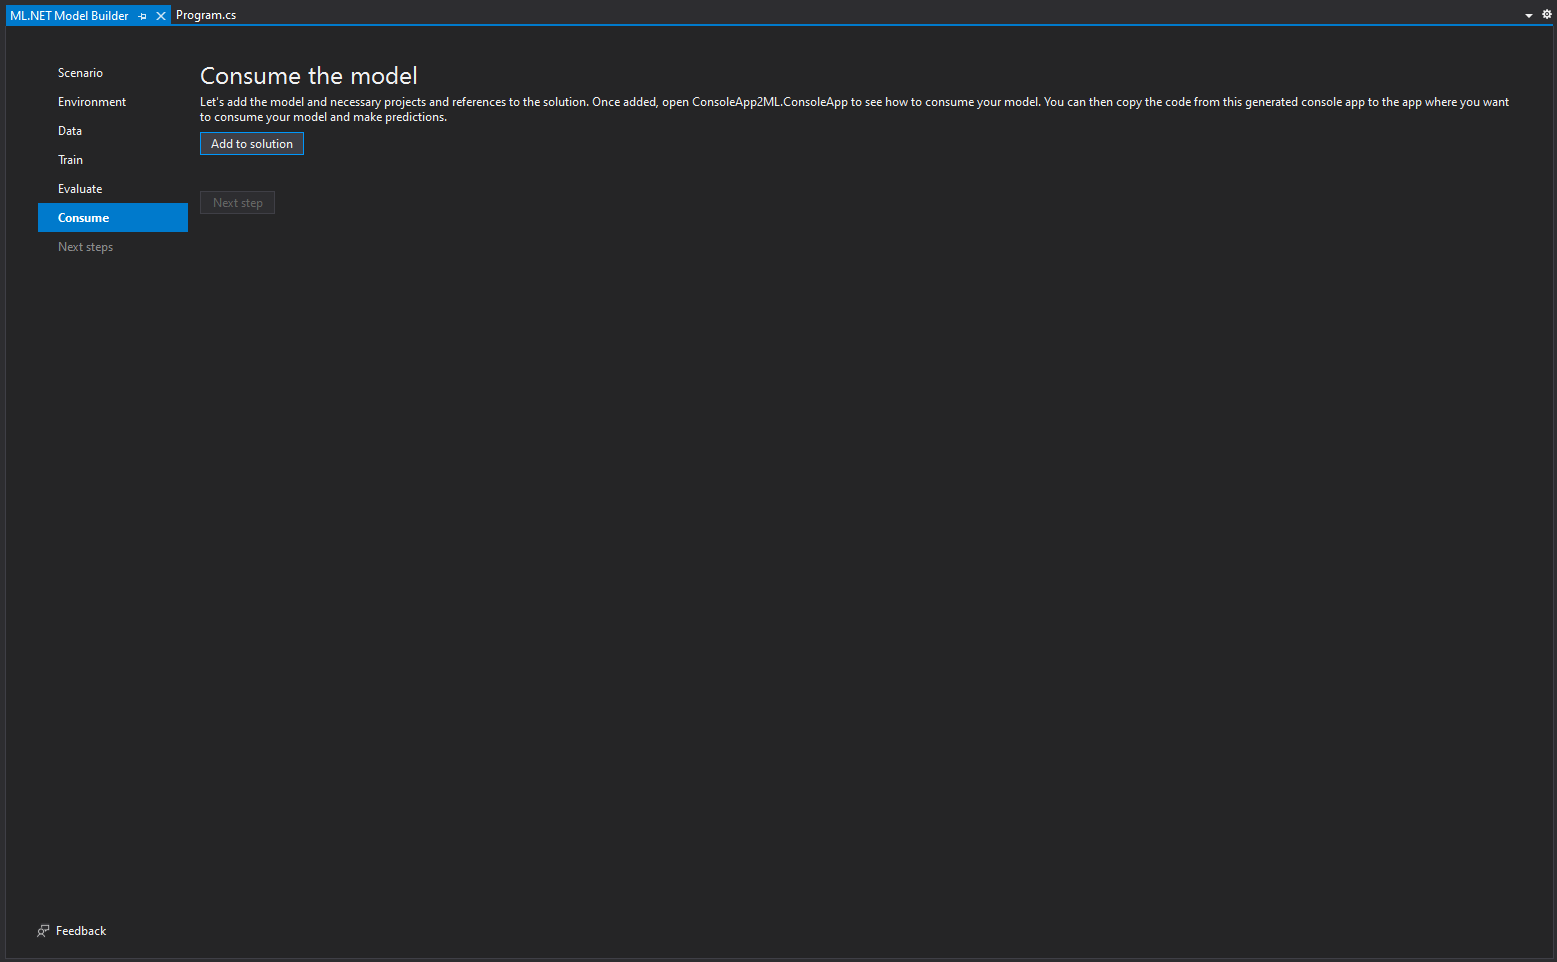
Click Add to solution and you are done!
Overview
ML.NET provides many differnet ways to implement Machine Learning to your project. Apart from the many different scenarios it also is extensible to consume other frameworks like TensorFlow, ONNX and Infer.NET to give you access to even more machine learning scenarios, like image classification, object detection and more. Let us take a look!
Binary Classification
Like in the example above, sentiment analysis returns weather a sentiment has a positive or negative intention. This is a from of binary classification, which can also be used to:
- predict if an insurance claim is valid or not.
- predict if a plane will be delayed or will arrive on time.
- predict if a face ID (photo) belongs to the owner of a device.
Clustering
Clustering splits data into groups. Each cluster includes records that share some common attributes. You can find a customer segmentation example here. It is classifying customers into categories with similar profile and interests using the K-Means algorithm.
Anomaly Detection
Detects anomalies and spikes in large datasets. Ingesting sales of a product is useful when building a business strategy and this provides a much better understanding of the given data. Here is a sample of Spike Detection and Change Point Detection of Product Sales.
Matrix Factorization
Matrix factorization is usually used for product recomendation in online shops. It consumes the sales data and it can recommend products that are bought together to the customer based upon their purchase order history. Here is a sample applying this to Amazon.
Object Detection
Object detection helps you recognize what objects are inside a given image and informs you about their position in that certain image. You can have a look at a sample here.
Scoring
Scores the images to help us do image classification. Gives a prediction to what an image is represinting. Here is a sample that applies image classification.
Price Prediction
Predicts price of an item or a service based on various collected data. In this sample it predicts taxi fares based on trip time, distance, passinger count and more.
Sales Forecasting
Helps you find the futures sales of a certain product using a regression algorithm based on a past sales dataset. Here is a sales forecasting sample using FastTreeTweedie Regression algorithm and Single Spectrum Analysis (SSA) time series for forecasting.
Get specific answers through the use of choice prompts
 November 20, 2020
Choice Prompt gives you the ability to have full controll over the user’s answers. It provides the user with a list of options that he is allowed to chose from. It has an intergraded validator in case the user tries to say something that is not in the list of choices.
Why Choice Prompt?
Choice prompt gives a better sense of understanding to the user over the given question, because all the possible answers are already provided to him. It also gives complete control to the developer over the possible outcomes of that question. However, because of the nature of this prompt, you might need to avoid it, if your bot is published entirely in voice controlled channels, like a personal assistance. It works better if the user has a way to observe the answers.
The intergraded validator can be changed. As is, it checks if the user input matches any of the choices and if it does, it returns that as the answer. If not, the user gets re-prompted with the same question.
Create
In this example we have a weather bot. We are prompting the user for the day of the week that he would like the weather forecast for. You can follow through using the core bot sample. You can grab the sample from the GitHub repo, or directly from Azure using this post.
Add this using at the top of the file.
using Microsoft.Bot.Builder.Dialogs.Choices;
In the dialog section, add the ChoicePrompt dialog.
AddDialog(new ChoicePrompt(nameof(ChoicePrompt)));
Here is how you create the prompt. The string msgText contains the question of the prompt. The dayChoice list of type Choice contains all the answers. If the validator detects that user input does not satisfy any possible answer, the user is re-promped and msgText is replaced with retryText. There is also an optional Style option that can be used like this: “Style = ListStyle.HeroCard”. You can find all the possible styles here. Ignoring the style option, will leave its value at default, which is what we are doing below. It is important to know that the style shown through the emulator does not completely reflect the style in the published channels. Each cannel might present the data differently.
var msgText = "What days weather forecast would you like?";
var promptMessage = MessageFactory.Text(msgText, msgText, InputHints.ExpectingInput);
var retryText = $"Please choose one option.\n\n{msgText}";
var retryPromptText = MessageFactory.Text(retryText, retryText, InputHints.ExpectingInput);

var dayChoice = new List<Choice>() { new Choice("Monday"), new Choice("Tuesday"), new Choice("Wednesday"), new Choice("Thursday"), new Choice("Friday"), new Choice("Saturday"), new Choice("Sunday") };

return await stepContext.PromptAsync(nameof(ChoicePrompt), new PromptOptions { Prompt = promptMessage, Choices = dayChoice, RetryPrompt = retryPromptText }, cancellationToken);
In order to get the answer form the next prompt, you can use this line. You can not get the Results value directly, so you need to cast it to FoundChoice.
Day = ((FoundChoice)stepContext.Result).Value;
Test
After implementing the above step, your results should look like this. The user can either press on any of the answers, or write something in the input text box.
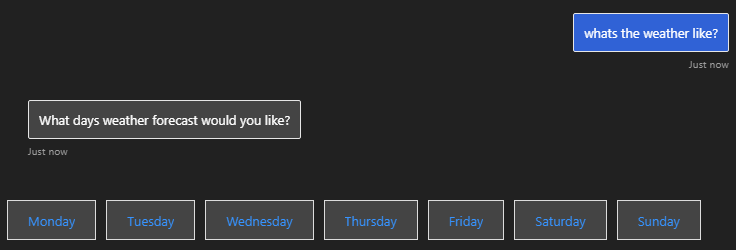
If the user enters an invalid answer, he is re-prompted with the retry message.
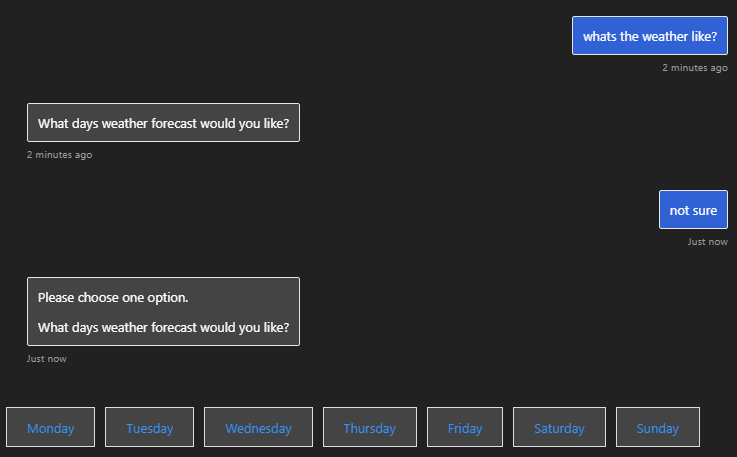
That is how you can implement Choice prompt to your bot, to improve your user’s experience.
Create a new bot dialog with Azure Bot Service
 November 10, 2020
Here you can find how to create your own custom dialogs using Azure Bot Service.
Dialogs provide a way to manage a long-running conversation with the user. A dialog performs a task that can represent part of or a complete conversational thread. It can span just one turn or many, and can span a short or long period of time.
Start
In this example we will be using the core bot sample. You can grab the sample from the GitHub repo, or directly from Azure using this post.
Create
Create a new Class and called NewDialog.cs. In this example we will create a weather dialog. The bot asks about the location and the time of the forecast that the user would like. The question about the location happens in LocationStepAsync and the question about time, in TimeStepAsync. These are both TextPrompts, which means the users answers them using text, or speech if supported. The values given by the user are stored in the corresponding variables in the next step of each question. ConfirmStepAsync confirms that the values given by the user are correct using a ConfirmPrompt and FinalStepAsync ends or restarts the dialog according to the users choice in the previous step. You could add another step which answers with the weather, but you will need to connect to a weather API for that.
using System.Threading.Tasks;
using System.Threading;
using Microsoft.Bot.Builder;
using Microsoft.Bot.Builder.Dialogs;
using Microsoft.Bot.Schema;

namespace Microsoft.BotBuilderSamples.Dialogs
{
    public class NewDialog : ComponentDialog
    {
        public string Location { get; set; }
        public string Time { get; set; }

        public NewDialog()
            : base(nameof(NewDialog))
        {
            AddDialog(new TextPrompt(nameof(TextPrompt)));
            AddDialog(new ConfirmPrompt(nameof(ConfirmPrompt)));
            AddDialog(new WaterfallDialog(nameof(WaterfallDialog), new WaterfallStep[]
            {
                LocationStepAsync,
                TimeStepAsync,
                ConfirmStepAsync,
                FinalStepAsync,
            }));

            // The initial child Dialog to run.
            InitialDialogId = nameof(WaterfallDialog);
        }


        private async Task<DialogTurnResult> LocationStepAsync(WaterfallStepContext stepContext, CancellationToken cancellationToken)
        {
            var messageText = "What is your location?";
            var promptMessage = MessageFactory.Text(messageText, messageText, InputHints.ExpectingInput);
            return await stepContext.PromptAsync(nameof(TextPrompt), new PromptOptions { Prompt = promptMessage }, cancellationToken);
        }

        private async Task<DialogTurnResult> TimeStepAsync(WaterfallStepContext stepContext, CancellationToken cancellationToken)
        {
            Location = stepContext.Context.Activity.Text;

            var messageText = "Specify the time of the forecast";
            var promptMessage = MessageFactory.Text(messageText, messageText, InputHints.ExpectingInput);
            return await stepContext.PromptAsync(nameof(TextPrompt), new PromptOptions { Prompt = promptMessage }, cancellationToken);
        }

        private async Task<DialogTurnResult> ConfirmStepAsync(WaterfallStepContext stepContext, CancellationToken cancellationToken)
        {
            Time = stepContext.Context.Activity.Text;

            var messageText = $"Please confirm that you want the weather at {Location} for {Time}. Is this correct?";
            var promptMessage = MessageFactory.Text(messageText, messageText, InputHints.ExpectingInput);

            return await stepContext.PromptAsync(nameof(ConfirmPrompt), new PromptOptions { Prompt = promptMessage }, cancellationToken);
        }

        private async Task<DialogTurnResult> FinalStepAsync(WaterfallStepContext stepContext, CancellationToken cancellationToken)
        {
            if ((bool)stepContext.Result)
                return await stepContext.EndDialogAsync();
            else
                return await stepContext.BeginDialogAsync(nameof(NewDialog));
        }
    }
}
Connect
Open MainDialog.cs file and find this piece of code.
public MainDialog(FlightBookingRecognizer luisRecognizer, BookingDialog bookingDialog, ILogger<MainDialog> logger)
    : base(nameof(MainDialog))
{
    _luisRecognizer = luisRecognizer;
    Logger = logger;

    AddDialog(new TextPrompt(nameof(TextPrompt)));
    AddDialog(bookingDialog);
    AddDialog(new WaterfallDialog(nameof(WaterfallDialog), new WaterfallStep[]
    {
        IntroStepAsync,
        ActStepAsync,
        FinalStepAsync,
    }));

    // The initial child Dialog to run.
    InitialDialogId = nameof(WaterfallDialog);
}
Replace it with the followning one. Essentially you are adding NewDialog newDialog into the constructor’s arguments in line 1 and adding your dialog in line 9.
public MainDialog(FlightBookingRecognizer luisRecognizer, BookingDialog bookingDialog, NewDialog newDialog, ILogger<MainDialog> logger)
    : base(nameof(MainDialog))
{
    _luisRecognizer = luisRecognizer;
    Logger = logger;

    AddDialog(new TextPrompt(nameof(TextPrompt)));
    AddDialog(bookingDialog);
    AddDialog(newDialog);
    AddDialog(new WaterfallDialog(nameof(WaterfallDialog), new WaterfallStep[]
    {
        IntroStepAsync,
        ActStepAsync,
        FinalStepAsync,
    }));

    // The initial child Dialog to run.
    InitialDialogId = nameof(WaterfallDialog);
}
Go further down to the file and find the unhandled GetWeather intent ine the switch.
      case FlightBooking.Intent.GetWeather:
          // We haven't implemented the GetWeatherDialog so we just display a TODO message.
          var getWeatherMessageText = "TODO: get weather flow here";
          var getWeatherMessage = MessageFactory.Text(getWeatherMessageText, getWeatherMessageText, InputHints.IgnoringInput);
          await stepContext.Context.SendActivityAsync(getWeatherMessage, cancellationToken);
          break;
Replace it with this. Instead of prompting a placeholder message to the user, it will send the newly created dialog.
      case FlightBooking.Intent.GetWeather:
          return await stepContext.BeginDialogAsync(nameof(NewDialog));
Before we are done, you need to add your dialog in Startup.cs. Just open Startup.cs and add the following line.
services.AddSingleton<NewDialog>();
After everithing is done, the finished dialog should look like this.
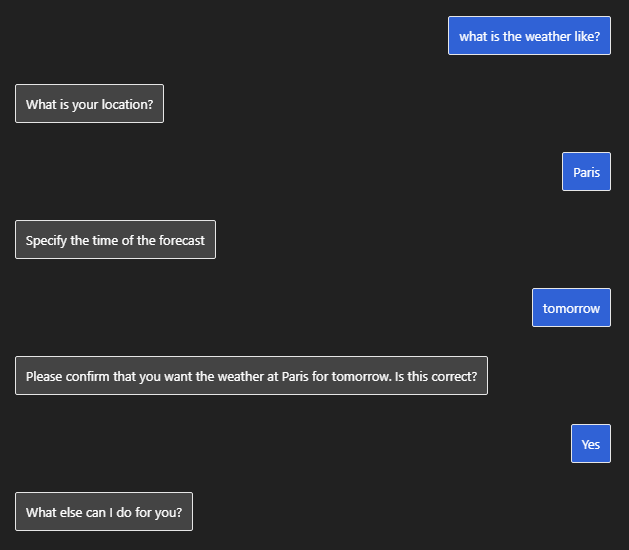
This is how you add your own dialogs to your bot!
Utilize asynchronous programming in C# to achieve a more responsive bot
 November 01, 2020
Here you can find how to use asynchronous programming to have your data fetched from a database before you need to process them, making your bot feel more responsive. We will be using the code from this post about CosmosDB in bot framework written in C#.
First let’s see what async and await operators do.
Async
The async modifier indicates that a method can run asynchronously. However an async method runs synchronously until it reaches its first await expression, at which point the method is suspended until the awaited task is complete. In the meantime, control returns to the caller of the method. If the method that the async keyword modifies does not contain an await expression or statement, the method executes synchronously, if it does, the method will run asynchronously after it reaches the await operator. You can learn more about async here.
Await
You can use the await operator when calling an async method. The await operator suspends evaluation of the enclosing async method until the asynchronous operation completes. When the asynchronous operation completes, the await operator returns the result of the operation, if any. When the await operator is applied to the operand that represents an already completed operation, it returns the result of the operation immediately without suspension of the enclosing method. The await operator doesn’t block the thread that evaluates the async method. When the await operator suspends the enclosing async method, the control returns to the caller of the method. Learn more about await here.
Code
This is the code we used in the Cosmos DB post in order to read data from the database. To summarize, in line 5 we use the ReadAsync function to get the data. Because of the use of await we need to wait for the database to respond in order to proceed to line 6. The reason we used await in the first place is because we need the data in the very next line of code (line 6).
// Fetch data from DB
DemoClass databaseValue = new DemoClass();
try
{
    var cosmosDbResults = await CosmosDBQuery.ReadAsync(new string[] { findId }, cancellationToken);
    if (cosmosDbResults.Values.FirstOrDefault() != null)
        databaseValue = (DemoClass)cosmosDbResults.Values.FirstOrDefault();
}
catch (Exception e)
{
    await stepContext.Context.SendActivityAsync($"Error while connecting to database.\n\n{e}");
}
Let’s see now how you can improve this code with the use of Tasks. The Task class represents a single operation that does not return a value and that usually executes asynchronously. You can find more about Tasks here.
The key is, you do not have to start asking for the data right before you need to use them. In reality you can request the data from the database when you have findId. For example, in bot framework, if you need to fetch the data of the user interacting with the bot, you can have access to the user ID right from the welcome message and you can sent a request to fetch the data from the very begining of the conversation.
You should include this line in your project (in the .cs file tha uses Tasks), if you do not already have it.
using System.Threading.Tasks;
Declare the Task at the begining of your project. The type of the Task should be the same as the return type of the function that it uses, in this example the ReadAsync. The return type of ReadAsync is IDictionary<string, object>.
public static Task<IDictionary<string, object>> ReadFromDb;
When you have findId you can immediately sent a request to the database to start fetching the data. This is easily done using the ‘=’ opperator. You assign the asynchronous function to a Task, and you will get the results when the Task is completed.
ReadFromDb = CosmosDBQuery.ReadAsync(new string[] { findId }, cancellationToken);
Finally, in line 5 we will be awaiting for the Task to complete. If it is already completed we will get our results immediately. Since the task started working asynchronously on the request, before the data was needed, we diminished the time the user might need to wait for the data to be shown or used.
// Fetch data from DB
DemoClass databaseValue = new DemoClass();
try
{
    var cosmosDbResults = await ReadFromDb;
    if (cosmosDbResults.Values.FirstOrDefault() != null)
        databaseValue = (DemoClass)cosmosDbResults.Values.FirstOrDefault();
}
catch (Exception e)
{
    await stepContext.Context.SendActivityAsync($"Error while connecting to database.\n\n{e}");
}
That is how you can utilise Tasks to make you project feel more responsive to the user.
Azure Cosmos DB as the database solution of your bot
 October 23, 2020
Fast and easy database solution without the need of configuring a strict database structure. Send your objects to the database and interact with it using json.
Azure Cosmos DB is a fully managed NoSQL database service for modern app development. No knowledge of database practices needed, easy to implement to your project and have instant access to your data at any time. Allows you to elastically scale your database when the needs rise. Support for SQL, MongoDB, Spark and many more.
Create
To create a Cosmos DB database open the Azure Portal and search for Azure Cosmos DB. Click Add to Create Azure Cosmos DB Account.
Fill ine the details for your Cosmos DB Account.
Only the fields with the ‘*’ are mandatory.
- The Subscription field is populated by default with your default azure subscription.
- Resource Group is the group that will contain the resources you are creating now. You can either create a new one, ore use an existing one.
- Account Name is the unique name of the resource you are creating.
- API lets you select the API and the Data Model for your Cosmos DB account. We will be using Core (SQL) for now, but Azure Cosmos DB for MongoDB API, Cassandra, Azure Table and Gremlin (graph) are also available.
- Notebooks (preview) enables the use of notebook with your account, is off by default.
- Location is also populated by default, but you are free to change it. It indicates where the server that contains your database is physically located.
- For Capacity mode you can choose between provisioned throughput and serverless. Learn which plan fits you best here. We will be using Provisioned throughput which is the default.
- Account Type lets you choose between Production and Non-Production and it can be changed later.
- Geo-Redundancy enables your account to be distributed globally, making it more reliable.
- Multi-region Writes allows you to take advantage of the provisioned throughput of your databases across the globe.
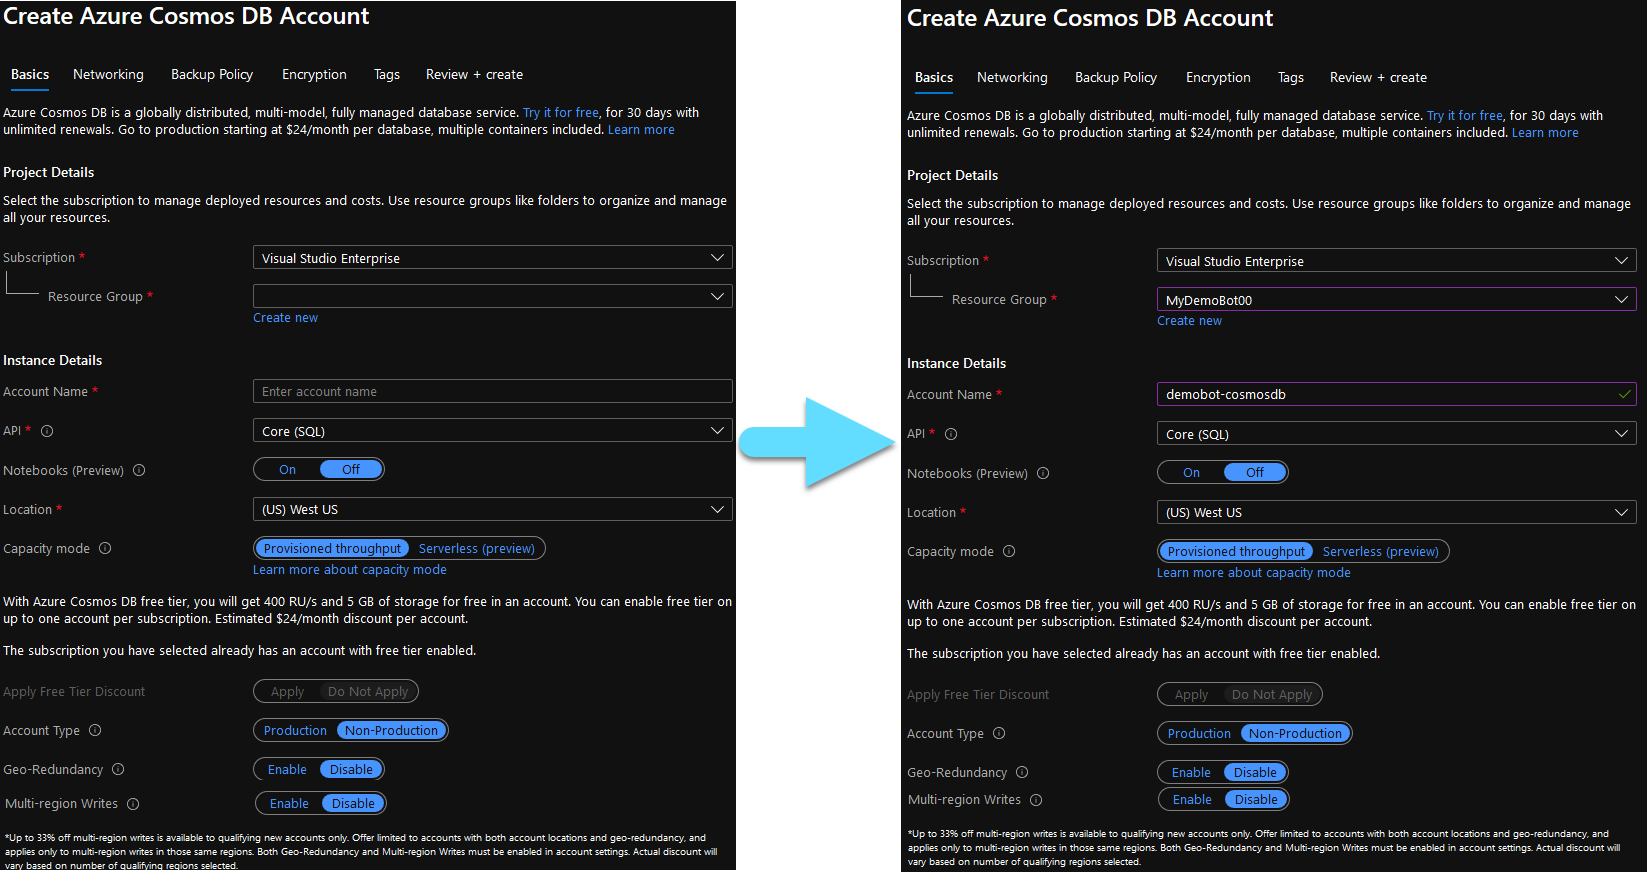
Complete the form like in the picture above and click Review + create to proceed.
You can also change Networking, Backup Policy and Encryption. We will be keeping the default values for now.
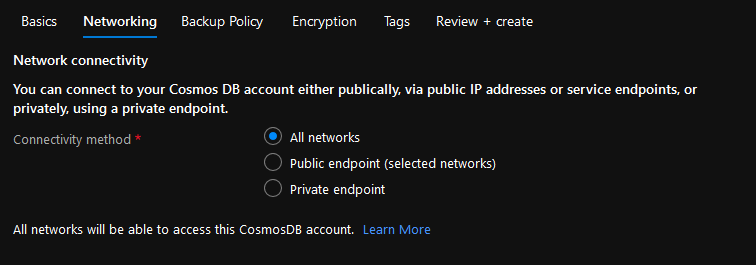
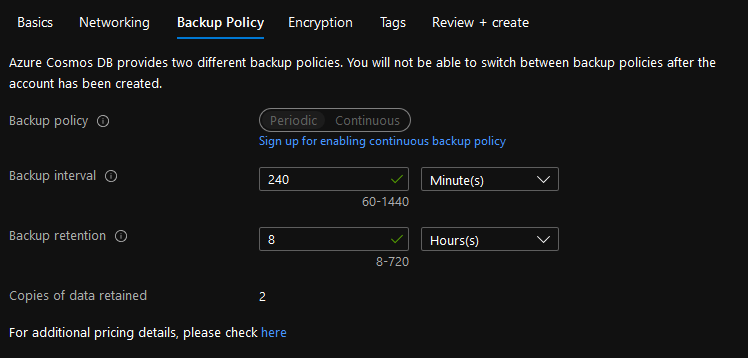
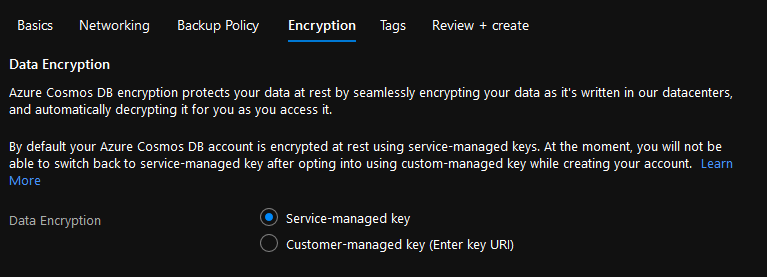
Ensure that everithing is in order and click Create to deploy your database. Deployment might take a few minutes.
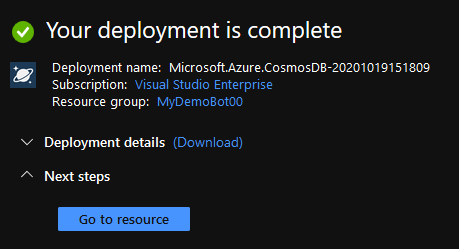
Click Go to resource and navigate to the Keys tab at the left. Here you can find your Service Endpoint and Database Key.
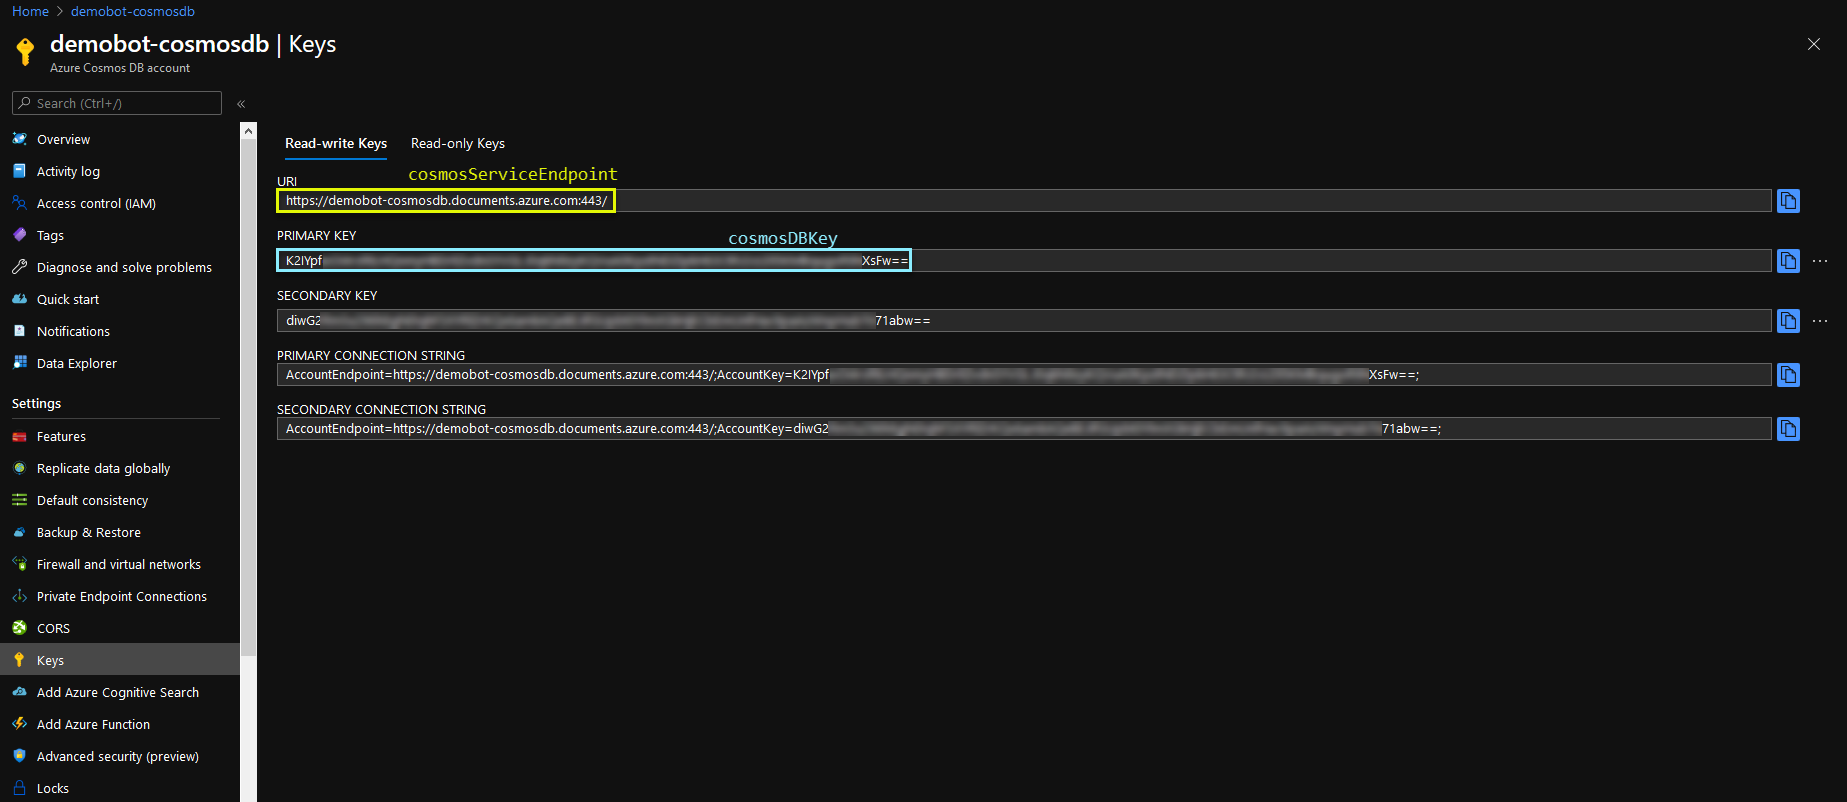
After you save them, navigate to the Settings tab to start setting up your database.
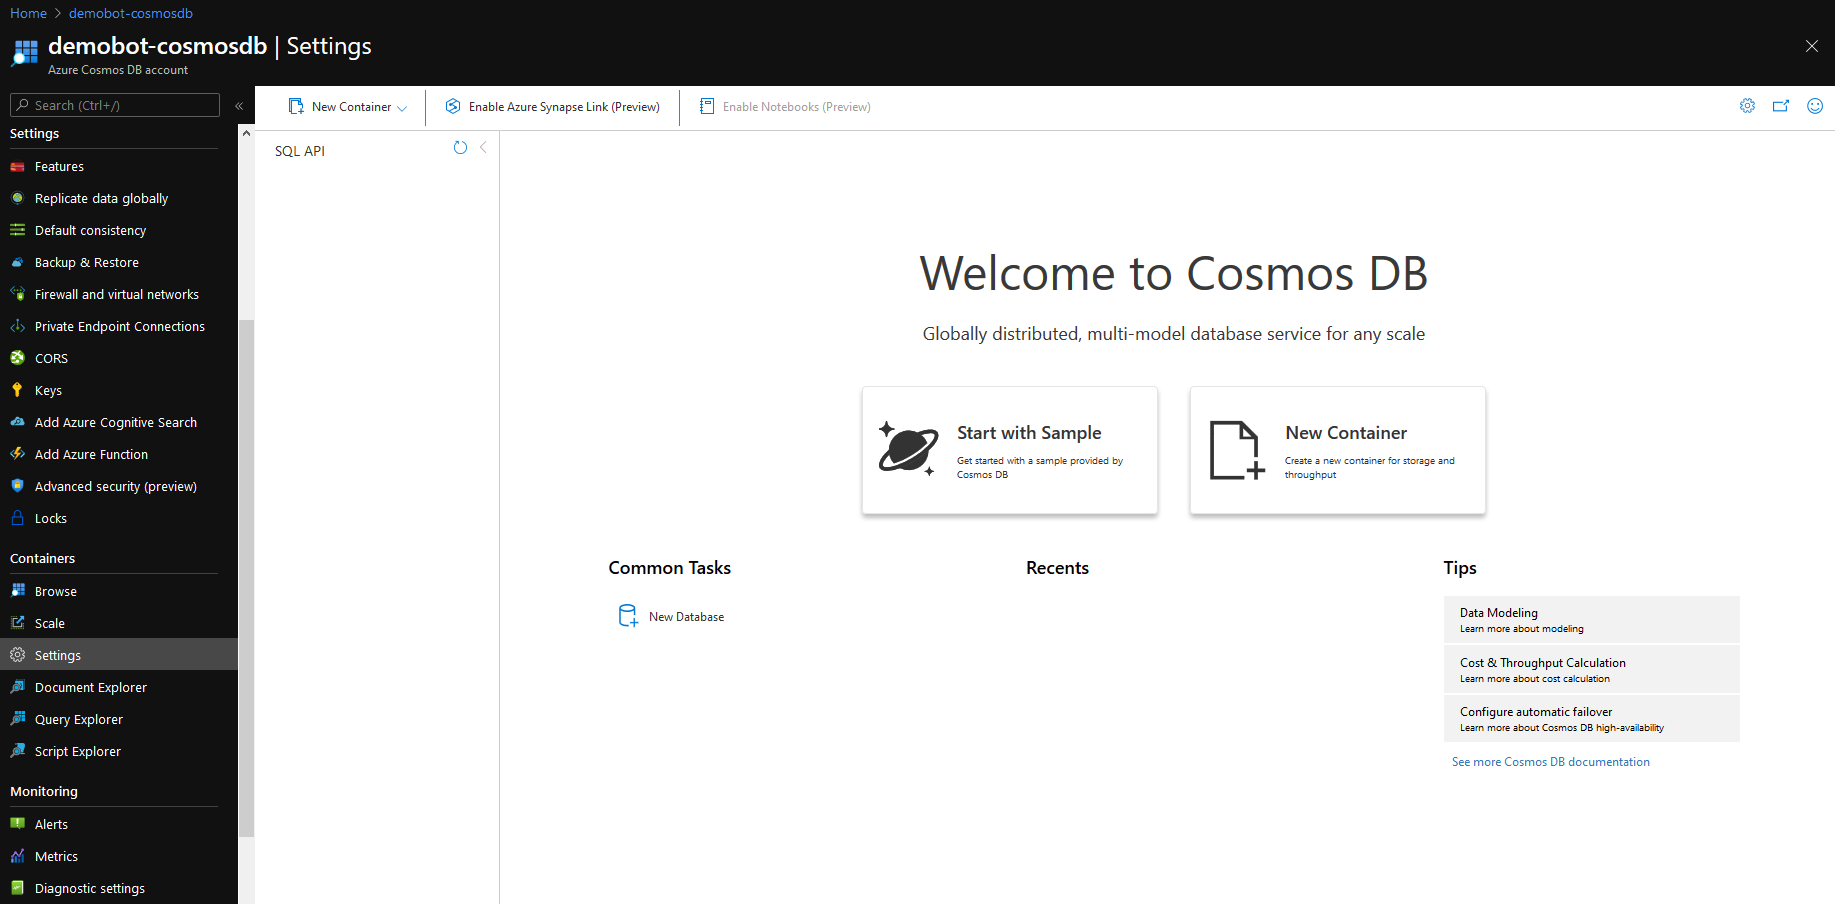
Click New Database to create a new Database in your account.
- The Database id field is the name of your database and you need to save it for later.
- Throughput is measured by RU/s (Request Unit per second). A read of 1KB document is 1 RU. Choose as many RUs to suit your needs.
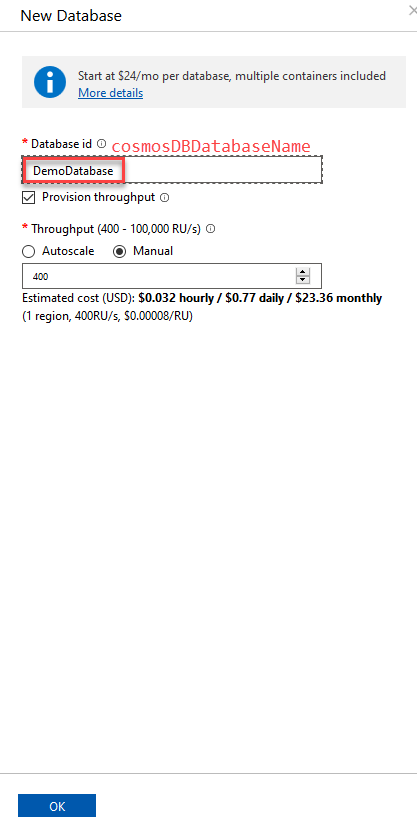
Click OK to create your database. After your database is ready, you need to create a container. Click New Container and fill in the details for your first container.
- Use existing radio button should already be selected and the Database id field should be populated with the database name tha you selected before.
- Container id is the Name of your Container and you need to save it for later use.
- For Partition key input /id.
You can leave the rest of the fields with their default values.
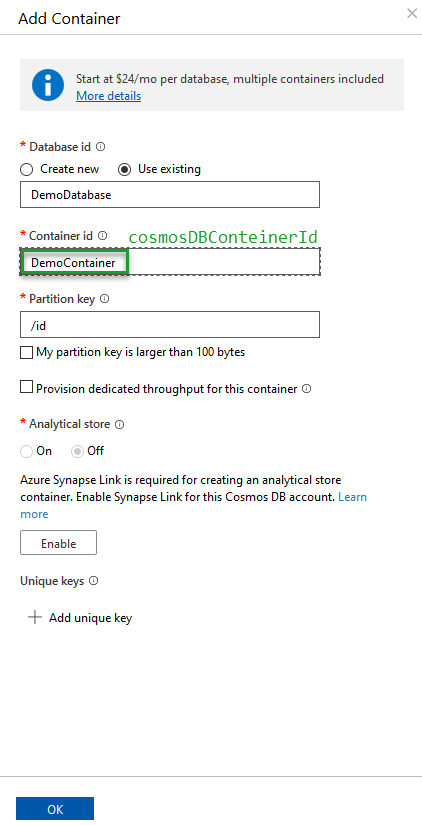
Click OK to create the container.
Your work here is done. Now is time to connect your project to the database.
Connect
Open Visual Studio, go to Project -> Manage NuGet Packages and install Microsoft.Bot.Builder.Azure package, considering you are using bot framework. You might need to update the rest of your packages first.
You will need to provide your Service Endpoint, Key, Database Name and Container ID. All of these are captured from the steeps above. You will also need to create a Storage Query to be able to send and fetch data from the database.
// CosmosDB Initialization
private const string cosmosServiceEndpoint = "https://demobot-cosmosdb.documents.azure.com:443/";
private const string cosmosDBKey = "K2IYpfYOUR_COSMOSDB_KEYXsFw==";
private const string cosmosDBDatabaseName = "DemoDatabase";
private const string cosmosDBConteinerId = "DemoContainer";

// Create Cosmos DB Storage.
public static readonly CosmosDbPartitionedStorage CosmosDBQuery = new CosmosDbPartitionedStorage(new CosmosDbPartitionedStorageOptions
{
    AuthKey = cosmosDBKey,
    ContainerId = cosmosDBConteinerId,
    CosmosDbEndpoint = cosmosServiceEndpoint,
    DatabaseId = cosmosDBDatabaseName,
});
With the following code you can send data to your database. Line 5 sends the data and the rest of the code is a protective measure in case something goes wrong. You can avoid the use of await in line 5 to achieve more responsive results. The program will continue running normally and not wait for the data to be sent in order to continue. If you require the data to be sent before continuing, then you can append an awake statement at the start of line 5. The data you want to sent are provided in line 2, input is the object you want to sent to the database and id is the string containing the unique id of that object on the database.
// Send to DB
var changes = new Dictionary<string, object>() { { id, input } };
try
{
    CosmosDBQuery.WriteAsync(changes, cancellationToken);
}
catch (Exception e)
{
    await stepContext.Context.SendActivityAsync($"Error while connecting to database.\n\n{e}");
}
In order to fetch data from the database, you can use the following code. Replace DemoClass with the type/class of the object you are trying to receive. Line 5 is where the data are being received. We are using the awake statement, because we are using that data immediately after. The rest of the code is, like before, a protective measure in case something goes wrong. After the execution of this code, the object databaseValue will contain the object fetched from the database.
// Fetch data from DB
DemoClass databaseValue = new DemoClass();
try
{
    var cosmosDbResults = await CosmosDBQuery.ReadAsync(new string[] { findId }, cancellationToken);
    if (cosmosDbResults.Values.FirstOrDefault() != null)
        databaseValue = (DemoClass)cosmosDbResults.Values.FirstOrDefault();
}
catch (Exception e)
{
    await stepContext.Context.SendActivityAsync($"Error while connecting to database.\n\n{e}");
}
You can visit your resource in the Azure Portal to see all the objects in your database. Go to the Settings tab and select the Items of the container you created. Here you can see an object of the type DemoClass, which contains a string called Value, with Test Value as it’s value.
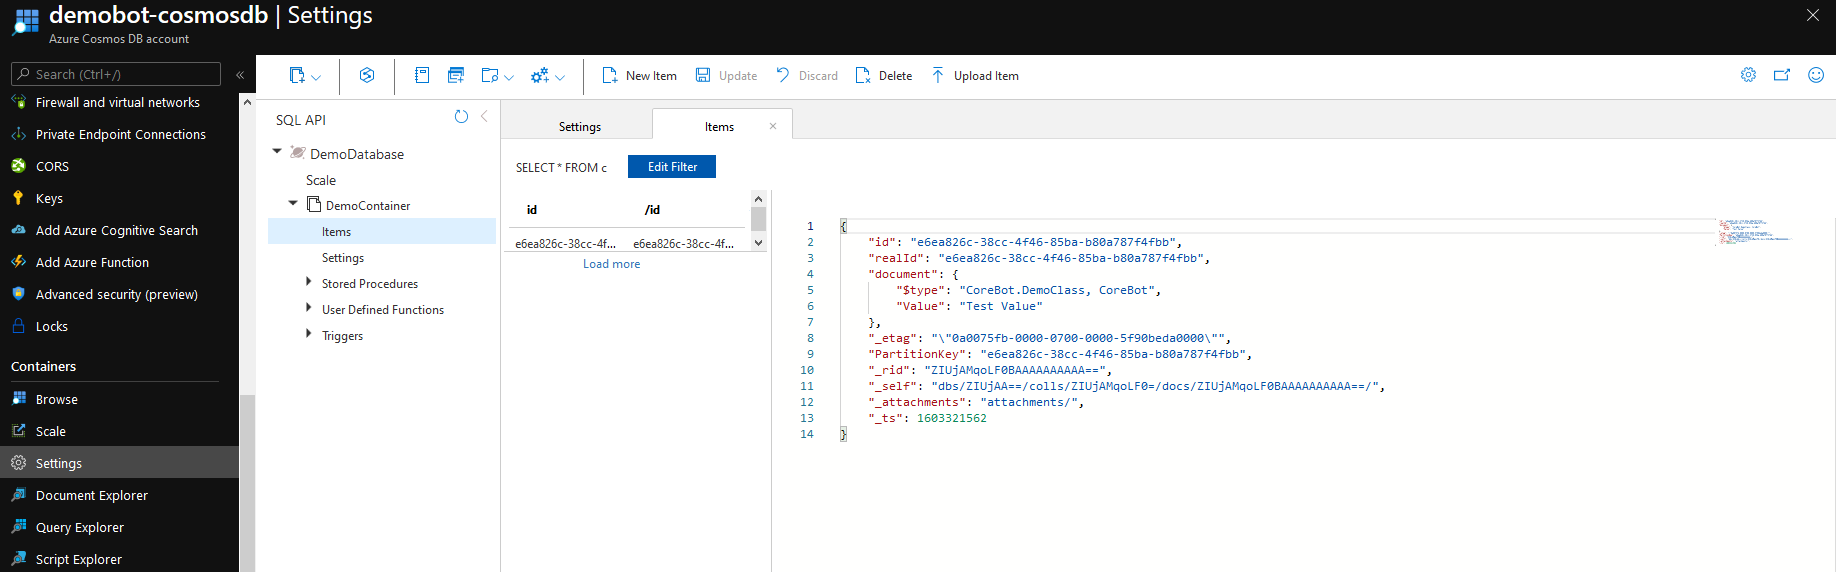
This is all you need to connect Azure Cosmos DB to your project and have a fast and easy to use database at your fingertips.
Knowledge base intergration using QnA Maker
 October 15, 2020
Here you will find how to intergrate a knowledge base to your bot to be able to answer questions parsed from an external source. Additionally give it the ability to answer some commonly used questions using preset or custom answers.
QnA Maker is a cloud-based API service, part of Azure Cognitive Services, that lets you create a conversational question-and-answer layer over your existing data. It gives you the ability to build knowledge bases and extract questions and answers to incorporate in your bot.
Chit-chat is what became from Personality Chat NuGet package. It enables you to intergrate small talk into your bot to answer comonly used user questions. It is now available through QnA Maker and you can use it just like any other knowledge base.
Create
At first, head over to https://www.qnamaker.ai/ and Sign In to create QnA Maker model. Click Create a knowledge base to get to the creation page.
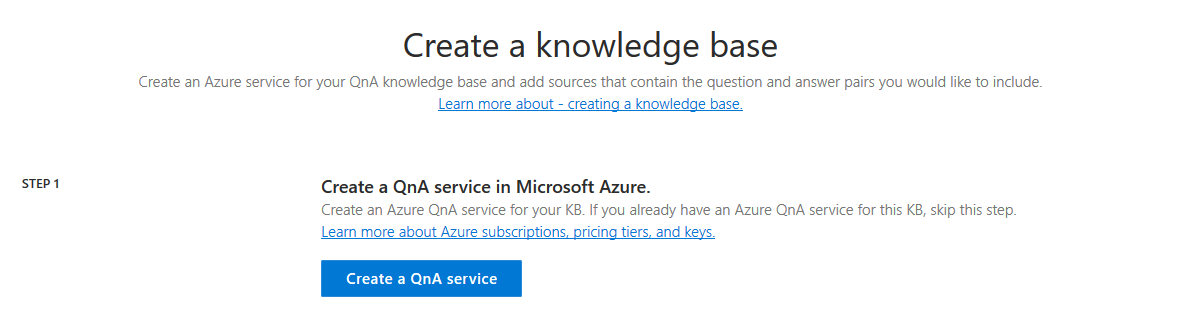
Follow STEP 1 and click the Create a QnA service button. This should open Azure Portal with the QnA Maker form ready to bee filled in.
Only the fields with the ‘*’ are mandatory.
- The Subscription field is populated by default with your default azure subscription.
- Resource Group is the group that will contain the resources you are creating now. You can either create a new one, ore use an existing one.
- Name is the name of your QnA service, as well as your domain endpoint. Find one that is available.
- For now you can choose a Free F0 Pricing tier and you can increase it later according to your needs.
- Azure Search location is occupied by default, but you can change it if you want something closer to you.
- You can choose Free F for Azure Search pricing tier and you can increase it later if your needs exceed it.
- App name is the name of your App service, and is occupied by default using your selected Name. you can change it if you like.
- Website Location can be changed for something closer to your area, although is not mandatory to do so.
- App insights enables your bot’s Analytics on Azure. It is on by default, but you can turn it off if you do not require access to Analytics.
- App insights location can also be changed to another area, but is fine as is.
After you complete everithing it should look like the picture bellow.
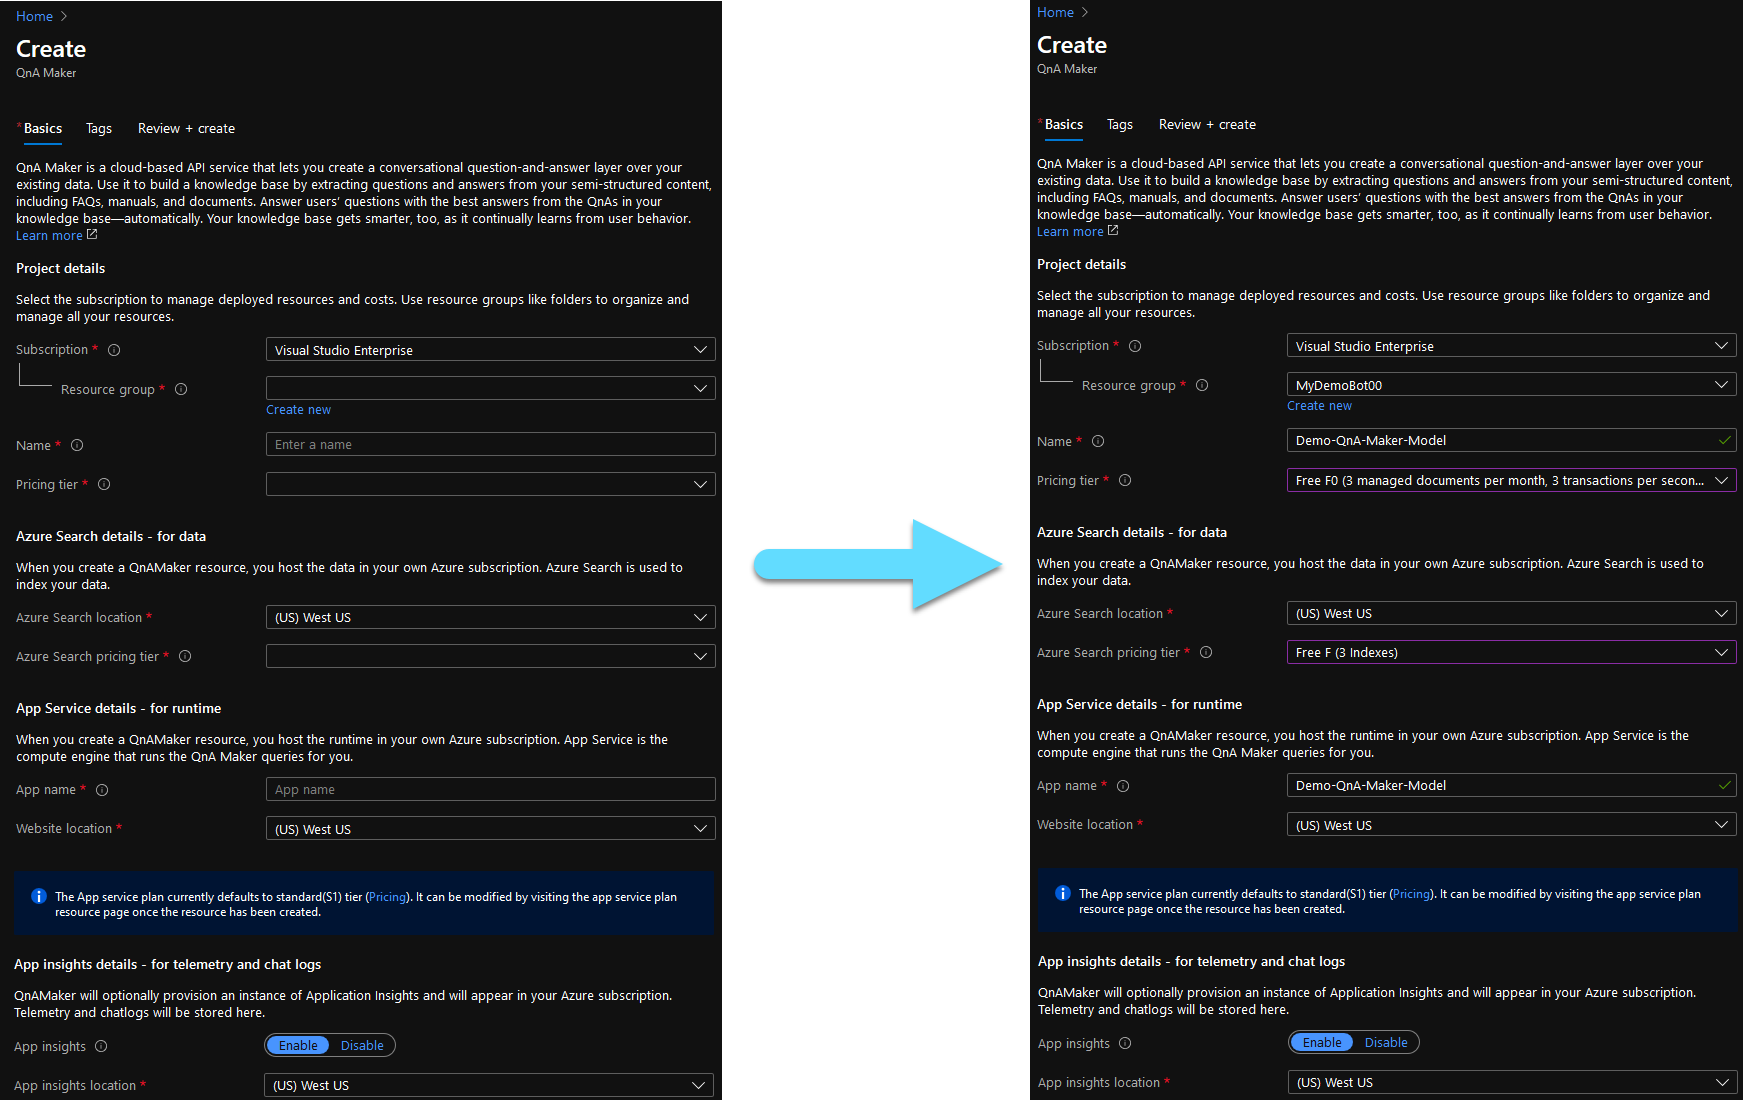
Click the Review + create button to get to the last tab. Check that everithing is correct and click Create.
Now deploymen id in progress and you might need to wait a few minutes. Once deployment is complete you will get a notification and a message will also appear on your screen.
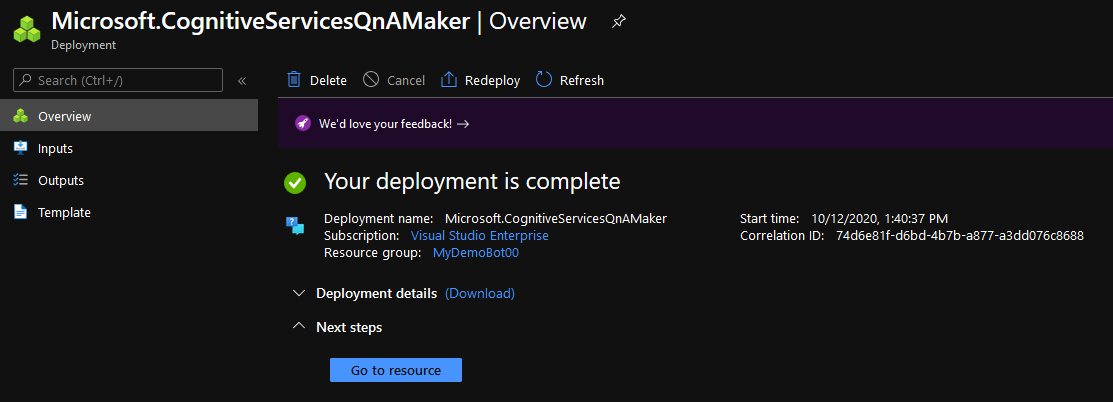
You can click Go to resource to navigate to the resource you just created. You do not need to take any further actions here, as the service has already been created. You can return to QnA Maker and continue with STEP 2.
Connect
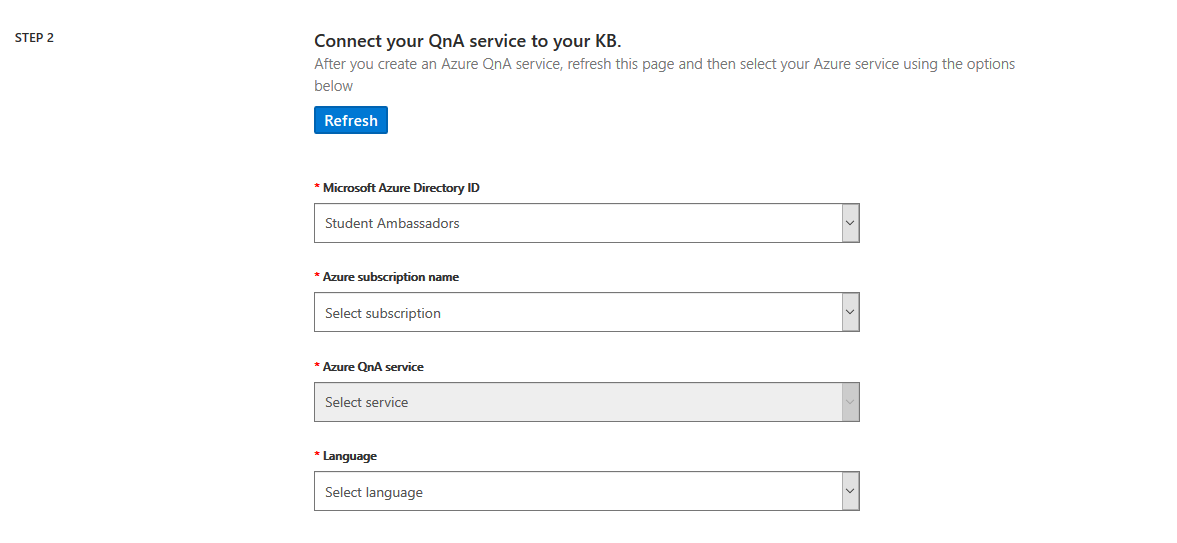
Here you can connect the service you just created to your Knowledge Base.
- In Microsoft Azure Directory ID you select your tenant. It might be already selected for you.
- In Azure subscription name just put the same subscription you used to create the QnA Maker service.
- Azure QnA service choose the name of the service you created.
- For Language you should choose the language that your knowledge base uses. Not all languages are supported by Chit-chat however and it might only be available for data extraction. For this example we will be using English which are also Chit-Chat supported.
Proceed to STEP 3 to pick a name for your knowledge base.

In STEP 4 you need to populate your knowledge base. You can extract questions and answers from a website, and fill in the provided URL and you can also upload questions and answers as files. You can find the supported data types here and also in the picture bellow.
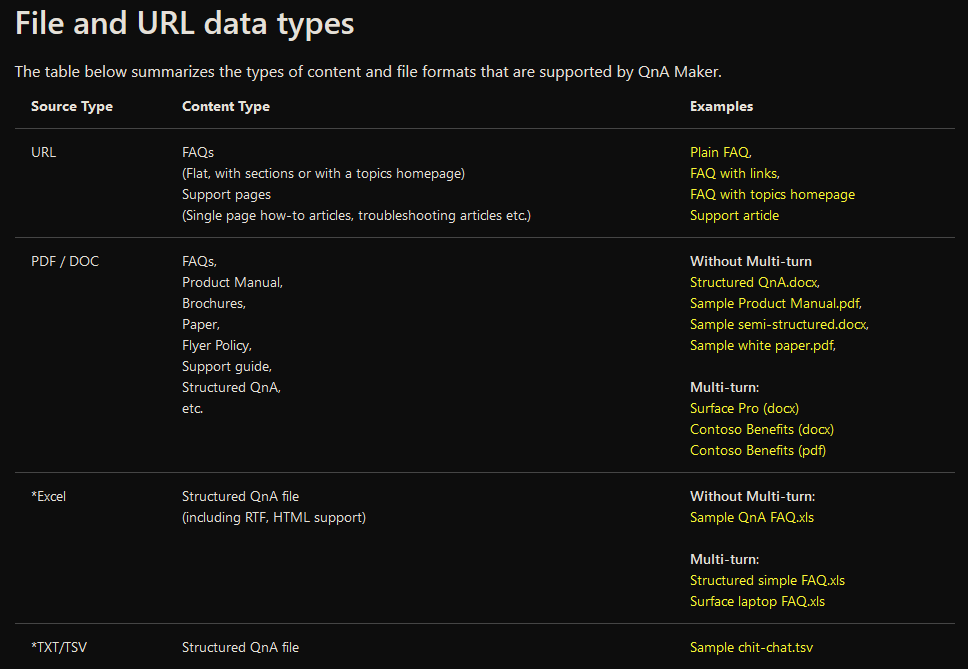
- You can check the checkbox to enable multi-turn conversation which will drive your bot develop a dialog with the user in order to answer a question. You can leave it unchecked for now.
- In the URL we will use this url: https://www.microsoft.com/en-us/software-download/faq which provides some Frequently Asked Questions about Microsoft products. You can replace it with any other question-and-answer formated source you like and you can also add more than one source.
- If you wish to upload a file, you can click Add file in the File name field.
- Chit-chat is the module that will handle small-talk for your bot. Pick a personalty for your bot, if you do not want this module to be included in your knowledge base, just pick None. We eill be using Friendly for this example.
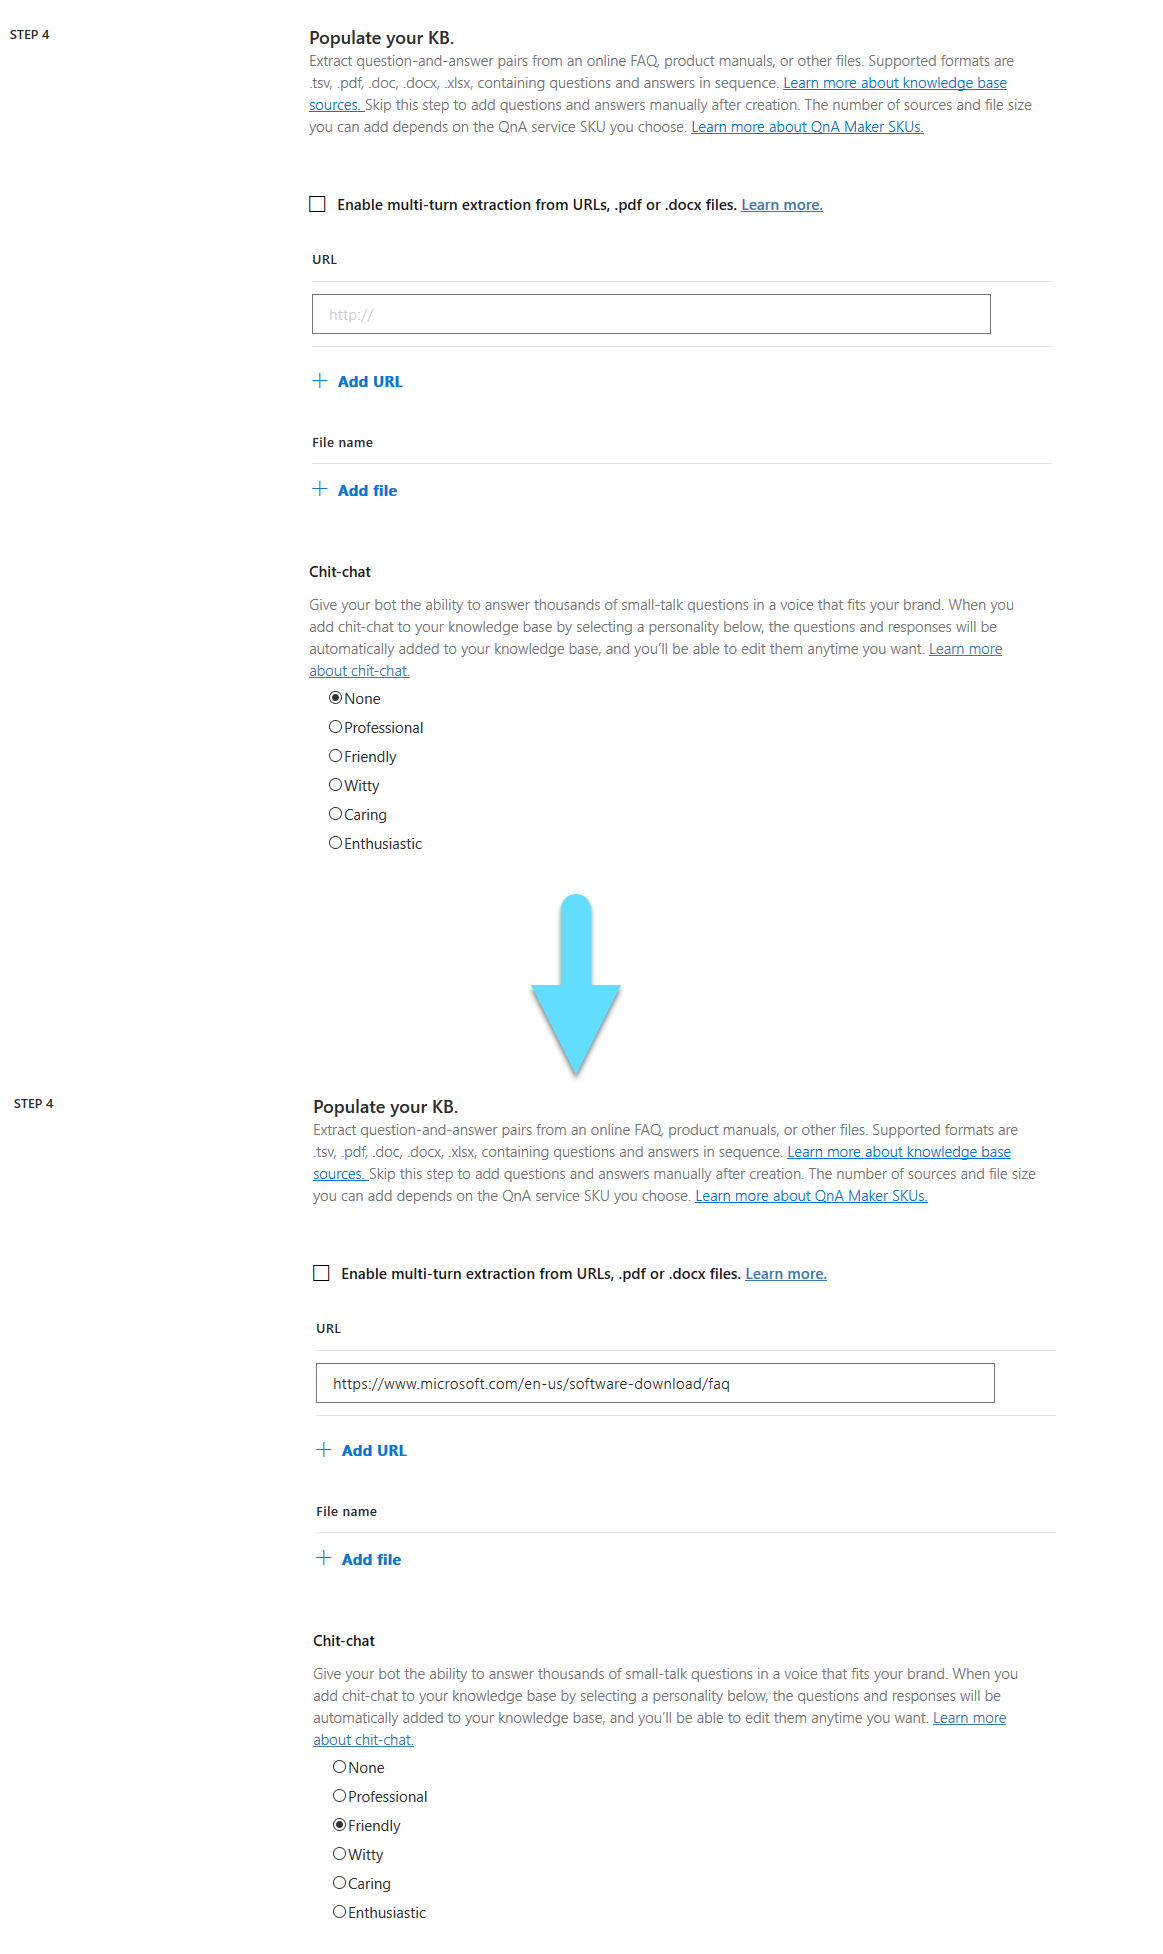
Lastly at STEP 5 click Create your KB to complete the creation of your knowledge base.
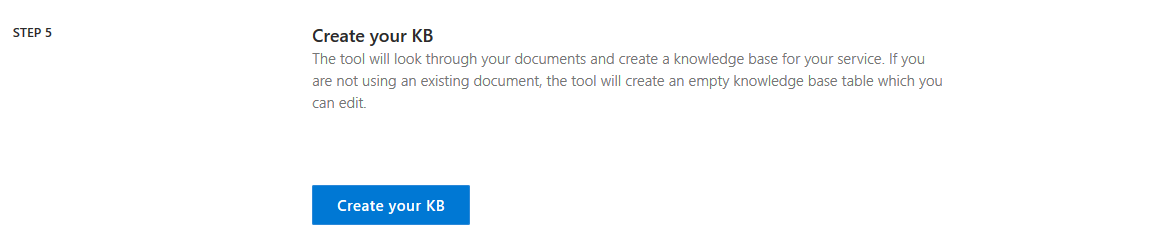
You might need to wait a few minutes for all the sources to get parsed. After is done you will see all the questions and answers, from all the sources that your knowledge base contains. You can edit the questions and the answers, add alternate phrasing for the questions, follow up prompts for the answers, or even add more questions. When you make all the changes you want click Save and train at the upper right corner of the window. Then you can click Test to ensure that everything is working right and ask away, like in the picture bellow.
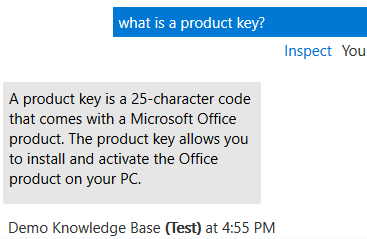
If everithing is working as expected, proceed by clicking on the PUBLISH tab.
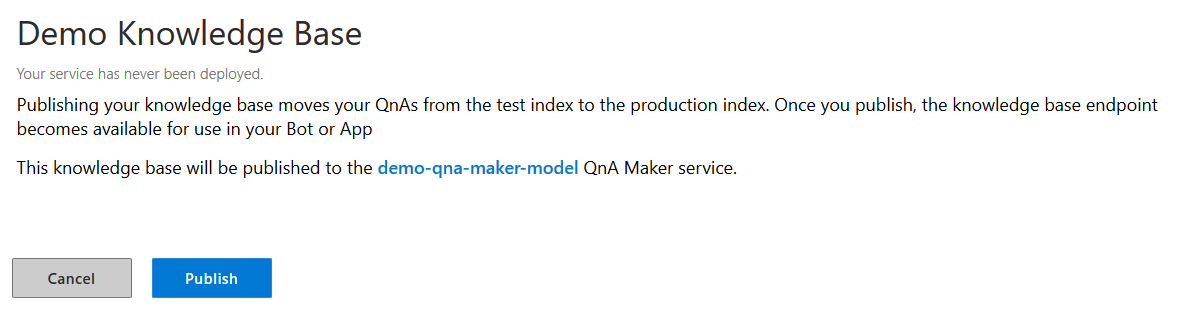
After it is published, you will see some usefull information about your knowledge base. Save your Knowledge Base ID, Endpoint Hostname and Endpoint Key for later use. To find them follow the picture bellow.
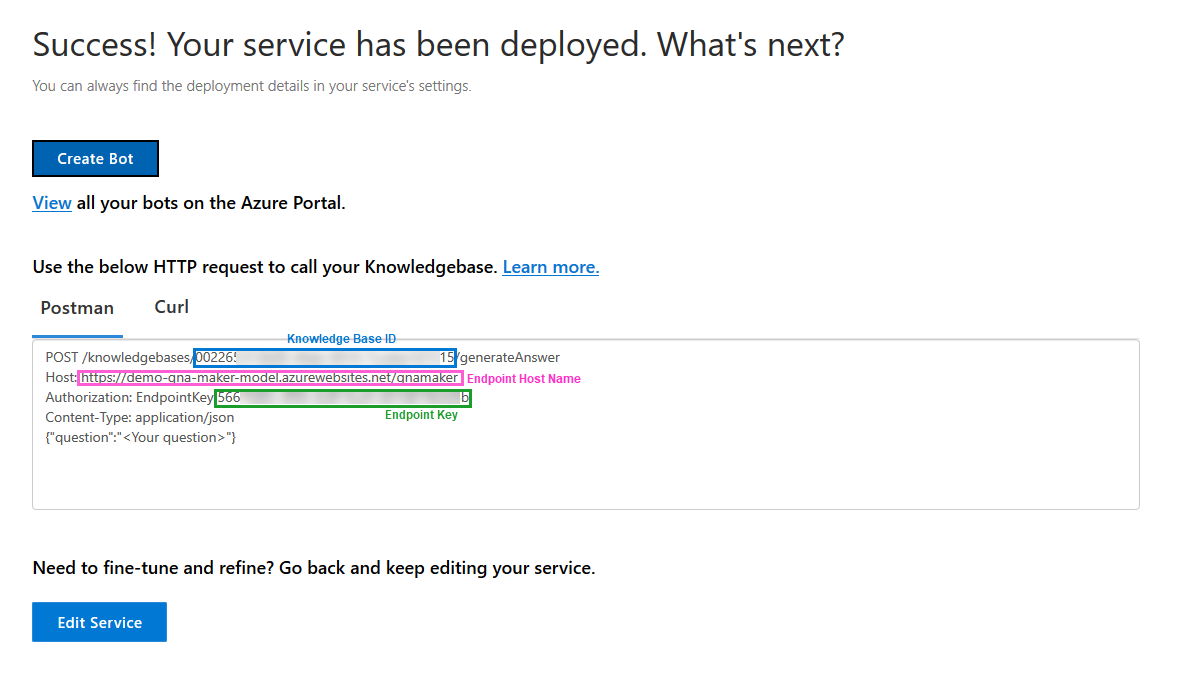
If you want to create a new bot, click Create Bot.
If you already have a bot and want to connect your knowledge base with it, continue with the implementation section.
Implement
We will be using a newly created Core Bot with source code donloaded from Azure. You can also find the source code in the GitHub Samples. If you are using the same, be sure to comment out MicrosoftAppId and MicrosoftAppPassword from the appsettings.json file, in order for the bot to run in the emulator. This bot has some functionality already build in, as well as a connection with LUIS Services. We will be sending a request to our knowledge base only if luis does not return with a build in intent.
Open your bot using Visual Studio, go to Project -> Manage NuGet Packages and install the Microsoft.Bot.Builder.AI.QnA package. You might need to update your existing packages before installing it.
In the FlightBookingRecognizer.cs add a using for the newly downloaded package. Put your Knowledge Base ID, Endpoint Key and Endpoint HostName as strings. Create a QnAMaker variable and inside FlightBookingRecognizer(IConfiguration configuration) populate the values for your variable. Your code should look like this.
FlightBookingRecognizer.cs
using System.Threading;
using System.Threading.Tasks;
using Microsoft.Bot.Builder;
using Microsoft.Bot.Builder.AI.Luis;
using Microsoft.Extensions.Configuration;
using Microsoft.Bot.Builder.AI.QnA;

namespace Microsoft.BotBuilderSamples
{
    public class FlightBookingRecognizer : IRecognizer
    {
        private string QnAKnowledgebaseId = "00226KnowledgeBaseID15";
        private string QnAEndpointKey = "566EndpointKeyb";
        private string QnAEndpointHostName = "https://demo-qna-maker-model.azurewebsites.net/qnamaker";

        private readonly LuisRecognizer _recognizer;

        public FlightBookingRecognizer(IConfiguration configuration)
        {
            var luisIsConfigured = !string.IsNullOrEmpty(configuration["LuisAppId"]) && !string.IsNullOrEmpty(configuration["LuisAPIKey"]) && !string.IsNullOrEmpty(configuration["LuisAPIHostName"]);
            if (luisIsConfigured)
            {
                var luisApplication = new LuisApplication(
                    configuration["LuisAppId"],
                    configuration["LuisAPIKey"],
                    "https://" + configuration["LuisAPIHostName"]);
                // Set the recognizer options depending on which endpoint version you want to use.
                // More details can be found in https://docs.microsoft.com/en-gb/azure/cognitive-services/luis/luis-migration-api-v3
                var recognizerOptions = new LuisRecognizerOptionsV3(luisApplication)
                {
                    PredictionOptions = new Bot.Builder.AI.LuisV3.LuisPredictionOptions
                    {
                        IncludeInstanceData = true,
                    }
                };

                _recognizer = new LuisRecognizer(recognizerOptions);
            }

            SampleQnA = new QnAMaker(new QnAMakerEndpoint
            {
                KnowledgeBaseId = QnAKnowledgebaseId,
                EndpointKey = QnAEndpointKey,
                Host = QnAEndpointHostName
            });
        }

        // Returns true if luis is configured in the appsettings.json and initialized.
        public virtual bool IsConfigured => _recognizer != null;

        public virtual async Task<RecognizerResult> RecognizeAsync(ITurnContext turnContext, CancellationToken cancellationToken)
            => await _recognizer.RecognizeAsync(turnContext, cancellationToken);

        public virtual async Task<T> RecognizeAsync<T>(ITurnContext turnContext, CancellationToken cancellationToken)
            where T : IRecognizerConvert, new()
            => await _recognizer.RecognizeAsync<T>(turnContext, cancellationToken);

        public QnAMaker SampleQnA { get; private set; }
    }
}
In the MainDialog.cs change the default step of the intent switch to the following code.
default:
    // Catch all for unhandled intents
    // Try to find an answer on the knowledge base
    var knowledgeBaseResult = await _luisRecognizer.SampleQnA.GetAnswersAsync(stepContext.Context);

    if (knowledgeBaseResult?.FirstOrDefault() != null)
        return await stepContext.ReplaceDialogAsync(InitialDialogId, knowledgeBaseResult[0].Answer, cancellationToken);
    else
    {
        // If it's not on the knowledge base, return error message
        var didntUnderstandMessageText = $"Sorry, I didn't get that. Please try asking in a different way (intent was {luisResult.TopIntent().intent})";
        var didntUnderstandMessage = MessageFactory.Text(didntUnderstandMessageText, didntUnderstandMessageText, InputHints.IgnoringInput);
        await stepContext.Context.SendActivityAsync(didntUnderstandMessage, cancellationToken);
    }
    break;
You have successfully implemented the knowledge base into your bot. You can test it using the emulator. It should be able to chit-chat and answer questions listed in the Microsoft FAQ page. Here is an example.
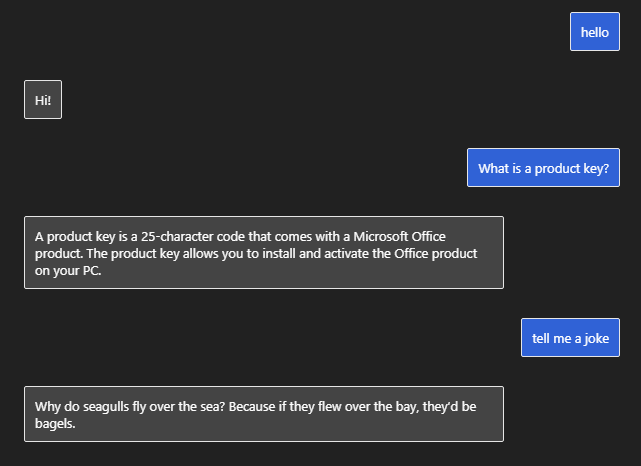
You can make any changes you wish to the knowledge base, or even add new sources, and it will immediately reflect those changes to your bot, without changing any code.
Get started with Azure Bot Service
 September 25, 2020
If you want to create an interactive bot that responds to human language, you are in the right place. Here you will find how to get started creating a basic bot.
Azure Bot Service provides you with a hosting environmend for your bot and allows you to develop intelligent, enterprise-grade bots using the help of Microsoft Bot Framework.
Microsoft Bot Framework is a comprehensive framework for building enterprise-grade conversational AI experiences, supporting a multitude of channels while being able to interact with human language and fetching data from knowledge bases. The SDK is open-source if you would like to take a look.
Create
Let’s start!
Head over to the Microsoft Azure Portal at https://portal.azure.com and log in, or sign up if you do not have an account yet.
You will then be greeted by the Azure portal. At the top of the page search for Web App Bot, like in the picture below.

Only the fields with the ‘*’ are mandatory.
- The Bot Handle is a unique identifier to your bot. However it does not have to be the same as the display name of your bot.
- The Subscription field is populated by default with your default azure subscription.
- Resource Group is the group that will contain the resources you are creating now. You can either create a new one, ore use an existing one.
- Location is also populated by default, but you are free to change it. It indicates where the server that contains your bot is physically located.
- Choose the Pricing Tier that suits the needs of your bot. It is automatically payed using your Azure credits.
- The App name forms your bot’s endpoint URL on azure. You can have the same name as your Bot handle.
- For the Bot template you have the options of Echo Bot and Basic Bot as well as the choice between C# and Node.js. The Echo Bot, echoes back the user messages, and the Basic Bot is a template containing Language Understunding (LUIS) intergration as well as Bot Analytics and some code on top of that to get you started. In this tutorial we will choose Basic Bot using the C# SDK.
- LUIS App location is the location of the Luis service that is going to be created along with your bot.
- Luis Account is the authoring resource that will cointain your bot’s connected LUIS app. You can name it something similar with your bot to better recognize it, as it will come usefull when you need to teach your bot how to understand human language. You can find your LUIS app, after the bot is deployed, at luis.ai.
- For the App service plan/Location you might need to create an new service plan. Just fill in the name and choose the desired location for your service plan. If you already have one, you can use that.
- Application Insights enables your bot’s Analytics on Azure. It is on by default, but you can turn it off if you do not require access to Analytics.
- Application Insight Location is the location for your Analytics and it is populated by default.
- Lastly on Microsoft App ID and password you can choose your own App ID and password for your bot, or you can leave it as is, to automatically create one for you.
After you completed everithing your page should look like the picture below.
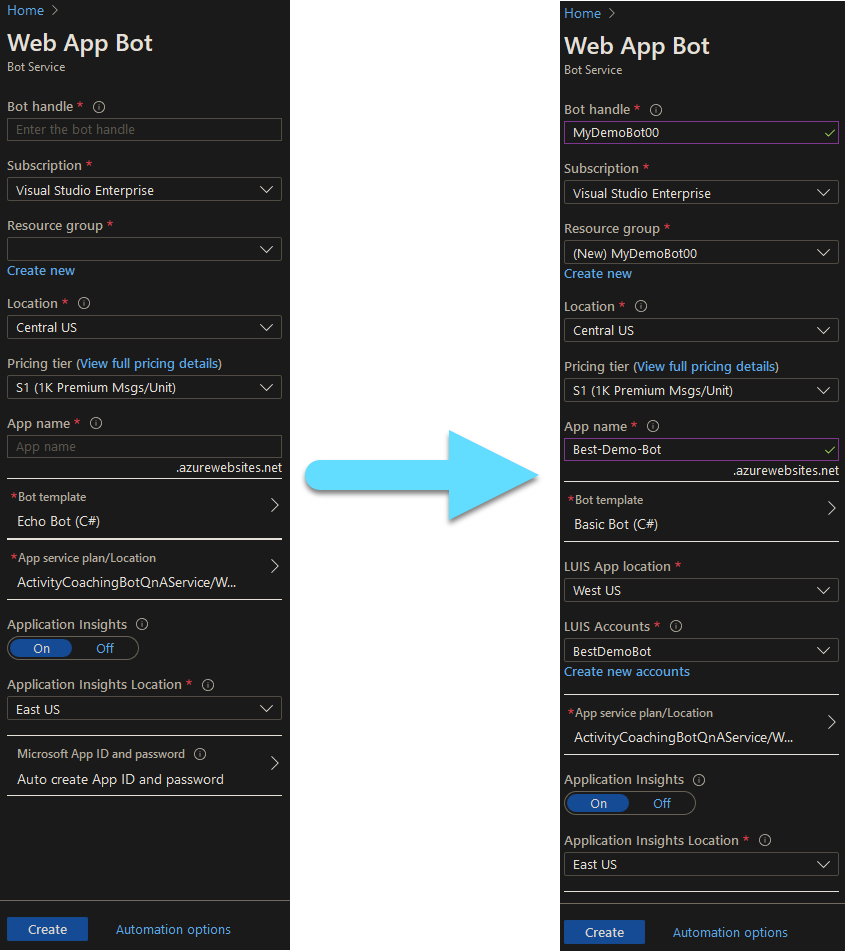
Click the Create button to start the deployment process. You might need to wait a few minutes. Once the deployment is complete, you will be greeted with a new notification prompting you to go to your new resource, just like the picture below.
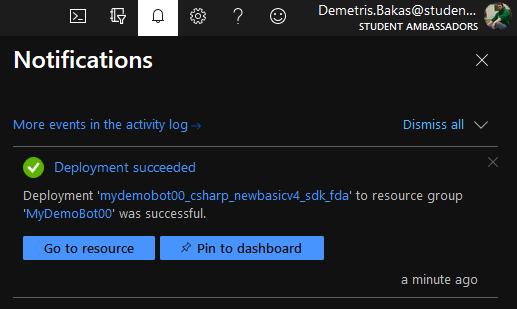
Click Go to resource to visit your newly created bot resource. Once you get into your bot’s overview page, you will see a chart on how to get started. Right now you just completed the build step. If you so desire, you can go ahead and test it.
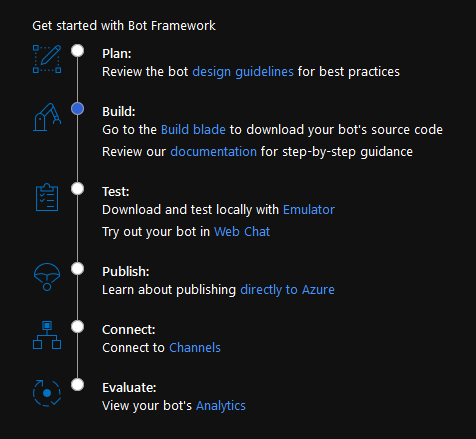
Click the Web Chat link in the Test category. You can now communicate with your bot. It has some basic book a flight dialogue build in to get you going. Try to talk to it, to observe how it responds.
Then you can proceed at configuring the channels you wish to publish your bot in. Click the Channels tab from the menu on the left.
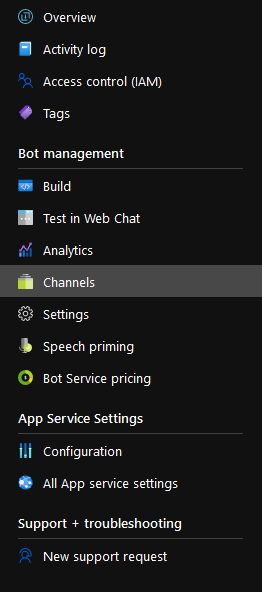
As you can see, your bot is already connected to Web Chat.
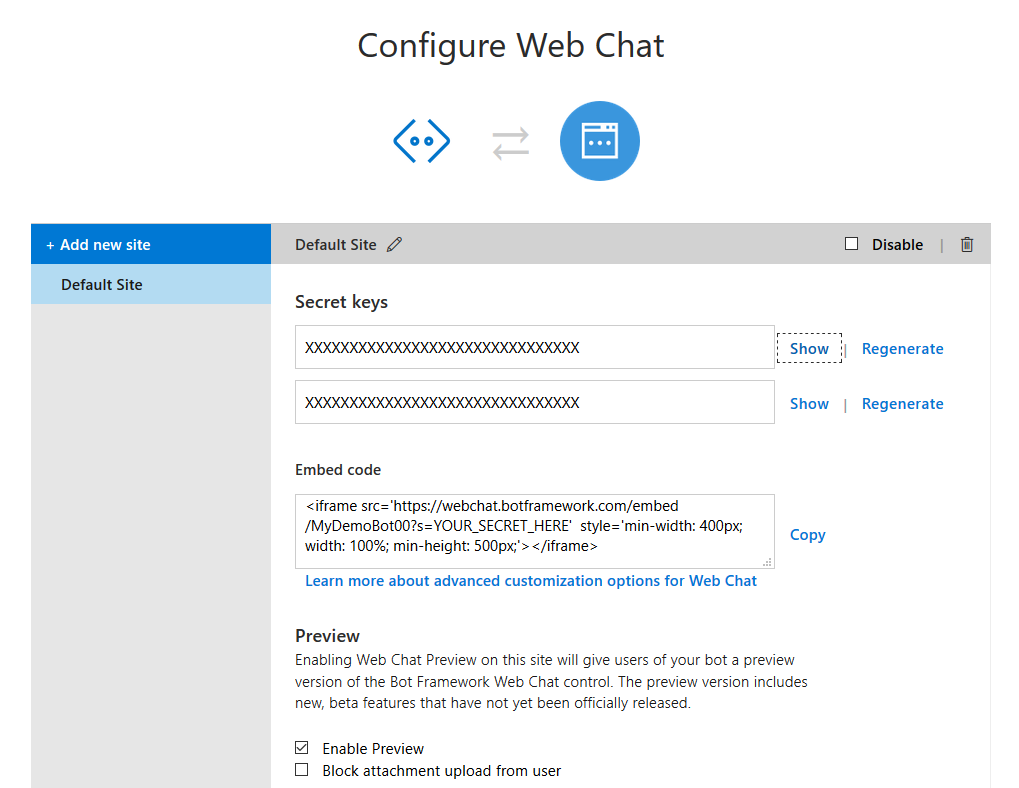
In the Embed code field you can find an iframe to publish your bot on a website. Just replace the YOUR_SECRET_HERE text with one of your Secret keys. Alternatively you can open the src link in a new tab and interact with your published bot there.
Build
Head over to the Build tab on your left and you can find this window. Here you can find the source code of your bot.
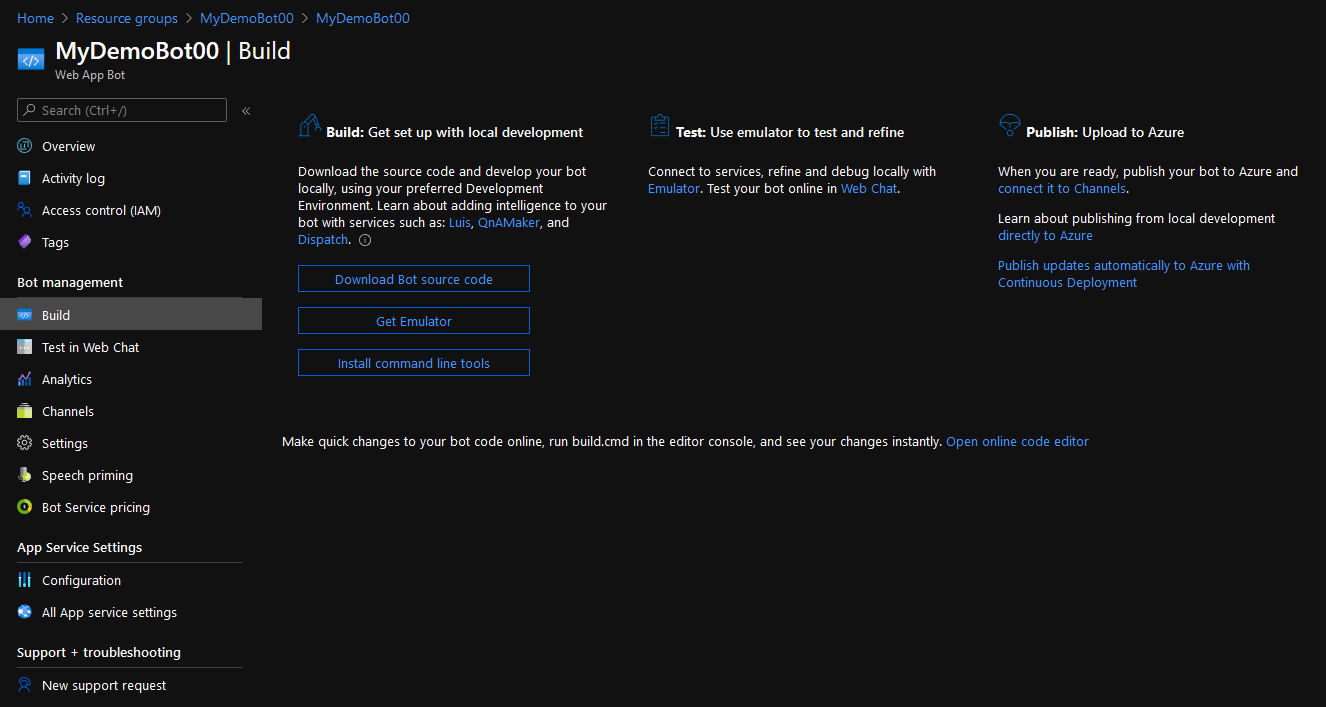
If you would like to make some fast changes to the bot you can click the Open online code editor link. However this is not an optimal way of modifying the code of your bot. If you need to actively write code for the bot on a regular basis, you should download an editor. For our needs, Visual Studio works best, you can download it here (the Community edition is free). After installing Visual Studio, you will need Bot Builder V4 SDK Templates. You can download it inside Visual Studio from Extensions, or you can get it from this link.
Back to Azure, you can get an emulator to run your bot by clicking the Get Emulator button. This will bring you to a GitHub repository, with the latest releases of the emulator. Download and install the latest one.
Now you have all the tools you need to start developping your bot. Click the Download Bot source code button to downlad a .zip with all the prewritten code. You will be asked if you would like to Include app settings in the downloaded zip file, click Yes and then Download Bot source code. Extract the .zip file in the directory you want your bot to be. Open the CoreBot.sln file using Visual Studio to load up your project. You can run the solution by pressing F5. A window in your browser should open, using port 3978. This is just to show you, that the bot is running. To interact with it you will need the emulator. Launch the emulator you installed before and press the Open Bot button. Put in the Bot URL field this URL http://localhost:3978/api/messages, like in the picture below. If your port is different than 3978, then replace it with the port you have. Leave the rest of the fields empty.

As you can see the bot does not run correctly. Stop the bot from running by pressing Shift + F5. Open the appsettings.json file from the Solution Explorer. This file contains the various keys your project has. Comment out the MicrosoftAppId and MicrosoftAppPassword lines, like the code below.
{
  "LuisAPIHostName": "westus.api.cognitive.microsoft.com",
  "LuisAPIKey": "3f64LuisKey3f8aa5abf",
  "LuisAppId": "d8fb2a71-LuisIda1924f851",
  //"MicrosoftAppId": "93427421-AppId52a6382",
  //"MicrosoftAppPassword": "A%PPasswordH&g)(&",
  "ScmType": "None"
}
Run the solution again and press Restart Conversation on the emulator. Now everithing should work correctly. At this point you can tinker with your bot as much as you like. You can also use this repo full of working samples for reference.
Publish
Now let’s take a look on how to publish a new version of our bot. There are many ways to publish a bot, you can do it straight form Visual Studio if you so desire. However, we are going to do it using git, to achieve a more consistent workflow going forword.
Firstly, get over to GitHub and create a new repository for your project (if you do not have a GitHub account, now is the time to create one). It is suggested to add a .gitignore file with the VisualStudio template, but you can always create that later on your own time. Avoid pushing passwords and keys in a public repository, add the appsettings.json in the .gitignore file. After that, create your first commit and push it to GitHub. You can upload the files directly to the GitHub website, but the use of a client program, or even terminal, will be almost mandatory in the future, and will greatly enchance your workflow. Now every time you make changes to your bot, you should commit them and then push them to GitHub.
Going back to Azure, open the Resource group that you created earlier. From the shown resources, click the one with the App Service Type.

Navigate to the Deployment Center on the left and you will see all the deployment options.

Since we uploaded the project to GitHub, we will choose the GitHub option. During the process you might be asked to log in with your GitHub account.
Next you should pick a Build Provider.
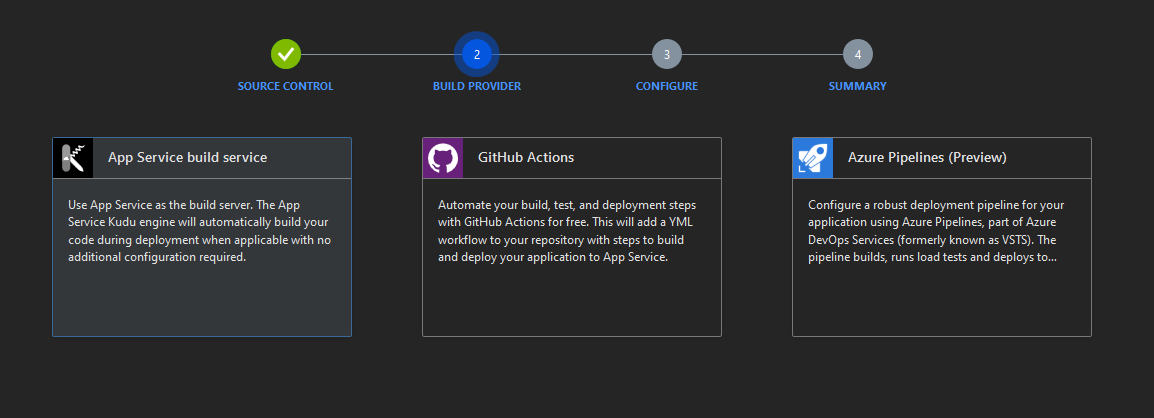
Choose App Service build service from the options and click Continue.
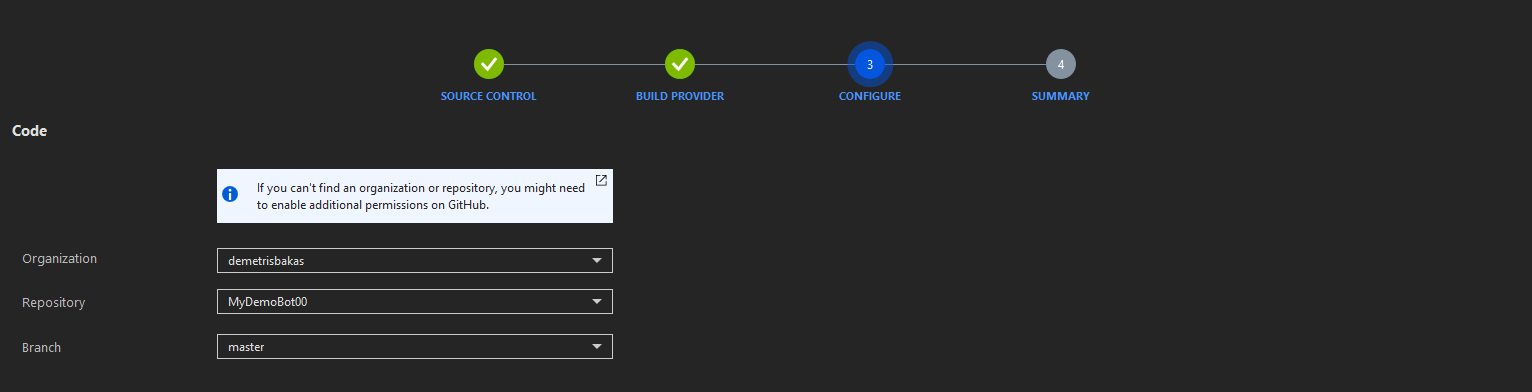
In the Configure step, put your GitHub username as Organization, the project’s repository name as Repository and the master branch, as Branch (Unless you have created a release branch).
Ensure that everything is correct in the Summary step and click Finish. Deployment might take a while.
After deployment is complete, you can check out your published bot int he Web Chat, or any other channel you have active. From now on, all you have to do to publish a new version of your bot, is to push a new commit to the master branch of your projects repo.
If buggy code is accidentally uploaded to master branch, it will automatically get deployed and introduce those bugs to your published bot. For this reason it is highly recommended to create another branch for the development of your bot. When you achieve a stable version, you can merge that branch with master to publish the new features.
Everithing is now ready to start the development of your own bot!
Introduction to LUIS Cognitive Services Video
 January 24, 2020
Bot Framework enables you to create a bot with no particular Machine learning experience and implement interactive dialogue between the user and your bot. This educational video demonstrates how to create a simple bot in Azure and get it ready to go. Following this video allows you to dive into Cognitive Services and use machine learning to teach your bot human interaction through understanding natural language. Train your bot to extract the exact information you need to process by guessing the user’s intents and finding the entities in the sentence.