Use Adaptive Cards as dialog in Bot Framework
 June 12, 2021
Adaptive Cards are platform-agnostic snippets of UI, authored in JSON, that apps and services can openly exchange. When delivered to a specific app, the JSON is transformed into native UI that automatically adapts to its surroundings. It helps design and integrate light-weight UI for all major platforms and frameworks.
The use of Adaptive Cards as dialog, provides the ability for the developer to gather user information that is not easily conveyed through natural language, in a controlled UI.
Create
In this post we will be using a Basic Bot. To create one follow this post.
Adaptive cards in Bot Framework work in turns. That means that they can be used to give some information to the user and then continue with the rest of the dialog step, ending in a prompt. Since Adaptive Cards connot be used as prompts, the user cannot give information to the card, hit a button and then expect the dialog to continue. To fix that, we are going to create our own prompt!
Create a new class and name it AdaptiveCardPrompt.cs. Then paste the following code.
using Microsoft.Bot.Builder;
using Microsoft.Bot.Builder.Dialogs;
using Microsoft.Bot.Schema;
using Newtonsoft.Json.Linq;
using System;
using System.Collections.Generic;
using System.Threading;
using System.Threading.Tasks;

namespace Microsoft.BotBuilderSamples
{
    public class AdaptiveCardPrompt : Prompt<JObject>
    {
        public AdaptiveCardPrompt(string dialogId, PromptValidator<JObject> validator = null)
            : base(dialogId, validator)
        {

        }
        protected override async Task OnPromptAsync(ITurnContext turnContext, IDictionary<string, object> state, PromptOptions options, bool isRetry, CancellationToken cancellationToken = default)
        {
            if (turnContext == null)
            {
                throw new ArgumentException(nameof(turnContext));
            }

            if (options == null)
            {
                throw new ArgumentException(nameof(options));
            }

            if (isRetry && options.Prompt != null)
            {
                await turnContext.SendActivityAsync(options.RetryPrompt, cancellationToken).ConfigureAwait(false);
            }
            else if (options.Prompt != null)
            {
                await turnContext.SendActivityAsync(options.Prompt, cancellationToken).ConfigureAwait(false);
            }
        }

        protected override Task<PromptRecognizerResult<JObject>> OnRecognizeAsync(ITurnContext turnContext, IDictionary<string, object> state, PromptOptions options, CancellationToken cancellationToken = default)
        {
            if (turnContext == null)
            {
                throw new ArgumentException(nameof(turnContext));
            }

            if (turnContext.Activity == null)
            {
                throw new ArgumentException(nameof(turnContext));
            }

            var result = new PromptRecognizerResult<JObject>();

            if (turnContext.Activity.Type == ActivityTypes.Message)
            {
                if (turnContext.Activity.Value != null)
                {
                    if (turnContext.Activity.Value is JObject)
                    {
                        result.Value = turnContext.Activity.Value as JObject;
                        result.Succeeded = true;
                    }
                }

            }

            return Task.FromResult(result);
        }
    }
}
We now need a class that will help us consume tha output of the card. Name this class AdaptiveCard.cs and populate it with the following code.
using System.IO;

namespace Microsoft.BotBuilderSamples
{
    public static class AdaptiveCard
    {
        public static string ReadCard(string fileName)
        {
            string[] BuildPath = { ".", "Cards", fileName };
            var filePath = Path.Combine(BuildPath);
            var fileRead = File.ReadAllText(filePath);
            return fileRead;
        }
    }
}
Here we are going to create our card. You can create as many cards you like this way.
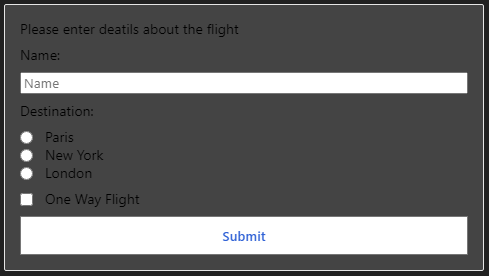
Create a file called bookingDetails.json, and populate it with the code below.
It contains a field to input text, a radio button, a checkbox, a regular button and a few text blocks.
{
  "$schema": "http://adaptivecards.io/schemas/adaptive-card.json",
  "type": "AdaptiveCard",
  "version": "1.0",
  "body": [
    {
      "type": "TextBlock",
      "text": "Please enter deatils about the flight"
    },
    {
      "type": "TextBlock",
      "text": "Name:"
    },
    {
      "type": "Input.Text",
      "id": "Name",
      "placeholder": "Name"
    },
    {
      "type": "TextBlock",
      "text": "Destination:"
    },
    {
      "type": "Input.ChoiceSet",
      "placeholder": "Destination",
      "choices": [
        {
          "title": "Paris",
          "value": "Paris"
        },
        {
          "title": "New York",
          "value": "New York"
        },
        {
          "title": "London",
          "value": "London"
        }
      ],
      "id": "Destination",
      "style": "expanded"
    },
    {
      "type": "Input.Toggle",
      "id": "OneWayFlight",
      "title": "One Way Flight",
      "value": "false"
    }
  ],
  "actions": [
    {
      "type": "Action.Submit",
      "title": "Submit"
    }
  ]
}
This is how the finished card will look like.
We also need to create a class that will hold the data gathered from the card, as it will be deserialized from JSON format. Create a new class called BookingDetailsJSON and add the code bellow. We only gether three variables from the card, so we will create these variables with their respective names.
public class BookingDetailsJSON
{
    public string Name { get; set; }
    public string Destination { get; set; }
    public bool OneWayFlight { get; set; }
}
Implement
Now go to the dialog that will use the new card prompt. You can create a new dialog, or use an existing one if you prefer.
Add the following using statement.
using Newtonsoft.Json;
Add the new prompt we created along with the rest of the prompts for the dialog.
AddDialog(new AdaptiveCardPrompt("adaptive"));
In the intro step, or the step that will show the card, add the following code.
var cardJson = AdaptiveCard.ReadCard("bookingDetails.json");

var cardAttachment = new Attachment()
{
    ContentType = "application/vnd.microsoft.card.adaptive",
    Content = JsonConvert.DeserializeObject(cardJson),
};

var options = new PromptOptions
{
    Prompt = new Activity
    {
        Attachments = new List<Attachment>() { cardAttachment },
        Type = ActivityTypes.Message
    }
};

return await stepContext.PromptAsync("adaptive", options, cancellationToken);
In the next step, we will consume the JSON from the card, show the information to the user and end the dialog.
var result = JsonConvert.DeserializeObject<BookingDetailsJSON>(stepContext.Result.ToString());

var messageText = $"Thank you for providing your data.\n\nName: {result.Name}\n\nDestination: {result.Destination}\n\nOne way flight: {result.OneWayFlight}";
var promptMessage = MessageFactory.Text(messageText, messageText, InputHints.ExpectingInput);
await stepContext.PromptAsync(nameof(TextPrompt), new PromptOptions { Prompt = promptMessage }, cancellationToken);
return await stepContext.EndDialogAsync(result, cancellationToken);
Lastly, a tricky part is that the Basic Bot has a class called CancelAndHelpDialog that handles the input text from the user. However since we are using the card to proceed in the dialog, the input text will be null, and CancelAndHelpDialog does not like that…
To fix this, go to the CancelAndHelpDialog.cs file and navigate to this line. It should be in line 35.
if (innerDc.Context.Activity.Type == ActivityTypes.Message)
Then replace it with the following line, to let it ignore null values.
if (innerDc.Context.Activity.Type == ActivityTypes.Message && innerDc.Context.Activity.Text != null)
And we are done! Let’s test our bot.
Test
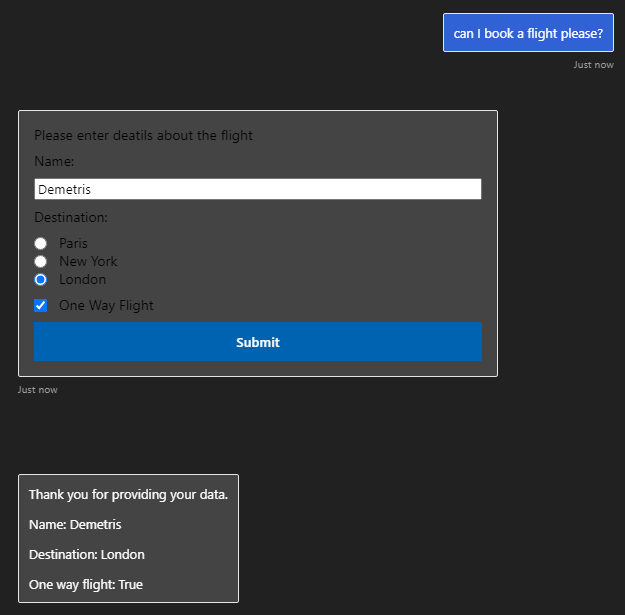
The card appears normally, I enter my data, click Submit, the dialog continues and the bot gathers my information correctly!
That is how you can use Adaptive Cards to follow dialog and gather data from the user!